ℹ️ Skipped - page is already crawled
| Filter | Status | Condition | Details |
|---|---|---|---|
| HTTP status | PASS | download_http_code = 200 | HTTP 200 |
| Age cutoff | PASS | download_stamp > now() - 6 MONTH | 2.1 months ago |
| History drop | PASS | isNull(history_drop_reason) | No drop reason |
| Spam/ban | PASS | fh_dont_index != 1 AND ml_spam_score = 0 | ml_spam_score=0 |
| Canonical | PASS | meta_canonical IS NULL OR = '' OR = src_unparsed | Not set |
| Property | Value |
|---|---|
| URL | https://www.nytimes.com/wirecutter/reviews/kasaro-peel-and-stick-backsplash-tiles-review/ |
| Last Crawled | 2026-02-19 21:46:57 (2 months ago) |
| First Indexed | not set |
| HTTP Status Code | 200 |
| Content | |
| Meta Title | For More-Convincing Peel-and-Stick Backsplash, Try Mother-of-Pearl Tiles | Reviews by Wirecutter |
| Meta Description | Peel-and-stick tile is relatively easy to install, but it’s often made from vinyl and can look flat. These mother-of-pearl sheets are a convincing alternative. |
| Meta Canonical | null |
| Boilerpipe Text | The tiles are gorgeous and convincing on the wall
My immediate impression was that the Kasaro wall tiles looked as good up close as they did online. Each mother-of-pearl tile appeared naturally imperfect, cut and polished into varied thicknesses of about 2 mm. The 0.75-inch squares are arranged on a square-foot sheet with a mesh and foam substrate. Together, the sheets had a lustrous visual dimension that reminded me of
Moroccan Zellige tiles,
which flat vinyl cannot replicate. When I broke a few of the tiles apart with a hammer, they sheared off in iridescent layers, consistent with what you’d expect from authentic mother-of-pearl.
The 0.75-inch mother-of-pearl squares, shown here in natural, come in square-foot sheets that are appealingly dimensional. The tiles are mounted on a mesh backing and a strong adhesive foam layer.
Ivy Elrod/NYT Wirecutter
Once installed, the tiles gave a light-reflecting makeover to otherwise dark or dull areas. I tested the tiles in white in a kitchen at Wirecutter’s office (covering a gray composite backsplash), and the transformation was remarkable. Not only did the area get brighter, but the mood of the once-mundane room (no offense to our office) seemed more elevated. What’s more, when colleagues walked into the upgraded kitchen, several thought I’d installed grouted tile. Mission accomplished.
The mother-of-pearl tiles, shown here in white, add texture and catch light, brightening the room. The varied, shimmering surface makes the tile look high end.
Ivy Elrod/NYT Wirecutter
While mother-of-pearl doesn’t align with every aesthetic, even my skeptical husband was sold when he saw the Kasaro sheets I was testing in our bathroom. The way the neutral-toned mother-of-pearl tiles caught the light was sophisticated but organic.
“I expected not to like it, and it’s actually chic and festive,” he admitted.
But installing them well takes patience (and maybe some caulk)
Overall, I found that the Kasaro tiles were relatively easy to install without looking overtly DIY. One common problem with applying peel-and-stick tiles to uneven surfaces is that their thin vinyl material can show flaws and develop bubbles. I didn’t experience that with the mother-of-pearl sheets. The stiff tiles themselves can’t bubble, and the thick adhesive layer they’re attached to has some give, so you can stretch it over a wall’s surface imperfections.
But there are other significant challenges to keep in mind, especially if you’re used to peel-and-stick sheets that are fairly forgiving when it comes to repositioning.
First, it’s important to get the placement right on the first try. The adhesive on the Kasaro tiles is extremely strong and bonded immediately to my bathroom’s plaster wall. While this gives me confidence in the stickers’ longevity, it means that repositioning after you remove the backing is not really an option. When I tried to peel off a sheet and adjust its position, parts of the adhesive foam tore and stayed fused to the wall. That corner of the sheet became unusable, and the residue was time-consuming to remove.
To complicate things, the sheets’ irregular edges (which add to their aesthetic success) are finicky to line up. It takes some effort to ensure that seams or gaps are minimal between them. I found it especially tricky when I installed the tiles on the laminate backsplash, where, despite my fiercest efforts, the seams were still slightly visible.
In our guide to installing peel-and-stick tile, we recommend caulking between seams for a more realistic (and more water-tight) finish; you’ll probably want to do that with the Kasaro tiles. Or you can do what longtime Wirecutter writer and DIY
columnist
Tim Heffernan suggested to me while I was testing these tiles: Use
all-purpose glue
, which works similarly in filling the gaps but is a bit easier to work with than caulk.
Prior to filling in the gaps in the seams, the installation on this backsplash looked less finished.
Ivy Elrod/NYT Wirecutter
I used the glue to fill the seams between sheets, aided by
an artist’s palette knife
, to great effect. Depending on the color of your tile, you might also add some
ground pumice
to your glue for color. Whether you use caulk or glue, the additional effort to fill your seams will have a major impact in making the tile installation look complete and convincing.
Due to the irregular edges of the tiles, seams are inevitable (left). I used an all-purpose glue and a palette knife to fill in the cracks.
Ivy Elrod/NYT Wirecutter
Last, while it’s easy enough to cut the sheets down to size by fitting the blades of a pair of scissors between the tiles, cutting through the tiles themselves (as is sometimes necessary to fit around sinks, light switches, and doorways) is not. The mother-of-pearl tiles are roughly 2 mm thick and bone hard. Kasaro suggests using a tile grinder, a tool that may be intimidating to casual DIYers. I had some success with a
tile snipper
, which is much less intimidating in comparison, but the cuts were rough and jagged. Again, caulking your edges will give your work a more refined look.
They’ll stay up, but don’t soak ’em
Kasaro states that the peel-and-stick tiles are suitable for wet use, including in the shower. If you’re putting peel-and-stick tile near water sources, it’s still a good idea to seal seams and edges with caulk (like along the bottom of a backsplash). And I’d stay away from spots that get soaking wet, unless you’re mounting the sheets to water-resistant tile backer boards. Water can penetrate micro-gaps between sheets, which over time may damage your wall or cause mold or mildew to grow.
To prep my wall before installing, I followed our
guide to installing and removing peel-and-stick til
e, since Kasaro’s instructions are minimal. Any adhesive product should be applied to a clean and dry surface, which can help with longevity. I then removed the sticker backing to expose the adhesive and pressed it on.
Still, these peel-and-stick tiles appear to be suitable for other wall applications. I subjected the tiles to high heat and freezing cold — a method called thermal cycling, a common test that manufacturers perform to assess an adhesive’s longevity — by applying a sample sheet to a piece of drywall, baking it for 60 minutes in an oven at 200 °F (the radiant heat tolerance suggested for most backsplashes), allowing it to cool to room temperature, and then transferring it to my freezer for 24 hours. After I repeated these tests four times, the adhesive remained strong, and the tiles were just as solidly stuck on as ever.
Left: I ran a series of thermal tests on the sheets installed on a piece of drywall, including baking the sample at 200 ºF, and found that the adhesive remained strong. Right: I inspected the mother-of-pearl’s authenticity by smashing tiles and found they were bone-hard (they broke the tip off my box cutter) and layered with iridescent material.
Ivy Elrod/NYT Wirecutter
While I didn’t test how humidity or light exposure may impact the peel-and-stick tiles’ durability long term, these thermal-cycling tests lead me to believe that the Kasaro tiles will stay firmly stuck to your wall, even through temperature extremes. That said, I don’t recommend using these tiles on the floor. They are not rated for floor use, and their edges could lead to a slippery or even sharp surface underfoot.
They’re best for the committed DIYer
The Kasaro mother-of-pearl tiles can artfully transform a backsplash or bathroom, can look like grouted tile up close, and are a significant visual upgrade from vinyl in the peel-and-stick category.
But all that comes at a price. A single square-foot sheet of Kasaro tiles costs around $15 at the time of writing, and a pack of 10 (covering 10 square feet) is about $100. That’s about $10 per square foot, compared with around $3 per square foot for vinyl or gel resin. Of course, mother-of-pearl is a more expensive material than gel resin or vinyl, and it’s natural, though the sheets are not entirely plastic-free.
While I wouldn’t steer renters fully clear, I found the mother-of-pearl tiles to be more challenging to apply and remove than other, more flexible stick-on tile options, even though they masked wall imperfections very well. After six weeks, I removed the two sheets from my bathroom wall. I didn’t notice any damage, but there was a substantial amount of adhesive that took me an hour to fully get off. I’m still not sure if time will make removal more difficult.
If you’re a renter or a homeowner who loathes to perform any (even low-lift) wall repair, such as skim-coating and repainting after removal, these tiles are probably not for you. But if you’re an intrepid DIYer who wants to achieve a semipermanent, high-impact look without bothering with grout, I found them to be a convincing and beautiful option.
This article was edited by Katie Okamoto and Catherine Kast. |
| Markdown | Advertisement
[SKIP ADVERTISEMENT](https://www.nytimes.com/wirecutter/reviews/kasaro-peel-and-stick-backsplash-tiles-review/#after-dfp-ad-top)
[Skip To Content](https://www.nytimes.com/wirecutter/reviews/kasaro-peel-and-stick-backsplash-tiles-review/#main)
We independently review everything we recommend. When you buy through our links, we may earn a commission. [Learn more›](https://www.nytimes.com/wirecutter/about/)
1. [Home](https://www.nytimes.com/wirecutter/home-garden/)
# Peel-and-Stick Tiles Never Fooled Me. Then I Tried These Sheets of Lustrous Mother-of-Pearl.
Published
February 19, 2026

![Mother-of-pearl peel and stick tile behind a kitchen sink next to a photo of someone holding the tile.]()
NYT Wirecutter
[](https://www.nytimes.com/wirecutter/authors/ivy-elrod/)
By [Ivy Elrod](https://www.nytimes.com/wirecutter/authors/ivy-elrod/)
Ivy Elrod is a writer covering home and decor. She has moved 37 times and believes that most things are hung at least 2 inches too low.
Last summer, while browsing online to help my sister with a home reno (giving free advice is one peril of being a designer-turned-writer), I stumbled upon a gorgeous photo of mother-of-pearl tiles in an airy, bright bathroom. I was shocked to learn that they were actually peel-and-stick tiles and not the real thing.
When I worked in interior design, I sometimes used adhesive peel-and-stick tiles for quick staging jobs, but these looked nothing like the vinyl or gel-resin sheets I was used to. Those peel-and-stick sheets offered a fast, dramatic, reno-free transformation, but up close, no one would be fooled into thinking they were real.
But those pretty mother-of-pearl tiles were real — and they were also peel-and-stick. I was curious to see if they indeed looked classy, not cheap, IRL, and if they’d be as easy to install as their vinyl counterparts.
After considering dozens of peel-and-stick mother-of-pearl tiles online, I chose to test some sold by Kasaro that are highly rated and widely available on Amazon and Wayfair. Kasaro claims that its tiles, made with mother-of-pearl from Chinese farmed oysters, are easy to install and suitable for wet environments, like a shower or backsplash. But what enticed me most was the implicit promise that for a fraction of the cost of a real tile renovation, they might deliver a high-end and permanent-looking makeover, with far less hassle.
I tested the Kasaro tiles in natural and white, installing them in my bathroom and on a kitchen backsplash. They’re definitely an aesthetic success — yes, even up close. But while they’re much simpler than grouted tile to put up, installation isn’t exactly easy. This, plus their roughly \$10-per-square-foot price tag, makes them best for someone who is invested in a lasting makeover.
[](https://www.nytimes.com/wirecutter/out/link/79044/234412/4/246603?merchant=Amazon)
## [A light-reflecting wall upgrade](https://www.nytimes.com/wirecutter/out/link/79044/234412/4/246603?merchant=Amazon "A light-reflecting wall upgrade")
### [Kasaro Mother-of-Pearl Peel and Stick Tile](https://www.nytimes.com/wirecutter/out/link/79044/234412/4/246603?merchant=Amazon "Kasaro Mother-of-Pearl Peel and Stick Tile")
This stick-on wall tile comes in sheets, with a backing that covers uneven surfaces. It’s not cheap, but it effectively upgrades a space, no grout needed.
[\$110 from Amazon (10 sheets)](https://www.nytimes.com/wirecutter/out/link/79044/234412/4/246603?merchant=Amazon)
## The tiles are gorgeous and convincing on the wall
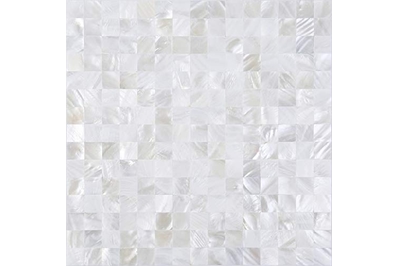
My immediate impression was that the Kasaro wall tiles looked as good up close as they did online. Each mother-of-pearl tile appeared naturally imperfect, cut and polished into varied thicknesses of about 2 mm. The 0.75-inch squares are arranged on a square-foot sheet with a mesh and foam substrate. Together, the sheets had a lustrous visual dimension that reminded me of [Moroccan Zellige tiles,](https://www.nytimes.com/2022/11/10/style/ceramic-tiles-home-decor.html) which flat vinyl cannot replicate. When I broke a few of the tiles apart with a hammer, they sheared off in iridescent layers, consistent with what you’d expect from authentic mother-of-pearl.
![A photo of someone holding peel and stick squares on the wall, next to a photo of the squares on an adhesive layer.]()
The 0.75-inch mother-of-pearl squares, shown here in natural, come in square-foot sheets that are appealingly dimensional. The tiles are mounted on a mesh backing and a strong adhesive foam layer. Ivy Elrod/NYT Wirecutter
Once installed, the tiles gave a light-reflecting makeover to otherwise dark or dull areas. I tested the tiles in white in a kitchen at Wirecutter’s office (covering a gray composite backsplash), and the transformation was remarkable. Not only did the area get brighter, but the mood of the once-mundane room (no offense to our office) seemed more elevated. What’s more, when colleagues walked into the upgraded kitchen, several thought I’d installed grouted tile. Mission accomplished.

The mother-of-pearl tiles, shown here in white, add texture and catch light, brightening the room. The varied, shimmering surface makes the tile look high end. Ivy Elrod/NYT Wirecutter

Before installing the tiles, the gray composite backsplash was dark, and the room lacked character. Ivy Elrod/NYT Wirecutter
The mother-of-pearl tiles, shown here in white, add texture and catch light, brightening the room. The varied, shimmering surface makes the tile look high end. Ivy Elrod/NYT Wirecutter


While mother-of-pearl doesn’t align with every aesthetic, even my skeptical husband was sold when he saw the Kasaro sheets I was testing in our bathroom. The way the neutral-toned mother-of-pearl tiles caught the light was sophisticated but organic.
“I expected not to like it, and it’s actually chic and festive,” he admitted.
## But installing them well takes patience (and maybe some caulk)
Overall, I found that the Kasaro tiles were relatively easy to install without looking overtly DIY. One common problem with applying peel-and-stick tiles to uneven surfaces is that their thin vinyl material can show flaws and develop bubbles. I didn’t experience that with the mother-of-pearl sheets. The stiff tiles themselves can’t bubble, and the thick adhesive layer they’re attached to has some give, so you can stretch it over a wall’s surface imperfections.
But there are other significant challenges to keep in mind, especially if you’re used to peel-and-stick sheets that are fairly forgiving when it comes to repositioning.
First, it’s important to get the placement right on the first try. The adhesive on the Kasaro tiles is extremely strong and bonded immediately to my bathroom’s plaster wall. While this gives me confidence in the stickers’ longevity, it means that repositioning after you remove the backing is not really an option. When I tried to peel off a sheet and adjust its position, parts of the adhesive foam tore and stayed fused to the wall. That corner of the sheet became unusable, and the residue was time-consuming to remove.
To complicate things, the sheets’ irregular edges (which add to their aesthetic success) are finicky to line up. It takes some effort to ensure that seams or gaps are minimal between them. I found it especially tricky when I installed the tiles on the laminate backsplash, where, despite my fiercest efforts, the seams were still slightly visible.
In our guide to installing peel-and-stick tile, we recommend caulking between seams for a more realistic (and more water-tight) finish; you’ll probably want to do that with the Kasaro tiles. Or you can do what longtime Wirecutter writer and DIY [columnist](https://www.nytimes.com/2025/05/02/realestate/how-to-restore-furniture.html?searchResultPosition=14) Tim Heffernan suggested to me while I was testing these tiles: Use [all-purpose glue](https://www.nytimes.com/wirecutter/out/link/79045/234414/4/246668/?merchant=Amazon), which works similarly in filling the gaps but is a bit easier to work with than caulk.

Prior to filling in the gaps in the seams, the installation on this backsplash looked less finished. Ivy Elrod/NYT Wirecutter
I used the glue to fill the seams between sheets, aided by [an artist’s palette knife](https://www.nytimes.com/wirecutter/out/link/79046/234488/4/246669/?merchant=Amazon), to great effect. Depending on the color of your tile, you might also add some [ground pumice](https://www.nytimes.com/wirecutter/out/link/79047/234416/4/246670/?merchant=Amazon) to your glue for color. Whether you use caulk or glue, the additional effort to fill your seams will have a major impact in making the tile installation look complete and convincing.

Due to the irregular edges of the tiles, seams are inevitable (left). I used an all-purpose glue and a palette knife to fill in the cracks. Ivy Elrod/NYT Wirecutter
Last, while it’s easy enough to cut the sheets down to size by fitting the blades of a pair of scissors between the tiles, cutting through the tiles themselves (as is sometimes necessary to fit around sinks, light switches, and doorways) is not. The mother-of-pearl tiles are roughly 2 mm thick and bone hard. Kasaro suggests using a tile grinder, a tool that may be intimidating to casual DIYers. I had some success with a [tile snipper](https://www.nytimes.com/wirecutter/out/link/79048/234417/4/246671/?merchant=Amazon), which is much less intimidating in comparison, but the cuts were rough and jagged. Again, caulking your edges will give your work a more refined look.
## They’ll stay up, but don’t soak ’em
Kasaro states that the peel-and-stick tiles are suitable for wet use, including in the shower. If you’re putting peel-and-stick tile near water sources, it’s still a good idea to seal seams and edges with caulk (like along the bottom of a backsplash). And I’d stay away from spots that get soaking wet, unless you’re mounting the sheets to water-resistant tile backer boards. Water can penetrate micro-gaps between sheets, which over time may damage your wall or cause mold or mildew to grow.
To prep my wall before installing, I followed our [guide to installing and removing peel-and-stick til](https://www.nytimes.com/wirecutter/reviews/advice-how-to-install-peel-and-stick-tiles/)e, since Kasaro’s instructions are minimal. Any adhesive product should be applied to a clean and dry surface, which can help with longevity. I then removed the sticker backing to expose the adhesive and pressed it on.
Still, these peel-and-stick tiles appear to be suitable for other wall applications. I subjected the tiles to high heat and freezing cold — a method called thermal cycling, a common test that manufacturers perform to assess an adhesive’s longevity — by applying a sample sheet to a piece of drywall, baking it for 60 minutes in an oven at 200 °F (the radiant heat tolerance suggested for most backsplashes), allowing it to cool to room temperature, and then transferring it to my freezer for 24 hours. After I repeated these tests four times, the adhesive remained strong, and the tiles were just as solidly stuck on as ever.

Left: I ran a series of thermal tests on the sheets installed on a piece of drywall, including baking the sample at 200 ºF, and found that the adhesive remained strong. Right: I inspected the mother-of-pearl’s authenticity by smashing tiles and found they were bone-hard (they broke the tip off my box cutter) and layered with iridescent material. Ivy Elrod/NYT Wirecutter
While I didn’t test how humidity or light exposure may impact the peel-and-stick tiles’ durability long term, these thermal-cycling tests lead me to believe that the Kasaro tiles will stay firmly stuck to your wall, even through temperature extremes. That said, I don’t recommend using these tiles on the floor. They are not rated for floor use, and their edges could lead to a slippery or even sharp surface underfoot.
## They’re best for the committed DIYer
The Kasaro mother-of-pearl tiles can artfully transform a backsplash or bathroom, can look like grouted tile up close, and are a significant visual upgrade from vinyl in the peel-and-stick category.
But all that comes at a price. A single square-foot sheet of Kasaro tiles costs around \$15 at the time of writing, and a pack of 10 (covering 10 square feet) is about \$100. That’s about \$10 per square foot, compared with around \$3 per square foot for vinyl or gel resin. Of course, mother-of-pearl is a more expensive material than gel resin or vinyl, and it’s natural, though the sheets are not entirely plastic-free.
While I wouldn’t steer renters fully clear, I found the mother-of-pearl tiles to be more challenging to apply and remove than other, more flexible stick-on tile options, even though they masked wall imperfections very well. After six weeks, I removed the two sheets from my bathroom wall. I didn’t notice any damage, but there was a substantial amount of adhesive that took me an hour to fully get off. I’m still not sure if time will make removal more difficult.
If you’re a renter or a homeowner who loathes to perform any (even low-lift) wall repair, such as skim-coating and repainting after removal, these tiles are probably not for you. But if you’re an intrepid DIYer who wants to achieve a semipermanent, high-impact look without bothering with grout, I found them to be a convincing and beautiful option.
*This article was edited by Katie Okamoto and Catherine Kast.*
#### Further reading
- [](https://www.nytimes.com/wirecutter/reviews/advice-how-to-install-peel-and-stick-tiles/)
### [How to Install (or Remove) Those Renter-Friendly Peel-and-Stick Tiles](https://www.nytimes.com/wirecutter/reviews/advice-how-to-install-peel-and-stick-tiles/)
Peel-and-stick tiles can be a quick way to restyle a room without the hassle and investment of a renovation. Here’s what to know before you take the leap.
- [](https://www.nytimes.com/wirecutter/reviews/best-removable-wallpapers/)
### [The Best Removable Wallpapers](https://www.nytimes.com/wirecutter/reviews/best-removable-wallpapers/)
After months of researching and testing removable wallpapers, we found the three best peel-and-stick papers with endless patterns to choose from.
- [](https://www.nytimes.com/wirecutter/reviews/how-to-clean-bathroom-tile-grout/)
### [How to Clean Bathroom Tile and Grout](https://www.nytimes.com/wirecutter/reviews/how-to-clean-bathroom-tile-grout/)
Once you identify the type of tile and grout stain you’re dealing with, you can be more effective and targeted while cleaning.
## Meet your guide

Ivy Elrod
What I Cover
I cover products, news, and design advice related to furniture, lighting, decor, and interiors.
Advertisement
[SKIP ADVERTISEMENT](https://www.nytimes.com/wirecutter/reviews/kasaro-peel-and-stick-backsplash-tiles-review/#after-dfp-ad-bottom)
[Edit](https://thewirecutter.com/wp-admin/post.php?post=530229&action=edit)
[Wirecutter](https://www.nytimes.com/wirecutter/ "Wirecutter")
Wirecutter is the product recommendation service from The New York Times. Our journalists combine independent research with (occasionally) over-the-top testing so you can make quick and confident buying decisions. Whether it’s finding great products or discovering helpful advice, we’ll help you get it right (the first time).
- [About Wirecutter](https://www.nytimes.com/wirecutter/about/ "About Wirecutter")
- [Our team](https://www.nytimes.com/wirecutter/masthead/ "Our team")
- [Staff demographics](https://www.nytimes.com/wirecutter/staff-demographics/ "Staff demographics")
- [Jobs at Wirecutter](https://job-boards.greenhouse.io/thenewyorktimes?keyword=wirecutter "Jobs at Wirecutter")
- [How to pitch](https://www.nytimes.com/wirecutter/how-to-pitch/ "How to pitch")
- [Contact The New York Times](https://help.nytimes.com/hc/en-us/articles/115015385887-Contact-The-New-York-Times "Contact The New York Times")
- [Send us feedback](https://www.nytimes.com/article/wirecutter-feedback.html "Send us feedback")
- [Newsletters](https://www.nytimes.com/wirecutter/newsletters/ "Newsletters")
- © 2026 Wirecutter, Inc., [A New York Times Company](https://www.nytimes.com/)
- [Privacy Policy](https://www.nytimes.com/privacy/privacy-policy "Privacy Policy")
- [Terms of Service](https://help.nytimes.com/hc/en-us/articles/115014893428-Terms-of-service "Terms of Service")
- [Cookie Policy](https://www.nytimes.com/privacy/cookie-policy "Cookie Policy")
- [Partnerships & Advertising](https://www.nytimes.com/wirecutter/partners/ "Partnerships & Advertising")
- [Licensing & Reprints](https://info.wrightsmedia.com/nyt-wirecutter-licensing "Licensing & Reprints")
- [RSS](https://www.nytimes.com/wirecutter/feed/ "RSS") |
| Readable Markdown | ## The tiles are gorgeous and convincing on the wall
My immediate impression was that the Kasaro wall tiles looked as good up close as they did online. Each mother-of-pearl tile appeared naturally imperfect, cut and polished into varied thicknesses of about 2 mm. The 0.75-inch squares are arranged on a square-foot sheet with a mesh and foam substrate. Together, the sheets had a lustrous visual dimension that reminded me of [Moroccan Zellige tiles,](https://www.nytimes.com/2022/11/10/style/ceramic-tiles-home-decor.html) which flat vinyl cannot replicate. When I broke a few of the tiles apart with a hammer, they sheared off in iridescent layers, consistent with what you’d expect from authentic mother-of-pearl.

The 0.75-inch mother-of-pearl squares, shown here in natural, come in square-foot sheets that are appealingly dimensional. The tiles are mounted on a mesh backing and a strong adhesive foam layer. Ivy Elrod/NYT Wirecutter
Once installed, the tiles gave a light-reflecting makeover to otherwise dark or dull areas. I tested the tiles in white in a kitchen at Wirecutter’s office (covering a gray composite backsplash), and the transformation was remarkable. Not only did the area get brighter, but the mood of the once-mundane room (no offense to our office) seemed more elevated. What’s more, when colleagues walked into the upgraded kitchen, several thought I’d installed grouted tile. Mission accomplished.
The mother-of-pearl tiles, shown here in white, add texture and catch light, brightening the room. The varied, shimmering surface makes the tile look high end. Ivy Elrod/NYT Wirecutter
While mother-of-pearl doesn’t align with every aesthetic, even my skeptical husband was sold when he saw the Kasaro sheets I was testing in our bathroom. The way the neutral-toned mother-of-pearl tiles caught the light was sophisticated but organic.
“I expected not to like it, and it’s actually chic and festive,” he admitted.
## But installing them well takes patience (and maybe some caulk)
Overall, I found that the Kasaro tiles were relatively easy to install without looking overtly DIY. One common problem with applying peel-and-stick tiles to uneven surfaces is that their thin vinyl material can show flaws and develop bubbles. I didn’t experience that with the mother-of-pearl sheets. The stiff tiles themselves can’t bubble, and the thick adhesive layer they’re attached to has some give, so you can stretch it over a wall’s surface imperfections.
But there are other significant challenges to keep in mind, especially if you’re used to peel-and-stick sheets that are fairly forgiving when it comes to repositioning.
First, it’s important to get the placement right on the first try. The adhesive on the Kasaro tiles is extremely strong and bonded immediately to my bathroom’s plaster wall. While this gives me confidence in the stickers’ longevity, it means that repositioning after you remove the backing is not really an option. When I tried to peel off a sheet and adjust its position, parts of the adhesive foam tore and stayed fused to the wall. That corner of the sheet became unusable, and the residue was time-consuming to remove.
To complicate things, the sheets’ irregular edges (which add to their aesthetic success) are finicky to line up. It takes some effort to ensure that seams or gaps are minimal between them. I found it especially tricky when I installed the tiles on the laminate backsplash, where, despite my fiercest efforts, the seams were still slightly visible.
In our guide to installing peel-and-stick tile, we recommend caulking between seams for a more realistic (and more water-tight) finish; you’ll probably want to do that with the Kasaro tiles. Or you can do what longtime Wirecutter writer and DIY [columnist](https://www.nytimes.com/2025/05/02/realestate/how-to-restore-furniture.html?searchResultPosition=14) Tim Heffernan suggested to me while I was testing these tiles: Use [all-purpose glue](https://www.nytimes.com/wirecutter/out/link/79045/234414/4/246668/?merchant=Amazon), which works similarly in filling the gaps but is a bit easier to work with than caulk.

Prior to filling in the gaps in the seams, the installation on this backsplash looked less finished. Ivy Elrod/NYT Wirecutter
I used the glue to fill the seams between sheets, aided by [an artist’s palette knife](https://www.nytimes.com/wirecutter/out/link/79046/234488/4/246669/?merchant=Amazon), to great effect. Depending on the color of your tile, you might also add some [ground pumice](https://www.nytimes.com/wirecutter/out/link/79047/234416/4/246670/?merchant=Amazon) to your glue for color. Whether you use caulk or glue, the additional effort to fill your seams will have a major impact in making the tile installation look complete and convincing.

Due to the irregular edges of the tiles, seams are inevitable (left). I used an all-purpose glue and a palette knife to fill in the cracks. Ivy Elrod/NYT Wirecutter
Last, while it’s easy enough to cut the sheets down to size by fitting the blades of a pair of scissors between the tiles, cutting through the tiles themselves (as is sometimes necessary to fit around sinks, light switches, and doorways) is not. The mother-of-pearl tiles are roughly 2 mm thick and bone hard. Kasaro suggests using a tile grinder, a tool that may be intimidating to casual DIYers. I had some success with a [tile snipper](https://www.nytimes.com/wirecutter/out/link/79048/234417/4/246671/?merchant=Amazon), which is much less intimidating in comparison, but the cuts were rough and jagged. Again, caulking your edges will give your work a more refined look.
## They’ll stay up, but don’t soak ’em
Kasaro states that the peel-and-stick tiles are suitable for wet use, including in the shower. If you’re putting peel-and-stick tile near water sources, it’s still a good idea to seal seams and edges with caulk (like along the bottom of a backsplash). And I’d stay away from spots that get soaking wet, unless you’re mounting the sheets to water-resistant tile backer boards. Water can penetrate micro-gaps between sheets, which over time may damage your wall or cause mold or mildew to grow.
To prep my wall before installing, I followed our [guide to installing and removing peel-and-stick til](https://www.nytimes.com/wirecutter/reviews/advice-how-to-install-peel-and-stick-tiles/)e, since Kasaro’s instructions are minimal. Any adhesive product should be applied to a clean and dry surface, which can help with longevity. I then removed the sticker backing to expose the adhesive and pressed it on.
Still, these peel-and-stick tiles appear to be suitable for other wall applications. I subjected the tiles to high heat and freezing cold — a method called thermal cycling, a common test that manufacturers perform to assess an adhesive’s longevity — by applying a sample sheet to a piece of drywall, baking it for 60 minutes in an oven at 200 °F (the radiant heat tolerance suggested for most backsplashes), allowing it to cool to room temperature, and then transferring it to my freezer for 24 hours. After I repeated these tests four times, the adhesive remained strong, and the tiles were just as solidly stuck on as ever.

Left: I ran a series of thermal tests on the sheets installed on a piece of drywall, including baking the sample at 200 ºF, and found that the adhesive remained strong. Right: I inspected the mother-of-pearl’s authenticity by smashing tiles and found they were bone-hard (they broke the tip off my box cutter) and layered with iridescent material. Ivy Elrod/NYT Wirecutter
While I didn’t test how humidity or light exposure may impact the peel-and-stick tiles’ durability long term, these thermal-cycling tests lead me to believe that the Kasaro tiles will stay firmly stuck to your wall, even through temperature extremes. That said, I don’t recommend using these tiles on the floor. They are not rated for floor use, and their edges could lead to a slippery or even sharp surface underfoot.
## They’re best for the committed DIYer
The Kasaro mother-of-pearl tiles can artfully transform a backsplash or bathroom, can look like grouted tile up close, and are a significant visual upgrade from vinyl in the peel-and-stick category.
But all that comes at a price. A single square-foot sheet of Kasaro tiles costs around \$15 at the time of writing, and a pack of 10 (covering 10 square feet) is about \$100. That’s about \$10 per square foot, compared with around \$3 per square foot for vinyl or gel resin. Of course, mother-of-pearl is a more expensive material than gel resin or vinyl, and it’s natural, though the sheets are not entirely plastic-free.
While I wouldn’t steer renters fully clear, I found the mother-of-pearl tiles to be more challenging to apply and remove than other, more flexible stick-on tile options, even though they masked wall imperfections very well. After six weeks, I removed the two sheets from my bathroom wall. I didn’t notice any damage, but there was a substantial amount of adhesive that took me an hour to fully get off. I’m still not sure if time will make removal more difficult.
If you’re a renter or a homeowner who loathes to perform any (even low-lift) wall repair, such as skim-coating and repainting after removal, these tiles are probably not for you. But if you’re an intrepid DIYer who wants to achieve a semipermanent, high-impact look without bothering with grout, I found them to be a convincing and beautiful option.
*This article was edited by Katie Okamoto and Catherine Kast.* |
| ML Classification | |
| ML Categories | null |
| ML Page Types | null |
| ML Intent Types | null |
| Content Metadata | |
| Language | en |
| Author | Ivy Elrod |
| Publish Time | 2026-02-19 19:30:55 (2 months ago) |
| Original Publish Time | 2026-02-19 19:30:55 (2 months ago) |
| Republished | No |
| Word Count (Total) | 2,157 |
| Word Count (Content) | 1,480 |
| Links | |
| External Links | 9 |
| Internal Links | 30 |
| Technical SEO | |
| Meta Nofollow | No |
| Meta Noarchive | No |
| JS Rendered | No |
| Redirect Target | null |
| Performance | |
| Download Time (ms) | 230 |
| TTFB (ms) | 227 |
| Download Size (bytes) | 63,340 |
| Shard | 84 (laksa) |
| Root Hash | 4566504020376537684 |
| Unparsed URL | com,nytimes!www,/wirecutter/reviews/kasaro-peel-and-stick-backsplash-tiles-review/ s443 |