ℹ️ Skipped - page is already crawled
| Filter | Status | Condition | Details |
|---|---|---|---|
| HTTP status | PASS | download_http_code = 200 | HTTP 200 |
| Age cutoff | PASS | download_stamp > now() - 6 MONTH | 0 months ago |
| History drop | PASS | isNull(history_drop_reason) | No drop reason |
| Spam/ban | PASS | fh_dont_index != 1 AND ml_spam_score = 0 | ml_spam_score=0 |
| Canonical | PASS | meta_canonical IS NULL OR = '' OR = src_unparsed | Not set |
| Property | Value |
|---|---|
| URL | https://www.fxmagnetic.com/how-to-use-the-bollinger-band-trading-strategies/ |
| Last Crawled | 2026-04-15 04:14:16 (1 day ago) |
| First Indexed | 2024-12-13 10:01:56 (1 year ago) |
| HTTP Status Code | 200 |
| Meta Title | How To Use The Bollinger Band Trading Strategies - FxMagnetic® - Trading Software for Metatrader |
| Meta Description | null |
| Meta Canonical | null |
| Boilerpipe Text | In this tutorial, we will explore the three core trading strategies available in FX Magnetic BB Trader:
Bollinger Bands Break-out
,
Bollinger Bands Break-in
, and
Bollinger Bands Break-out with Momentum
. Each strategy comes with multiple variations which can help you take advantage of different market conditions and get better trading results in the process.
This guide will jumpstart your progress with FX Magnetic BB Trader so you can start utilizing its capabilities effectively.
Table of Contents
Built-In Trading Strategies Quick Look
What Is the Bollinger Band?
Understanding The Scanner
Scanner Configuration
Trading Modes
Regular Mode
Reverse Mode
Buy Only Mode
Sell Only Mode
Reverse Buy Only Mode
Reverse Sell Only Mode
Strategy Deep Dive
1. BB Break-Out Strategy (Regular Mode)
2. BB Break-Out Strategy (Reverse Mode)
3. BB Break-In Strategy (Regular Mode)
4. BB Break-In Strategy (Reverse Mode)
5. BB Break-Out Strategy + Momentum (Regular Mode)
BB Break-Out Strategy + Momentum (Reverse Mode)
Important Trading Rules
Monitoring Performance
Tips for Success
Built-In Trading Strategies Quick Look
Bollinger Bands Break-out
Modes: Regular, Reverse, Buy Only, Sell Only.
Bollinger Bands Break-in
Modes: Regular, Reverse, Buy Only, Sell Only.
Bollinger Bands Breakout with Momentum
Modes: Regular, Reverse, Buy Only, Sell Only.
More on this later…
What Is the Bollinger Band?
Bollinger Bands are a volatility-based indicator consisting of three bands that expand and contract around price movement.
Important things to understand:
The bands consist of a middle line (20-period moving average) with upper and lower bands
Upper and lower bands are set 2 standard deviations above and below the middle line
Wider bands indicate increased market volatility
Narrower bands suggest decreased volatility
Price touching the bands often signals potential trading opportunities
Band settings (period and deviation) can be customized based on trading strategy
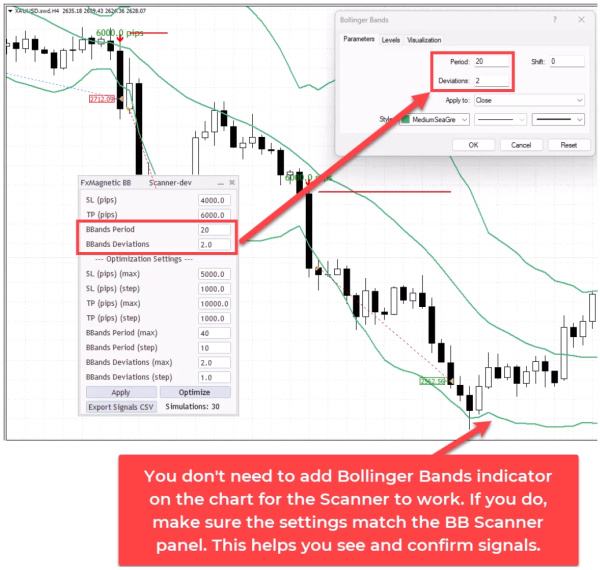
Understanding The Scanner
The Scanner serves as the analytical engine, processing market data and generating signals based on your configured parameters.
It can operate independently without a visual indicator. Though optional, we suggest you add the built-in Metatrader Bollinger Band indicator.
Using both in tandem is a great way to visually verify the Scanner’s decision-making process.
The auto-trader that comes with the software is a great addition for when you find the parameters that work for you, and want to automate your trading.
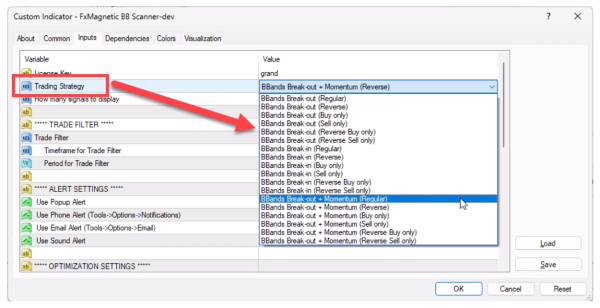
Scanner Configuration
The Scanner’s configuration panel presents several critical parameters that define your trading approach:
Bollinger Band Period: Determines the lookback period for calculating trends.
Deviations: Sets the upper and lower bands.
Strategy Selection: Choose between Breakin, Breakout, or BBand Momentum approaches.
Trade Direction: Regular, Reverse, or directional-only modes.
Each parameter can significantly impact your trading results, making proper configuration essential for optimal performance.
Trading Modes
Each strategy can be used in different modes:
Regular Mode
Takes both buy and sell trades.
Closes existing trades when an opposite signal appears.
Only one trade opens at a time.
Reverse Mode
Takes opposite trades from what the strategy indicates.
Example: Take sell trade when strategy shows buy signal.
Buy Only Mode
Only takes buy trades.
Hold until stop loss or take profit.
Ignores sell signals.
Sell Only Mode
Only takes sell trades.
Hold until stop loss or take profit.
Ignores buy signals.
Reverse Buy Only Mode
Only looks for buy signals but takes sell trades instead.
Reverse Sell Only Mode
Only looks for sell signals but takes buy trades instead
Strategy Deep Dive
Each strategy can be executed in multiple modes to adapt to various market conditions:
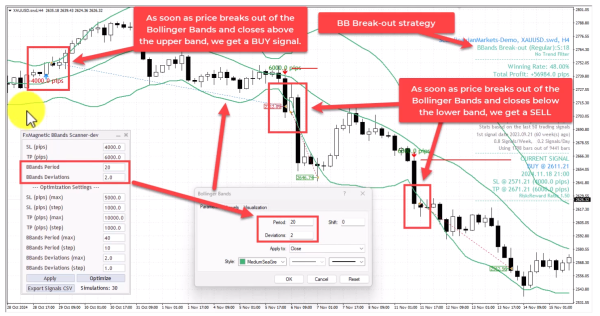
1. BB Break-Out Strategy (Regular Mode)
This strategy waits for price to enter the bands, hence called “break-in”.
The standard implementation follows traditional Bollinger Bands theory:
The BB Scanner is set to use a
Bollinger Bands period of 20 with deviation of 2.
BUY signal
is when the price breaks out of the Bollinger Bands and
closes above the upper band.
SELL signal
is when the price breaks out of the Bollinger Bands and
closes below the Lower band.
2. BB Break-Out Strategy (Reverse Mode)
This strategy waits for price to exit the bands, hence called “break-out”.
This contrarian approach inverts the traditional signals:
The BB Scanner is set to use a
Bollinger Bands period of 20 with deviation of 1.
With an
added 200-moving average
serving as a buy and sell filter.
BUY signal
is when the
price is above the 200-MA and breaks out
of the Bollinger Bands and
closes below the lower band.
SELL signal
is when the
price is below 200-MA
and breaks out
of the Bollinger Bands and
closes above the upper band.
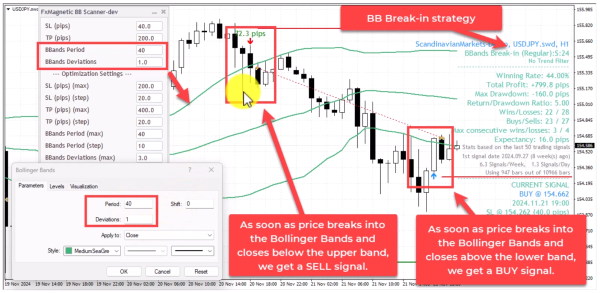
3. BB Break-In Strategy (Regular Mode)
The BB Scanner is set to use a
Bollinger Bands period of 40 with deviation of 1.
BUY signal
is when the price breaks into the Bollinger Bands and
closes above the lower band.
SELL signal
is when the price breaks into the Bollinger Bands and
closes below the upper band.
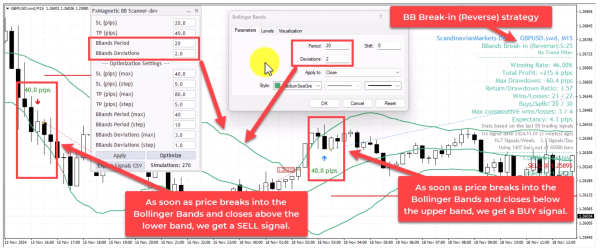
4. BB Break-In Strategy (Reverse Mode)
The BB Scanner is set to use a
Bollinger Bands period of 20 with deviation of 2.
BUY signal
is when the price breaks into the Bollinger Bands and
closes below the upper band.
SELL signal
is when the price breaks into the Bollinger Bands and
closes above the lower band.
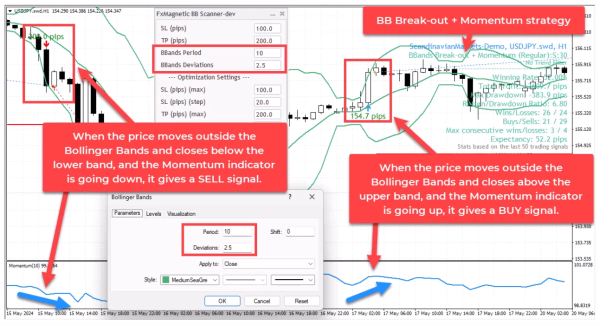
5. BB Break-Out Strategy + Momentum (Regular Mode)
With an
added momentum indicator
to provide better trend strength signals.
The BB Scanner is set to use a
Bollinger Bands period of 10 with deviation of 2.5.
BUY signal
is when the price breaks out of the Bollinger Bands and
closes above the upper band
, and the Momentum indicator is going up.
SELL signal
is when the price breaks out of the Bollinger Bands and
closes below the lower band
, and the Momentum indicator is going down.
Note: If you attach the built-in MT4 momentum indicator, make sure the settings are the same.
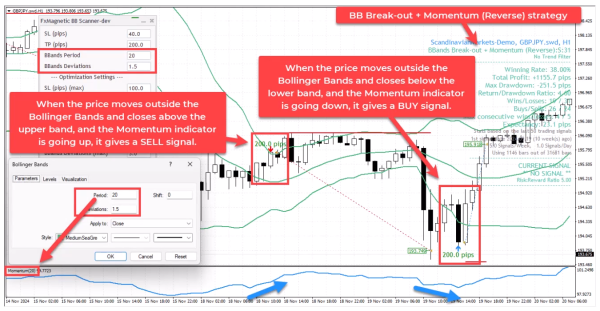
BB Break-Out Strategy + Momentum (Reverse Mode)
With an
added momentum indicator
to provide better trend strength signals.
The BB Scanner is set to use a
Bollinger Bands period of 10 with deviation of 2.5.
BUY signal
is when the price breaks out of the Bollinger Bands and closes below the Lower band, and the Momentum indicator is going down.
SELL signal
is when the price breaks out of the Bollinger Bands and closes above the upper band, and the Momentum indicator is going up.
Important Trading Rules
The software opens one trade at a time per strategy for better risk management. If you need more than one trade for some reason, or run different strategies at the same time, you can attach the software on another chart.
NFor regular/reverse modes, new opposite signals close existing trades.
For “only” modes, trades run until stop loss or take profit.
You can use trend filters for additional confirmation.
Consider reoptimizing the parameters or exploring other modes if experiencing more consecutive losses than historically normal.
Monitoring Performance
Track these key metrics:
Win rate percentage
Maximum consecutive losses
Return to drawdown ratio
Total pips/points gained
Drawdown percentage
Understanding your numbers is crucial to your trading success. Remember, FxMagnetic can only help speed up your strategy development. Your outcomes would still depend on how well you use the software.
Tips for Success
When starting out, we recommend you use the built-in Bollinger Band indicator from MT4 as visual confirmation for the scanner. Just remember to match the settings on both.
Monitor max consecutive losses as indicator for the strategy viability.
Consider monitoring the higher time frames to know the overall trend.
Regularly optimizing the settings is a good practice to adapt to changes in market conditions.
To better understand how the indicator and scanner work, we highly recommend you watch the tutorial. |
| Markdown | [Skip to content](https://www.fxmagnetic.com/how-to-use-the-bollinger-band-trading-strategies/#content)
[](https://www.fxmagnetic.com/)
Toggle navigation
- [Home](https://www.fxmagnetic.com/)
- [Pricing](https://www.fxmagnetic.com/funnel/fxmagnetic-apps/now/)
- [Tutorials](https://www.fxmagnetic.com/category/tutorials/)
- [Contact Us](https://www.fxmagnetic.com/contact-us/)
- [TV Show](https://insidesuccess.tv/programs/rimantas-petrauskas-trading-success-personal-resilience-the-power-of-will?category_id=237591)
- [Close Search Form](https://www.fxmagnetic.com/how-to-use-the-bollinger-band-trading-strategies/)
[Open Search Form](https://www.fxmagnetic.com/how-to-use-the-bollinger-band-trading-strategies/)
[Share on Facebook](http://www.facebook.com/sharer.php?u=https%3A%2F%2Fwww.fxmagnetic.com%2Fhow-to-use-the-bollinger-band-trading-strategies%2F&t=How+To+Use+The+Bollinger+Band+Trading+Strategies)
[Tutorials](https://www.fxmagnetic.com/category/tutorials/)
# [How To Use The Bollinger Band Trading Strategies](https://www.fxmagnetic.com/how-to-use-the-bollinger-band-trading-strategies/)
[0Comments](https://www.fxmagnetic.com/how-to-use-the-bollinger-band-trading-strategies/#respond) [ by FxMagnetic](https://www.fxmagnetic.com/author/admin/)
In this tutorial, we will explore the three core trading strategies available in FX Magnetic BB Trader: **Bollinger Bands Break-out**, **Bollinger Bands Break-in**, and **Bollinger Bands Break-out with Momentum**. Each strategy comes with multiple variations which can help you take advantage of different market conditions and get better trading results in the process.
This guide will jumpstart your progress with FX Magnetic BB Trader so you can start utilizing its capabilities effectively.
Table of Contents
[Toggle](https://www.fxmagnetic.com/how-to-use-the-bollinger-band-trading-strategies/)
- [Built-In Trading Strategies Quick Look](https://www.fxmagnetic.com/how-to-use-the-bollinger-band-trading-strategies/#Built-In_Trading_Strategies_Quick_Look)
- [What Is the Bollinger Band?](https://www.fxmagnetic.com/how-to-use-the-bollinger-band-trading-strategies/#What_Is_the_Bollinger_Band)
- [Understanding The Scanner](https://www.fxmagnetic.com/how-to-use-the-bollinger-band-trading-strategies/#Understanding_The_Scanner)
- [Scanner Configuration](https://www.fxmagnetic.com/how-to-use-the-bollinger-band-trading-strategies/#Scanner_Configuration)
- [Trading Modes](https://www.fxmagnetic.com/how-to-use-the-bollinger-band-trading-strategies/#Trading_Modes)
- [Regular Mode](https://www.fxmagnetic.com/how-to-use-the-bollinger-band-trading-strategies/#Regular_Mode)
- [Reverse Mode](https://www.fxmagnetic.com/how-to-use-the-bollinger-band-trading-strategies/#Reverse_Mode)
- [Buy Only Mode](https://www.fxmagnetic.com/how-to-use-the-bollinger-band-trading-strategies/#Buy_Only_Mode)
- [Sell Only Mode](https://www.fxmagnetic.com/how-to-use-the-bollinger-band-trading-strategies/#Sell_Only_Mode)
- [Reverse Buy Only Mode](https://www.fxmagnetic.com/how-to-use-the-bollinger-band-trading-strategies/#Reverse_Buy_Only_Mode)
- [Reverse Sell Only Mode](https://www.fxmagnetic.com/how-to-use-the-bollinger-band-trading-strategies/#Reverse_Sell_Only_Mode)
- [Strategy Deep Dive](https://www.fxmagnetic.com/how-to-use-the-bollinger-band-trading-strategies/#Strategy_Deep_Dive)
- [1\. BB Break-Out Strategy (Regular Mode)](https://www.fxmagnetic.com/how-to-use-the-bollinger-band-trading-strategies/#1_BB_Break-Out_Strategy_Regular_Mode)
- [2\. BB Break-Out Strategy (Reverse Mode)](https://www.fxmagnetic.com/how-to-use-the-bollinger-band-trading-strategies/#2_BB_Break-Out_Strategy_Reverse_Mode)
- [3\. BB Break-In Strategy (Regular Mode)](https://www.fxmagnetic.com/how-to-use-the-bollinger-band-trading-strategies/#3_BB_Break-In_Strategy_Regular_Mode)
- [4\. BB Break-In Strategy (Reverse Mode)](https://www.fxmagnetic.com/how-to-use-the-bollinger-band-trading-strategies/#4_BB_Break-In_Strategy_Reverse_Mode)
- [5\. BB Break-Out Strategy + Momentum (Regular Mode)](https://www.fxmagnetic.com/how-to-use-the-bollinger-band-trading-strategies/#5_BB_Break-Out_Strategy_Momentum_Regular_Mode)
- [BB Break-Out Strategy + Momentum (Reverse Mode)](https://www.fxmagnetic.com/how-to-use-the-bollinger-band-trading-strategies/#BB_Break-Out_Strategy_Momentum_Reverse_Mode)
- [Important Trading Rules](https://www.fxmagnetic.com/how-to-use-the-bollinger-band-trading-strategies/#Important_Trading_Rules)
- [Monitoring Performance](https://www.fxmagnetic.com/how-to-use-the-bollinger-band-trading-strategies/#Monitoring_Performance)
- [Tips for Success](https://www.fxmagnetic.com/how-to-use-the-bollinger-band-trading-strategies/#Tips_for_Success)
## **Built-In Trading Strategies Quick Look**
- **Bollinger Bands Break-out**
- Modes: Regular, Reverse, Buy Only, Sell Only.
- **Bollinger Bands Break-in**
- Modes: Regular, Reverse, Buy Only, Sell Only.
- **Bollinger Bands Breakout with Momentum**
- Modes: Regular, Reverse, Buy Only, Sell Only.
*More on this later…*
## **What Is the Bollinger Band?**
Bollinger Bands are a volatility-based indicator consisting of three bands that expand and contract around price movement. Important things to understand:
- The bands consist of a middle line (20-period moving average) with upper and lower bands
- Upper and lower bands are set 2 standard deviations above and below the middle line
- Wider bands indicate increased market volatility
- Narrower bands suggest decreased volatility
- Price touching the bands often signals potential trading opportunities
- Band settings (period and deviation) can be customized based on trading strategy
## **Understanding The Scanner**
The Scanner serves as the analytical engine, processing market data and generating signals based on your configured parameters.
It can operate independently without a visual indicator. Though optional, we suggest you add the built-in Metatrader Bollinger Band indicator.
Using both in tandem is a great way to visually verify the Scanner’s decision-making process.
The auto-trader that comes with the software is a great addition for when you find the parameters that work for you, and want to automate your trading.
### **Scanner Configuration**
The Scanner’s configuration panel presents several critical parameters that define your trading approach:
- Bollinger Band Period: Determines the lookback period for calculating trends.
- Deviations: Sets the upper and lower bands.
- Strategy Selection: Choose between Breakin, Breakout, or BBand Momentum approaches.
- Trade Direction: Regular, Reverse, or directional-only modes.
Each parameter can significantly impact your trading results, making proper configuration essential for optimal performance.
## **Trading Modes**
Each strategy can be used in different modes:
### **Regular Mode**
- Takes both buy and sell trades.
- Closes existing trades when an opposite signal appears.
- Only one trade opens at a time.
### **Reverse Mode**
- Takes opposite trades from what the strategy indicates.
- Example: Take sell trade when strategy shows buy signal.
### **Buy Only Mode**
- Only takes buy trades.
- Hold until stop loss or take profit.
- Ignores sell signals.
### **Sell Only Mode**
- Only takes sell trades.
- Hold until stop loss or take profit.
- Ignores buy signals.
### **Reverse Buy Only Mode**
- Only looks for buy signals but takes sell trades instead.
### **Reverse Sell Only Mode**
- Only looks for sell signals but takes buy trades instead
## **Strategy Deep Dive**
Each strategy can be executed in multiple modes to adapt to various market conditions:
### **1\. BB Break-Out Strategy (Regular Mode)**
This strategy waits for price to enter the bands, hence called “break-in”.
The standard implementation follows traditional Bollinger Bands theory:
- The BB Scanner is set to use a **Bollinger Bands period of 20 with deviation of 2.**
- **BUY signal** is when the price breaks out of the Bollinger Bands and **closes above the upper band.**
- **SELL signal** is when the price breaks out of the Bollinger Bands and **closes below the Lower band.**
### **2\. BB Break-Out Strategy (Reverse Mode)**
This strategy waits for price to exit the bands, hence called “break-out”.

This contrarian approach inverts the traditional signals:
- The BB Scanner is set to use a **Bollinger Bands period of 20 with deviation of 1.**
- With an **added 200-moving average** serving as a buy and sell filter.
- **BUY signal** is when the **price is above the 200-MA and breaks out** of the Bollinger Bands and **closes below the lower band.**
- **SELL signal** is when the **price is below 200-MA** **and breaks out** of the Bollinger Bands and **closes above the upper band.**
### **3\. BB Break-In Strategy (Regular Mode)**
- The BB Scanner is set to use a **Bollinger Bands period of 40 with deviation of 1.**
- **BUY signal** is when the price breaks into the Bollinger Bands and **closes above the lower band.**
- **SELL signal** is when the price breaks into the Bollinger Bands and **closes below the upper band.**
### **4\. BB Break-In Strategy (Reverse Mode)**
- The BB Scanner is set to use a **Bollinger Bands period of 20 with deviation of 2.**
- **BUY signal** is when the price breaks into the Bollinger Bands and **closes below the upper band.**
- **SELL signal** is when the price breaks into the Bollinger Bands and **closes above the lower band.**
### **5\. BB Break-Out Strategy + Momentum (Regular Mode)**
- With an **added momentum indicator** to provide better trend strength signals.
- The BB Scanner is set to use a **Bollinger Bands period of 10 with deviation of 2.5.**
- **BUY signal** is when the price breaks out of the Bollinger Bands and **closes above the upper band**, and the Momentum indicator is going up.
- **SELL signal** is when the price breaks out of the Bollinger Bands and **closes below the lower band**, and the Momentum indicator is going down.
*Note: If you attach the built-in MT4 momentum indicator, make sure the settings are the same.*
### **BB Break-Out Strategy + Momentum (Reverse Mode)**
- With an **added momentum indicator** to provide better trend strength signals.
- The BB Scanner is set to use a **Bollinger Bands period of 10 with deviation of 2.5.**
- **BUY signal** is when the price breaks out of the Bollinger Bands and closes below the Lower band, and the Momentum indicator is going down.
- **SELL signal** is when the price breaks out of the Bollinger Bands and closes above the upper band, and the Momentum indicator is going up.
## **Important Trading Rules**
- The software opens one trade at a time per strategy for better risk management. If you need more than one trade for some reason, or run different strategies at the same time, you can attach the software on another chart.
- NFor regular/reverse modes, new opposite signals close existing trades.
- For “only” modes, trades run until stop loss or take profit.
- You can use trend filters for additional confirmation.
- Consider reoptimizing the parameters or exploring other modes if experiencing more consecutive losses than historically normal.
## **Monitoring Performance**
Track these key metrics:
- Win rate percentage
- Maximum consecutive losses
- Return to drawdown ratio
- Total pips/points gained
- Drawdown percentage
Understanding your numbers is crucial to your trading success. Remember, FxMagnetic can only help speed up your strategy development. Your outcomes would still depend on how well you use the software.
## **Tips for Success**
- When starting out, we recommend you use the built-in Bollinger Band indicator from MT4 as visual confirmation for the scanner. Just remember to match the settings on both.
- Monitor max consecutive losses as indicator for the strategy viability.
- Consider monitoring the higher time frames to know the overall trend.
- Regularly optimizing the settings is a good practice to adapt to changes in market conditions.
- To better understand how the indicator and scanner work, we highly recommend you watch the tutorial.
***
[](https://www.fxmagnetic.com/author/admin/)
[FxMagnetic](https://www.fxmagnetic.com/author/admin/)
***
[**« Previous Post** How To Use The RSI Trading Strategies](https://www.fxmagnetic.com/how-to-use-the-rsi-trading-strategies-overview/ "How To Use The RSI Trading Strategies") [**Next Post »** Discover Winning Bollinger Bands Trading Strategies with FxMagnetic™ BB Trader](https://www.fxmagnetic.com/discover-winning-bollinger-bands-trading-strategies-with-fxmagnetic-bb-trader/ "Discover Winning Bollinger Bands Trading Strategies with FxMagnetic™ BB Trader")
## Categories
- [Tutorials](https://www.fxmagnetic.com/category/tutorials/)
- [Tutorials (Español)](https://www.fxmagnetic.com/category/tutorials-es/)
- [Tutorials (Français)](https://www.fxmagnetic.com/category/tutorials-fr/)
- [Tutorials (Italiano)](https://www.fxmagnetic.com/category/tutorials-it/)
- [Tutorials (Português)](https://www.fxmagnetic.com/category/tutorials-pt/)
- [Updates](https://www.fxmagnetic.com/category/updates/)

**© fxmagnetic.com 2025. All rights reserved** \| [Terms and Conditions](https://www.fxmagnetic.com/terms/) \| [Privacy Policy](https://www.fxmagnetic.com/privacy/) \| [Contact Us](https://www.fxmagnetic.com/contact-us/)
**Risk Warning:** Trading foreign exchange on margin carries a high level of risk, and may not be suitable for all investors. The high degree of leverage can work against you as well as for you. Before deciding to invest in foreign exchange you should carefully consider your investment objectives, level of experience, and risk appetite. The possibility exists that you could sustain a loss of some or all of your initial investment and therefore you should not invest money that you cannot afford to lose. You should be aware of all the risks associated with foreign exchange trading, and seek advice from an independent financial advisor if you have any doubts.
This site is not part of, or endorsed by Metaquotes Ltd. or Metatrader in any way. All product names, logos, and brands are property of their respective owners. All company, product and service names used in this website are for identification purposes only. Use of these names, logos, and brands does not imply endorsement. METATRADER, MT4, and MT5 is a trademark of METAQUOTES LTD.
This website uses cookies to improve your experience. We'll assume you're ok with this, but you can opt-out if you wish.[Accept]() [Reject]() [Read More](https://www.fxmagnetic.com/privacy/)
Privacy & Cookies Policy
Close
#### Privacy Overview
This website uses cookies to improve your experience while you navigate through the website. Out of these, the cookies that are categorized as necessary are stored on your browser as they are essential for the working of basic functionalities of the website. We also use third-party cookies that help us analyze and understand how you use this website. These cookies will be stored in your browser only with your consent. You also have the option to opt-out of these cookies. But opting out of some of these cookies may affect your browsing experience.
[Necessary]()
Necessary
Always Enabled
Necessary cookies are absolutely essential for the website to function properly. This category only includes cookies that ensures basic functionalities and security features of the website. These cookies do not store any personal information.
[Non-necessary]()
Non-necessary
Any cookies that may not be particularly necessary for the website to function and is used specifically to collect user personal data via analytics, ads, other embedded contents are termed as non-necessary cookies. It is mandatory to procure user consent prior to running these cookies on your website.
[SAVE & ACCEPT]() |
| Readable Markdown | In this tutorial, we will explore the three core trading strategies available in FX Magnetic BB Trader: **Bollinger Bands Break-out**, **Bollinger Bands Break-in**, and **Bollinger Bands Break-out with Momentum**. Each strategy comes with multiple variations which can help you take advantage of different market conditions and get better trading results in the process.
This guide will jumpstart your progress with FX Magnetic BB Trader so you can start utilizing its capabilities effectively.
Table of Contents
- [Built-In Trading Strategies Quick Look](https://www.fxmagnetic.com/how-to-use-the-bollinger-band-trading-strategies/#Built-In_Trading_Strategies_Quick_Look)
- [What Is the Bollinger Band?](https://www.fxmagnetic.com/how-to-use-the-bollinger-band-trading-strategies/#What_Is_the_Bollinger_Band)
- [Understanding The Scanner](https://www.fxmagnetic.com/how-to-use-the-bollinger-band-trading-strategies/#Understanding_The_Scanner)
- [Scanner Configuration](https://www.fxmagnetic.com/how-to-use-the-bollinger-band-trading-strategies/#Scanner_Configuration)
- [Trading Modes](https://www.fxmagnetic.com/how-to-use-the-bollinger-band-trading-strategies/#Trading_Modes)
- [Regular Mode](https://www.fxmagnetic.com/how-to-use-the-bollinger-band-trading-strategies/#Regular_Mode)
- [Reverse Mode](https://www.fxmagnetic.com/how-to-use-the-bollinger-band-trading-strategies/#Reverse_Mode)
- [Buy Only Mode](https://www.fxmagnetic.com/how-to-use-the-bollinger-band-trading-strategies/#Buy_Only_Mode)
- [Sell Only Mode](https://www.fxmagnetic.com/how-to-use-the-bollinger-band-trading-strategies/#Sell_Only_Mode)
- [Reverse Buy Only Mode](https://www.fxmagnetic.com/how-to-use-the-bollinger-band-trading-strategies/#Reverse_Buy_Only_Mode)
- [Reverse Sell Only Mode](https://www.fxmagnetic.com/how-to-use-the-bollinger-band-trading-strategies/#Reverse_Sell_Only_Mode)
- [Strategy Deep Dive](https://www.fxmagnetic.com/how-to-use-the-bollinger-band-trading-strategies/#Strategy_Deep_Dive)
- [1\. BB Break-Out Strategy (Regular Mode)](https://www.fxmagnetic.com/how-to-use-the-bollinger-band-trading-strategies/#1_BB_Break-Out_Strategy_Regular_Mode)
- [2\. BB Break-Out Strategy (Reverse Mode)](https://www.fxmagnetic.com/how-to-use-the-bollinger-band-trading-strategies/#2_BB_Break-Out_Strategy_Reverse_Mode)
- [3\. BB Break-In Strategy (Regular Mode)](https://www.fxmagnetic.com/how-to-use-the-bollinger-band-trading-strategies/#3_BB_Break-In_Strategy_Regular_Mode)
- [4\. BB Break-In Strategy (Reverse Mode)](https://www.fxmagnetic.com/how-to-use-the-bollinger-band-trading-strategies/#4_BB_Break-In_Strategy_Reverse_Mode)
- [5\. BB Break-Out Strategy + Momentum (Regular Mode)](https://www.fxmagnetic.com/how-to-use-the-bollinger-band-trading-strategies/#5_BB_Break-Out_Strategy_Momentum_Regular_Mode)
- [BB Break-Out Strategy + Momentum (Reverse Mode)](https://www.fxmagnetic.com/how-to-use-the-bollinger-band-trading-strategies/#BB_Break-Out_Strategy_Momentum_Reverse_Mode)
- [Important Trading Rules](https://www.fxmagnetic.com/how-to-use-the-bollinger-band-trading-strategies/#Important_Trading_Rules)
- [Monitoring Performance](https://www.fxmagnetic.com/how-to-use-the-bollinger-band-trading-strategies/#Monitoring_Performance)
- [Tips for Success](https://www.fxmagnetic.com/how-to-use-the-bollinger-band-trading-strategies/#Tips_for_Success)
## **Built-In Trading Strategies Quick Look**

- **Bollinger Bands Break-out**
- Modes: Regular, Reverse, Buy Only, Sell Only.
- **Bollinger Bands Break-in**
- Modes: Regular, Reverse, Buy Only, Sell Only.
- **Bollinger Bands Breakout with Momentum**
- Modes: Regular, Reverse, Buy Only, Sell Only.
*More on this later…*
## **What Is the Bollinger Band?**
Bollinger Bands are a volatility-based indicator consisting of three bands that expand and contract around price movement. Important things to understand:
- The bands consist of a middle line (20-period moving average) with upper and lower bands
- Upper and lower bands are set 2 standard deviations above and below the middle line
- Wider bands indicate increased market volatility
- Narrower bands suggest decreased volatility
- Price touching the bands often signals potential trading opportunities
- Band settings (period and deviation) can be customized based on trading strategy
## **Understanding The Scanner**
The Scanner serves as the analytical engine, processing market data and generating signals based on your configured parameters.
It can operate independently without a visual indicator. Though optional, we suggest you add the built-in Metatrader Bollinger Band indicator.
Using both in tandem is a great way to visually verify the Scanner’s decision-making process.
The auto-trader that comes with the software is a great addition for when you find the parameters that work for you, and want to automate your trading.
### **Scanner Configuration**
The Scanner’s configuration panel presents several critical parameters that define your trading approach:
- Bollinger Band Period: Determines the lookback period for calculating trends.
- Deviations: Sets the upper and lower bands.
- Strategy Selection: Choose between Breakin, Breakout, or BBand Momentum approaches.
- Trade Direction: Regular, Reverse, or directional-only modes.
Each parameter can significantly impact your trading results, making proper configuration essential for optimal performance.

## **Trading Modes**
Each strategy can be used in different modes:
### **Regular Mode**
- Takes both buy and sell trades.
- Closes existing trades when an opposite signal appears.
- Only one trade opens at a time.
### **Reverse Mode**
- Takes opposite trades from what the strategy indicates.
- Example: Take sell trade when strategy shows buy signal.
### **Buy Only Mode**
- Only takes buy trades.
- Hold until stop loss or take profit.
- Ignores sell signals.
### **Sell Only Mode**
- Only takes sell trades.
- Hold until stop loss or take profit.
- Ignores buy signals.
### **Reverse Buy Only Mode**
- Only looks for buy signals but takes sell trades instead.
### **Reverse Sell Only Mode**
- Only looks for sell signals but takes buy trades instead
## **Strategy Deep Dive**
Each strategy can be executed in multiple modes to adapt to various market conditions:
### **1\. BB Break-Out Strategy (Regular Mode)**
This strategy waits for price to enter the bands, hence called “break-in”.

The standard implementation follows traditional Bollinger Bands theory:
- The BB Scanner is set to use a **Bollinger Bands period of 20 with deviation of 2.**
- **BUY signal** is when the price breaks out of the Bollinger Bands and **closes above the upper band.**
- **SELL signal** is when the price breaks out of the Bollinger Bands and **closes below the Lower band.**
### **2\. BB Break-Out Strategy (Reverse Mode)**
This strategy waits for price to exit the bands, hence called “break-out”.

This contrarian approach inverts the traditional signals:
- The BB Scanner is set to use a **Bollinger Bands period of 20 with deviation of 1.**
- With an **added 200-moving average** serving as a buy and sell filter.
- **BUY signal** is when the **price is above the 200-MA and breaks out** of the Bollinger Bands and **closes below the lower band.**
- **SELL signal** is when the **price is below 200-MA** **and breaks out** of the Bollinger Bands and **closes above the upper band.**
### **3\. BB Break-In Strategy (Regular Mode)**

- The BB Scanner is set to use a **Bollinger Bands period of 40 with deviation of 1.**
- **BUY signal** is when the price breaks into the Bollinger Bands and **closes above the lower band.**
- **SELL signal** is when the price breaks into the Bollinger Bands and **closes below the upper band.**
### **4\. BB Break-In Strategy (Reverse Mode)**

- The BB Scanner is set to use a **Bollinger Bands period of 20 with deviation of 2.**
- **BUY signal** is when the price breaks into the Bollinger Bands and **closes below the upper band.**
- **SELL signal** is when the price breaks into the Bollinger Bands and **closes above the lower band.**
### **5\. BB Break-Out Strategy + Momentum (Regular Mode)**

- With an **added momentum indicator** to provide better trend strength signals.
- The BB Scanner is set to use a **Bollinger Bands period of 10 with deviation of 2.5.**
- **BUY signal** is when the price breaks out of the Bollinger Bands and **closes above the upper band**, and the Momentum indicator is going up.
- **SELL signal** is when the price breaks out of the Bollinger Bands and **closes below the lower band**, and the Momentum indicator is going down.
*Note: If you attach the built-in MT4 momentum indicator, make sure the settings are the same.*
### **BB Break-Out Strategy + Momentum (Reverse Mode)**

- With an **added momentum indicator** to provide better trend strength signals.
- The BB Scanner is set to use a **Bollinger Bands period of 10 with deviation of 2.5.**
- **BUY signal** is when the price breaks out of the Bollinger Bands and closes below the Lower band, and the Momentum indicator is going down.
- **SELL signal** is when the price breaks out of the Bollinger Bands and closes above the upper band, and the Momentum indicator is going up.
## **Important Trading Rules**
- The software opens one trade at a time per strategy for better risk management. If you need more than one trade for some reason, or run different strategies at the same time, you can attach the software on another chart.
- NFor regular/reverse modes, new opposite signals close existing trades.
- For “only” modes, trades run until stop loss or take profit.
- You can use trend filters for additional confirmation.
- Consider reoptimizing the parameters or exploring other modes if experiencing more consecutive losses than historically normal.
## **Monitoring Performance**
Track these key metrics:
- Win rate percentage
- Maximum consecutive losses
- Return to drawdown ratio
- Total pips/points gained
- Drawdown percentage
Understanding your numbers is crucial to your trading success. Remember, FxMagnetic can only help speed up your strategy development. Your outcomes would still depend on how well you use the software.
## **Tips for Success**
- When starting out, we recommend you use the built-in Bollinger Band indicator from MT4 as visual confirmation for the scanner. Just remember to match the settings on both.
- Monitor max consecutive losses as indicator for the strategy viability.
- Consider monitoring the higher time frames to know the overall trend.
- Regularly optimizing the settings is a good practice to adapt to changes in market conditions.
- To better understand how the indicator and scanner work, we highly recommend you watch the tutorial. |
| Shard | 132 (laksa) |
| Root Hash | 3202791095136304132 |
| Unparsed URL | com,fxmagnetic!www,/how-to-use-the-bollinger-band-trading-strategies/ s443 |