ℹ️ Skipped - page is already crawled
| Filter | Status | Condition | Details |
|---|---|---|---|
| HTTP status | PASS | download_http_code = 200 | HTTP 200 |
| Age cutoff | PASS | download_stamp > now() - 6 MONTH | 1.4 months ago |
| History drop | PASS | isNull(history_drop_reason) | No drop reason |
| Spam/ban | PASS | fh_dont_index != 1 AND ml_spam_score = 0 | ml_spam_score=0 |
| Canonical | PASS | meta_canonical IS NULL OR = '' OR = src_unparsed | Not set |
| Property | Value |
|---|---|
| URL | https://www.freeflour.com/how-to-take-a-screenshot-on-a-mac-print-screen-mac/ |
| Last Crawled | 2026-03-09 18:02:31 (1 month ago) |
| First Indexed | 2015-12-09 11:38:03 (10 years ago) |
| HTTP Status Code | 200 |
| Meta Title | How to Take a Screenshot on a Mac | Print Screen Mac |
| Meta Description | How to take a screenshot on a Mac, how to print screen on Mac, taking screenshot of the Entire Screen, a part of the screen or certain window. |
| Meta Canonical | null |
| Boilerpipe Text | How to take a screenshot on a Mac, how to print screen on Mac, taking screenshot of the Entire Screen, a part of the screen or certain window.
If you want to show your friend an interesting moment on your screen, present a snapshot of your project to your lecturer, show an expert the error message you receive on your computer, or to display an instruction of how to use a software on your website, screenshot or print screen is the perfect way to show exactly what happen on your computer screen.
Print screen or taking a screenshot on a Mac is pretty simple in Mac OS X. In Mac, you can flexibly take a screenshot of your whole screen, a part of your screen, a window, menu or anything in any way you want. These are all built-in features in Mac (Macbook Pro, Macbook Air and other Mac) by default which means you don’t have to install anything to make this happen.
How to take a screenshot on Mac – Print Screen Mac
Print screen can be done easily by pressing certain shortcut keys on your Mac keyboard (which we will explain about it later). Different shortcut key (based on your preference) will result in a different way in taking screenshot on Mac. The file will ultimately be saved onto your desktop as an PNG file.
We have listed all the Mac screenshot and print screen methods, instructions and shortcut keys below. Choose a method that best suit your need to take a screenshot on Mac.
How to Print Screen on Mac – Entire Screen
If you want to take a screenshot of the whole screen of your Mac, press and hold Command, Shift and then 3.
It won’t work if you press them one by one. You will need to press and hold the Command key, and then the Shift key without releasing the Command key, and finally the 3 key without releasing the 2 keys you’ve been holding earlier.
How to take a screenshot of your entire screen on Mac:
COMMAND + SHIFT + 3
How to take a screenshot on a Mac – Part of the screen
If you want to take a screenshot of only a part of your current screen, press and hold Command + Shift + 4.
This will change your mouse pointer to a crosshair. While holding your mouse button, drag your pointer and highlight any part or area of your screen that you want to print screen. While dragging, you can try holding Shift, Option or Space bar key for different types of selection. When you’ve done highlighting the area you wish to take a screenshot from, release your mouse button.
Screenshot will then be saved on your desktop as an PNG image file.
How to take a screenshot of part of your screen on Mac:
COMMAND + SHIFT + 4
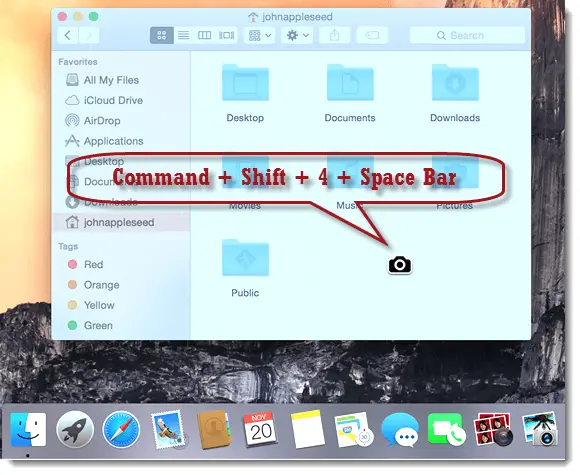
How to take a screenshot of a window on Mac
If you want to take a screenshot of a certain Window perfectly without having to manually highlighting using the crosshair, press Command + Shift + 4.
And then press the space bar key which will then change the pointer into a camera. This pointer will automatically detect the window you are currently pointing at and when you click on it, it will take a screenshot of the selected window. Screenshot will be saved as an PNG file on your Mac desktop.
How to take a screenshot of a specific window on Mac:
COMMAND + SHIFT + 4
and then
Space bar
How to Print screen and save the screenshot in the Clipboard on Mac
If you don’t need a file and would like to save your screenshot in the clipboard and paste it somewhere else, say like an image editor, you can do so by holding the Control key followed by one of the above shortcut keys combination. For example, to take screenshot of your entire screen to the clipboard, hold Command + Shift + Control + 3 and paste it to anywhere you like by holding and pressing Command + V.
How to print screen to clipboard on Mac
Command + Shift + Control + 3/4
to copy,
Command + V
to paste.
Taking screenshot on Mac with screen capture tools for Mac OS X
Other than using the built-in Mac print screen tools, you can also download and use some of the most popular third party screen capture tools and programs to print screen on Mac.
These tools offer wider range of screenshot options and flexibility. Most would come with an image editor to edit, highlight, input details, drawing circles or adding whatever you want on your newly taken screenshots.
You may want to check out Skitch, WebClipper, SharpShooter, Captur, Jing and Snagit Editor. These mentioned screenshot capture tools for Mac are the most widely used and the most recommended for designers. |
| Markdown | [](https://www.freeflour.com/ "Freeflour.com - Trending Windows 10 and Android Tips")
# How to Take a Screenshot on a Mac \| Print Screen Mac
Dec 9, 2015
How to take a screenshot on a Mac, how to print screen on Mac, taking screenshot of the Entire Screen, a part of the screen or certain window.
If you want to show your friend an interesting moment on your screen, present a snapshot of your project to your lecturer, show an expert the error message you receive on your computer, or to display an instruction of how to use a software on your website, screenshot or print screen is the perfect way to show exactly what happen on your computer screen.
Print screen or taking a screenshot on a Mac is pretty simple in Mac OS X. In Mac, you can flexibly take a screenshot of your whole screen, a part of your screen, a window, menu or anything in any way you want. These are all built-in features in Mac (Macbook Pro, Macbook Air and other Mac) by default which means you don’t have to install anything to make this happen.
## How to take a screenshot on Mac – Print Screen Mac
Print screen can be done easily by pressing certain shortcut keys on your Mac keyboard (which we will explain about it later). Different shortcut key (based on your preference) will result in a different way in taking screenshot on Mac. The file will ultimately be saved onto your desktop as an PNG file.
We have listed all the Mac screenshot and print screen methods, instructions and shortcut keys below. Choose a method that best suit your need to take a screenshot on Mac.
[How to Take a Screenshot on Windows 10 \| Print Screen Windows 10](https://www.freeflour.com/how-to-take-a-screenshot-on-windows-10-print-screen-windows-10/ "How to Take a Screenshot on Windows 10 | Print Screen Windows 10")
## How to Print Screen on Mac – Entire Screen
If you want to take a screenshot of the whole screen of your Mac, press and hold Command, Shift and then 3.
It won’t work if you press them one by one. You will need to press and hold the Command key, and then the Shift key without releasing the Command key, and finally the 3 key without releasing the 2 keys you’ve been holding earlier.
- How to take a screenshot of your entire screen on Mac:
**COMMAND + SHIFT + 3**
## How to take a screenshot on a Mac – Part of the screen
If you want to take a screenshot of only a part of your current screen, press and hold Command + Shift + 4.
This will change your mouse pointer to a crosshair. While holding your mouse button, drag your pointer and highlight any part or area of your screen that you want to print screen. While dragging, you can try holding Shift, Option or Space bar key for different types of selection. When you’ve done highlighting the area you wish to take a screenshot from, release your mouse button.
Screenshot will then be saved on your desktop as an PNG image file.
- How to take a screenshot of part of your screen on Mac:
**COMMAND + SHIFT + 4**
## How to take a screenshot of a window on Mac
If you want to take a screenshot of a certain Window perfectly without having to manually highlighting using the crosshair, press Command + Shift + 4.
And then press the space bar key which will then change the pointer into a camera. This pointer will automatically detect the window you are currently pointing at and when you click on it, it will take a screenshot of the selected window. Screenshot will be saved as an PNG file on your Mac desktop.
- How to take a screenshot of a specific window on Mac:
**COMMAND + SHIFT + 4** and then **Space bar**
## How to Print screen and save the screenshot in the Clipboard on Mac
If you don’t need a file and would like to save your screenshot in the clipboard and paste it somewhere else, say like an image editor, you can do so by holding the Control key followed by one of the above shortcut keys combination. For example, to take screenshot of your entire screen to the clipboard, hold Command + Shift + Control + 3 and paste it to anywhere you like by holding and pressing Command + V.
- How to print screen to clipboard on Mac
**Command + Shift + Control + 3/4** to copy, **Command + V** to paste.
## Taking screenshot on Mac with screen capture tools for Mac OS X
Other than using the built-in Mac print screen tools, you can also download and use some of the most popular third party screen capture tools and programs to print screen on Mac.
These tools offer wider range of screenshot options and flexibility. Most would come with an image editor to edit, highlight, input details, drawing circles or adding whatever you want on your newly taken screenshots.
You may want to check out Skitch, WebClipper, SharpShooter, Captur, Jing and Snagit Editor. These mentioned screenshot capture tools for Mac are the most widely used and the most recommended for designers.
##
By [Sin Cheong](https://www.freeflour.com/about/)
[Home](https://www.freeflour.com/) - [Apple](https://www.freeflour.com/apple/) - How to Take a Screenshot on a Mac \| Print Screen Mac
- [How to Take a Screenshot on Windows 10 \| Print Screen Windows 10](https://www.freeflour.com/how-to-take-a-screenshot-on-windows-10-print-screen-windows-10/ "How to Take a Screenshot on Windows 10 | Print Screen Windows 10")
- [How to Downgrade iOS 10.2 to 10.1.1 for Jailbreak Purpose](https://www.freeflour.com/downgrade-ios-10-2-to-ios-9-3-3-10-1-1-jailbreak/ "How to Downgrade iOS 10.2 to 10.1.1 for Jailbreak Purpose")
- [Windows 10 Black Screen With Cursor or No Cursor After Login](https://www.freeflour.com/windows-10-black-screen-with-cursor-no-cursor-after-login/ "Windows 10 Black Screen With Cursor or No Cursor After Login")
- [Windows 10 Upgrade Failed to Install Black Screen](https://www.freeflour.com/windows-10-upgrade-failed-to-install-black-screen-windows-7-8/ "Windows 10 Upgrade Failed to Install Black Screen")
- [How to Show Hidden Files and Folders in Windows 10](https://www.freeflour.com/how-to-show-hidden-files-folders-in-windows-10/ "How to Show Hidden Files and Folders in Windows 10")
- [Download WinRAR 64 bit 32 bit Free for Windows 10 Mac Offline Installer](https://www.freeflour.com/download-winrar-64-bit-for-windows-10-mac-offline-installer/ "Download WinRAR 64 bit 32 bit Free for Windows 10 Mac Offline Installer")
- [How to Downgrade iOS 9.1 to iOS 9.0.2 for Jailbreak Tutorial](https://www.freeflour.com/how-to-downgrade-ios-9-1-to-ios-9-0-2-for-jailbreak-tutorial/ "How to Downgrade iOS 9.1 to iOS 9.0.2 for Jailbreak Tutorial")
- [Windows 10 Totally Black Screen After Login Windows 7/8/8.1 Fix](https://www.freeflour.com/windows-10-8-7-black-screen-after-login-windows-7-8-10-fix/ "Windows 10 Totally Black Screen After Login Windows 7/8/8.1 Fix")
Show Comments
- [About](https://www.freeflour.com/about/)
- [Privacy Policy](https://www.freeflour.com/privacy-policy-for-www-freeflour-com/)
- [Terms and Policies](https://www.freeflour.com/terms-and-policies/)
Copyright © 2022 Freeflour.com. All rights reserved.
The content is copyrighted to SIN CHEONG and may not be reproduced in any form without written permission.
[↑ Back to top](https://www.freeflour.com/how-to-take-a-screenshot-on-a-mac-print-screen-mac/#header) |
| Readable Markdown | How to take a screenshot on a Mac, how to print screen on Mac, taking screenshot of the Entire Screen, a part of the screen or certain window.
If you want to show your friend an interesting moment on your screen, present a snapshot of your project to your lecturer, show an expert the error message you receive on your computer, or to display an instruction of how to use a software on your website, screenshot or print screen is the perfect way to show exactly what happen on your computer screen.
Print screen or taking a screenshot on a Mac is pretty simple in Mac OS X. In Mac, you can flexibly take a screenshot of your whole screen, a part of your screen, a window, menu or anything in any way you want. These are all built-in features in Mac (Macbook Pro, Macbook Air and other Mac) by default which means you don’t have to install anything to make this happen.
## How to take a screenshot on Mac – Print Screen Mac
Print screen can be done easily by pressing certain shortcut keys on your Mac keyboard (which we will explain about it later). Different shortcut key (based on your preference) will result in a different way in taking screenshot on Mac. The file will ultimately be saved onto your desktop as an PNG file.
We have listed all the Mac screenshot and print screen methods, instructions and shortcut keys below. Choose a method that best suit your need to take a screenshot on Mac.
## How to Print Screen on Mac – Entire Screen
If you want to take a screenshot of the whole screen of your Mac, press and hold Command, Shift and then 3.
It won’t work if you press them one by one. You will need to press and hold the Command key, and then the Shift key without releasing the Command key, and finally the 3 key without releasing the 2 keys you’ve been holding earlier.
- How to take a screenshot of your entire screen on Mac:
**COMMAND + SHIFT + 3**
## How to take a screenshot on a Mac – Part of the screen
If you want to take a screenshot of only a part of your current screen, press and hold Command + Shift + 4.
This will change your mouse pointer to a crosshair. While holding your mouse button, drag your pointer and highlight any part or area of your screen that you want to print screen. While dragging, you can try holding Shift, Option or Space bar key for different types of selection. When you’ve done highlighting the area you wish to take a screenshot from, release your mouse button.
Screenshot will then be saved on your desktop as an PNG image file.
- How to take a screenshot of part of your screen on Mac:
**COMMAND + SHIFT + 4**
## How to take a screenshot of a window on Mac
If you want to take a screenshot of a certain Window perfectly without having to manually highlighting using the crosshair, press Command + Shift + 4.
And then press the space bar key which will then change the pointer into a camera. This pointer will automatically detect the window you are currently pointing at and when you click on it, it will take a screenshot of the selected window. Screenshot will be saved as an PNG file on your Mac desktop.
- How to take a screenshot of a specific window on Mac:
**COMMAND + SHIFT + 4** and then **Space bar**

## How to Print screen and save the screenshot in the Clipboard on Mac
If you don’t need a file and would like to save your screenshot in the clipboard and paste it somewhere else, say like an image editor, you can do so by holding the Control key followed by one of the above shortcut keys combination. For example, to take screenshot of your entire screen to the clipboard, hold Command + Shift + Control + 3 and paste it to anywhere you like by holding and pressing Command + V.
- How to print screen to clipboard on Mac
**Command + Shift + Control + 3/4** to copy, **Command + V** to paste.
## Taking screenshot on Mac with screen capture tools for Mac OS X
Other than using the built-in Mac print screen tools, you can also download and use some of the most popular third party screen capture tools and programs to print screen on Mac.
These tools offer wider range of screenshot options and flexibility. Most would come with an image editor to edit, highlight, input details, drawing circles or adding whatever you want on your newly taken screenshots.
You may want to check out Skitch, WebClipper, SharpShooter, Captur, Jing and Snagit Editor. These mentioned screenshot capture tools for Mac are the most widely used and the most recommended for designers. |
| Shard | 154 (laksa) |
| Root Hash | 4915184839985985754 |
| Unparsed URL | com,freeflour!www,/how-to-take-a-screenshot-on-a-mac-print-screen-mac/ s443 |