ℹ️ Skipped - page is already crawled
| Filter | Status | Condition | Details |
|---|---|---|---|
| HTTP status | PASS | download_http_code = 200 | HTTP 200 |
| Age cutoff | PASS | download_stamp > now() - 6 MONTH | 0 months ago |
| History drop | PASS | isNull(history_drop_reason) | No drop reason |
| Spam/ban | PASS | fh_dont_index != 1 AND ml_spam_score = 0 | ml_spam_score=0 |
| Canonical | PASS | meta_canonical IS NULL OR = '' OR = src_unparsed | Not set |
| Property | Value |
|---|---|
| URL | https://www.digitalcitizen.life/screenshot-mac/ |
| Last Crawled | 2026-04-09 21:37:19 (23 hours ago) |
| First Indexed | 2021-01-26 09:55:57 (5 years ago) |
| HTTP Status Code | 200 |
| Meta Title | How to screenshot on Mac: All you need to know |
| Meta Description | Learn everything about how to screenshot on Mac, from keyboard shortcuts to using the Screenshot and Preview apps! |
| Meta Canonical | null |
| Boilerpipe Text | How to screenshot on Mac is anything but obvious, as the absence of a
Print Screen
Mac button confuses most new users. However, Apple makes up for that by offering plenty of user-friendly tools to take a Mac screenshot, from several keyboard shortcuts to built-in apps. Whether you’re saving receipts or a friend’s reaction during a video call, if you’re wondering how to
print screen
on a Mac, this guide has all the answers you need. Read on to find out how to screenshot on Mac using all the available options and discover the one(s) you prefer:
Table of contents
Use a Mac screenshot shortcut to grab what you want
If you want to know how to
screen grab
on a Mac (as some veteran users call it) as fast as possible, the trick is to memorize a few default keyboard shortcuts. Don’t worry; they are all quite similar and easy to learn. You can use a Mac screenshot shortcut to capture the entire display, one to grab a specific portion of the screen or window, and there’s another Mac screenshot command to save what’s on your
Touch Bar
(if you have one). With the help of a few hotkeys, you can capture exactly what you want on any macOS device, no matter how old or new.
NOTE:
Mac screenshots are automatically saved on your
Desktop
, but, as you’re about to see, some keyboard shortcuts help you copy them to the
Clipboard
instead. If you can’t find a Mac screenshot,
our guide about screenshot locations
provides more details.
How to Print Screen on Mac - Capture the entire screen
As we said, there is no
Print Screen
button in macOS, but if you want to capture the entire display, you can use the Mac
print screen
shortcut:
Command (⌘) + Shift + 3
.
Hold down the highlighted keys simultaneously to Print Screen on Mac
This Mac screenshot command instantly saves an image of everything on your display. If you’re using multiple screens, it creates more screenshots at the same time, one for each of the displays on macOS.
You might want to copy the resulting image to your
Clipboard
instead of saving it automatically. In that case, the Mac screenshot shortcut is a little different:
Command (⌘) + Control + Shift + 3
.
How to screenshot in Mac and copy the entire screen to the Clipboard
Since you can’t save more than one Mac screenshot to
Clipboard
, only your main display is captured when you’re using multiple monitors.
TIP:
If you’re wondering how to paste a screenshot on Mac into another app or document, use
Command (⌘) + V
or check our guide for more
ways to Cut, Copy, and Paste
.
Screenshotting a selected portion of the screen
When you screenshot on Mac, you don’t always need everything on your screen. If you want a macOS screenshot showing only part of your display, use the keyboard shortcut:
Command (⌘) + Shift + 4
.
Use this screenshot shortcut on Mac to capture part of the display
As soon as you press the Mac screenshot command, your pointer turns into a crosshair. Click-and-hold, then drag the cursor to create a rectangular selection around the area you want to grab. The captured image’s width and height are indicated in numbers of pixels, next to the crosshair.
Check the size of your image while screenshotting on Mac
If you release the mouse button or trackpad, your macOS screenshot is saved. You can press
Esc
(Escape) on your keyboard to cancel taking it if you make the wrong selection, but then you have to start over. However, if you highlight an area and then realize you don’t have what you need, press-and-hold the
Spacebar
key without releasing the mouse or trackpad. This lets you move around the selected area. When you get it into the right position, release the
Spacebar
to continue resizing the highlighted area. While making your selection, you can also press-and-hold the
Option
key and move the crosshair. This scales the highlighted area up or down, keeping the original
aspect ratio
- much like zooming in or out.
TIP:
If you’re looking for a specific size when you screengrab on Mac using this command, you can also use the
Shift
key the same way to toggle between resizing the selection vertically or horizontally (without changing the other dimension). However, you’re better off using the
Screenshot
app, discussed in the next chapter, to get an image of a certain size.
If you want the resulting image saved to your
Clipboard
instead, use the slightly different Mac screenshot shortcut:
Command (⌘) + Control + Shift + 4
.
How to screen shot on a Mac, saving the highlighted area to the Clipboard
Combine the instructions and hotkeys explained in this subchapter to adjust your selection. When you manage to frame the data you need perfectly, release the mouse or trackpad, and the resulting Mac
print screen
is saved to the
Clipboard
.
Get a macOS screenshot of a highlighted window or menu
The same keyboard shortcuts illustrated in the previous subchapter apply when screenshotting a window or a menu, but the instructions that follow are a bit different. First, use the shortcut
Command (⌘) + Shift + 4
to get the crosshair pointer. Then, press the
Spacebar
key.
The screenshot Mac shortcut to capture any highlighted element
Your mouse pointer now looks like a small camera. When you hover over different elements, like windows, open menus, and even the dock, they become highlighted. Clicking on any element, even if it’s not entirely visible, saves its contents right away as a macOS screenshot.
Grab a window or menu in your mac os screenshot
When you use this Mac screenshot command, the resulting image includes the element’s shadow - a border around the resulting image. To screenshot on a Mac without the shadow, press and hold
Option
on your keyboard while clicking to capture a window or menu.
TIP:
If you change your mind, pressing the
Spacebar
key again returns your cursor to a crosshair, allowing you to toggle between capturing an area or an app window.
Just like before, if you want your screengrab copied to the
Clipboard
instead, use:
Command (⌘) + Control + Shift + 4
, followed by
Spacebar
.
Use this shortcut and the result is copied to the Clipboard when you screenshot in Mac
TIP:
If you’re taking Mac screenshots from your favorite movies and videos, it might be easier to use our guide on
saving VLC snapshots
.
Capture the Touch Bar (if your MacBook has one)
The
Touch Bar
is a thin OLED touch screen fitted on the keyboard of your MacBook. Apple created a keyboard shortcut in case you want to show someone what you see on the
Touch Bar
. Simultaneously press:
Command (⌘) + Shift + 6
.
Create a Mac print screen of the Touch Bar OLED display
This immediately saves a very wide and skinny image of your Touch Bar.
How to screenshot on a Mac with the Screenshot app
The first time I came across the different macOS keyboard commands, I asked myself,
“How do I screenshot on a Mac without remembering complicated shortcuts?”
. If you also feel they are too hard to learn, don’t worry! A few years ago, Apple introduced the
Screenshot
app, creating a visual interface that makes screenshotting fun and user-friendly. However, the app is only available on macOS Mojave or newer, so
check your macOS version
to make sure you have it.
The easiest way to open the
Screenshot
app on macOS is simultaneously pressing the keys:
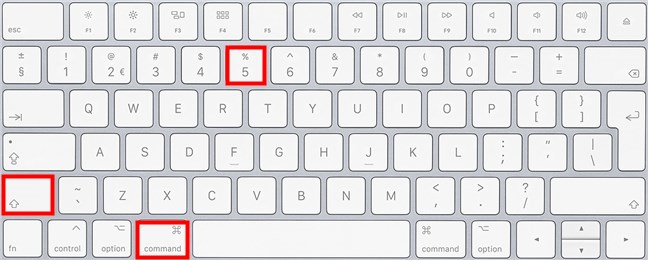
Command (⌘) + Shift + 5
.
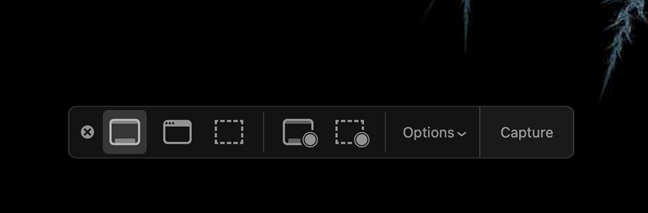
The Screenshot Mac shortcut launches the app
This brings up a simple toolbar that includes all the options you need, including a timer and a way to change where you save a macOS screenshot. We’ve already explored in great detail
the Screenshot app and its many options to print screen on Mac
if you want to learn more about what it has to offer.
Use the Mac Screenshot app to get the image you want
In addition to taking a screenshot on Mac, the app can also be used
to make a video recording of your screen
.
How to screenshot on Mac with the Preview app
Not everyone knows this, but you can also use the
Preview
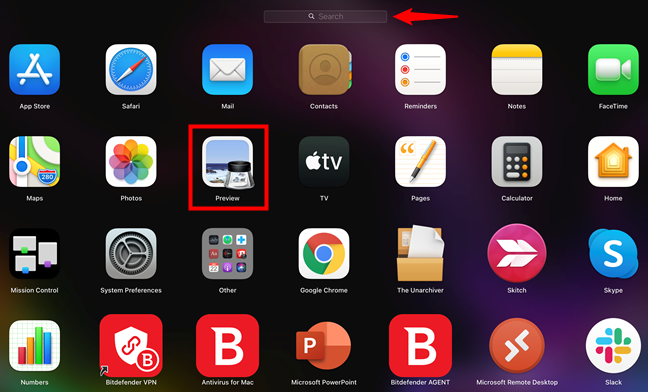
app to screenshot on Mac. This is helpful if you want to edit the macOS screenshot right away. Open your
Applications
folder by pressing the
F4
key and click on
Preview
. You can also use the search bar on top to find the app.
Take and edit Mac screenshots with Preview
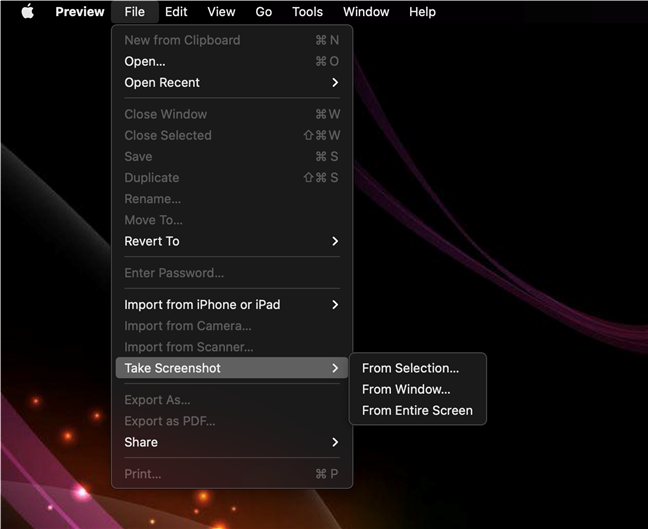
In the menu bar, click
File
and hover over
Take Screenshot
to reveal three options:
Preview offers three options to screenshot on Mac
From Selection
- lets you capture a rectangular area on your screen by clicking and dragging to create a selection. To best use this option, scroll up in this guide, and check the instructions and hotkeys detailed in the subchapter about
Screenshotting a selected portion of the screen
with keyboard shortcuts.
From Window
- allows you to grab an open app window. Press
Option
while clicking on the window you want to remove its shadow.
From Entire Screen
- sets off a timer, giving you time to access what you want to capture, and then creates a macOS image of the entire display.
When you click on an option, the
Preview
app displays instructions for it on your screen. The screenshots you take are immediately open. You can edit them and then save them in the format and location you want.
How do you screenshot on a Mac?
Shortcuts are the reliable way to screenshot on a Mac, but the
Screenshot
app is more fun and flexible, while
Preview
lets you edit your results right away. Which one do you prefer? Whether you’re using an iMac or a MacBook Pro, let us know what works best for you when you
print screen
on Mac. |
| Markdown | [UP]()
[MENU]()
[](https://www.digitalcitizen.life/ "Home")
[ SEARCH]()

Subscribe
Categories
- [Productivity](https://www.digitalcitizen.life/category/productivity/)
- [Entertainment](https://www.digitalcitizen.life/category/entertainment/)
- [Security](https://www.digitalcitizen.life/category/security/)
- [Smartphone](https://www.digitalcitizen.life/category/smartphone/)
- [Smarthome](https://www.digitalcitizen.life/category/smarthome/)
- [Health](https://www.digitalcitizen.life/category/health/)
Other
- [SUBSCRIBE](https://www.digitalcitizen.life/subscription-options/)
- [About us](https://www.digitalcitizen.life/about-us/)
- [Contact us](https://www.digitalcitizen.life/contact-us/)
- [Ethics Code](https://www.digitalcitizen.life/ethics-statement/)
- [Terms & Privacy](https://www.digitalcitizen.life/terms-conditions/)
- [Cookies](https://www.digitalcitizen.life/cookies-on-digital-citizen/)
# How to screenshot on Mac: All you need to know
- [Radu Tyrsina](https://www.digitalcitizen.life/author/radu/)
-  Modified on 10.10.2025
tutorial

How to screenshot on Mac is anything but obvious, as the absence of a *Print Screen* Mac button confuses most new users. However, Apple makes up for that by offering plenty of user-friendly tools to take a Mac screenshot, from several keyboard shortcuts to built-in apps. Whether you’re saving receipts or a friend’s reaction during a video call, if you’re wondering how to *print screen* on a Mac, this guide has all the answers you need. Read on to find out how to screenshot on Mac using all the available options and discover the one(s) you prefer:
**Table of contents**
### Skip to chapter
1. [Use a Mac screenshot shortcut to grab what you want](https://www.digitalcitizen.life/screenshot-mac/#ftoc-heading-1)
1. [How to Print Screen on Mac - Capture the entire screen](https://www.digitalcitizen.life/screenshot-mac/#ftoc-heading-2)
2. [Screenshotting a selected portion of the screen](https://www.digitalcitizen.life/screenshot-mac/#ftoc-heading-3)
3. [Get a macOS screenshot of a highlighted window or menu](https://www.digitalcitizen.life/screenshot-mac/#ftoc-heading-4)
4. [Capture the Touch Bar (if your MacBook has one)](https://www.digitalcitizen.life/screenshot-mac/#ftoc-heading-5)
2. [How to screenshot on a Mac with the Screenshot app](https://www.digitalcitizen.life/screenshot-mac/#ftoc-heading-6)
3. [How to screenshot on Mac with the Preview app](https://www.digitalcitizen.life/screenshot-mac/#ftoc-heading-7)
4. [How do you screenshot on a Mac?](https://www.digitalcitizen.life/screenshot-mac/#ftoc-heading-8)
## Use a Mac screenshot shortcut to grab what you want
If you want to know how to *screen grab* on a Mac (as some veteran users call it) as fast as possible, the trick is to memorize a few default keyboard shortcuts. Don’t worry; they are all quite similar and easy to learn. You can use a Mac screenshot shortcut to capture the entire display, one to grab a specific portion of the screen or window, and there’s another Mac screenshot command to save what’s on your *Touch Bar* (if you have one). With the help of a few hotkeys, you can capture exactly what you want on any macOS device, no matter how old or new. **NOTE:** Mac screenshots are automatically saved on your *Desktop*, but, as you’re about to see, some keyboard shortcuts help you copy them to the *Clipboard* instead. If you can’t find a Mac screenshot, [our guide about screenshot locations](https://www.digitalcitizen.life/where-are-screenshots-saved-locations/) provides more details.
### How to Print Screen on Mac - Capture the entire screen
As we said, there is no *Print Screen* button in macOS, but if you want to capture the entire display, you can use the Mac *print screen* shortcut: **Command (⌘) + Shift + 3**.
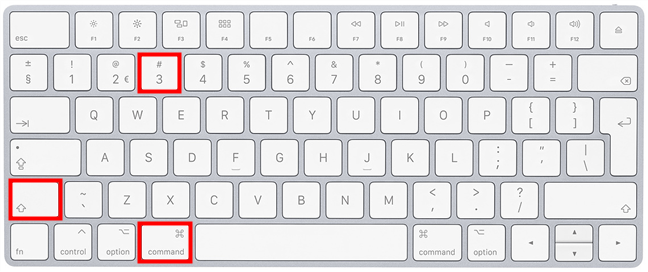

Hold down the highlighted keys simultaneously to Print Screen on Mac This Mac screenshot command instantly saves an image of everything on your display. If you’re using multiple screens, it creates more screenshots at the same time, one for each of the displays on macOS. You might want to copy the resulting image to your *Clipboard* instead of saving it automatically. In that case, the Mac screenshot shortcut is a little different: **Command (⌘) + Control + Shift + 3**.
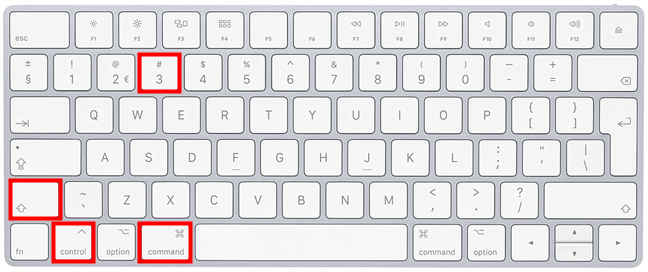

How to screenshot in Mac and copy the entire screen to the Clipboard Since you can’t save more than one Mac screenshot to *Clipboard*, only your main display is captured when you’re using multiple monitors. **TIP:** If you’re wondering how to paste a screenshot on Mac into another app or document, use *Command (⌘) + V* or check our guide for more [ways to Cut, Copy, and Paste](https://www.digitalcitizen.life/cut-copy-paste-text-mac/).
### Screenshotting a selected portion of the screen
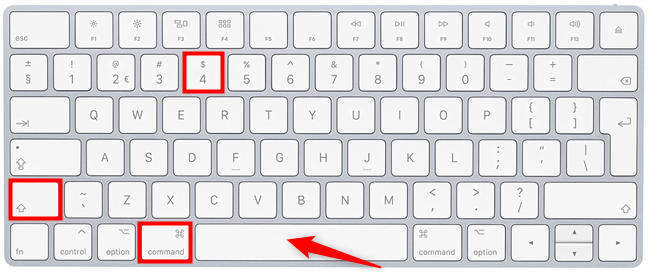
When you screenshot on Mac, you don’t always need everything on your screen. If you want a macOS screenshot showing only part of your display, use the keyboard shortcut: **Command (⌘) + Shift + 4**.
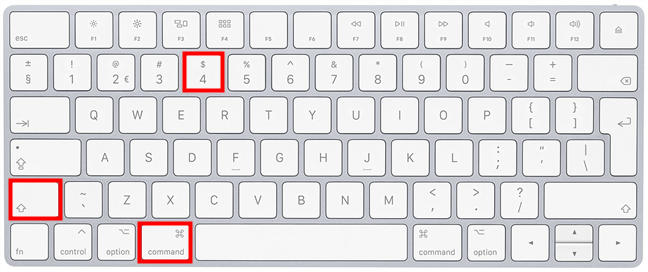

Use this screenshot shortcut on Mac to capture part of the display As soon as you press the Mac screenshot command, your pointer turns into a crosshair. Click-and-hold, then drag the cursor to create a rectangular selection around the area you want to grab. The captured image’s width and height are indicated in numbers of pixels, next to the crosshair.


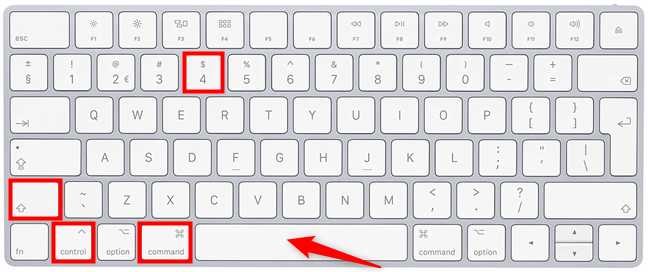
Check the size of your image while screenshotting on Mac If you release the mouse button or trackpad, your macOS screenshot is saved. You can press *Esc* (Escape) on your keyboard to cancel taking it if you make the wrong selection, but then you have to start over. However, if you highlight an area and then realize you don’t have what you need, press-and-hold the *Spacebar* key without releasing the mouse or trackpad. This lets you move around the selected area. When you get it into the right position, release the *Spacebar* to continue resizing the highlighted area. While making your selection, you can also press-and-hold the *Option* key and move the crosshair. This scales the highlighted area up or down, keeping the original [aspect ratio](https://www.digitalcitizen.life/what-screen-resolution-or-aspect-ratio-what-do-720p-1080i-1080p-mean/) - much like zooming in or out. **TIP:** If you’re looking for a specific size when you screengrab on Mac using this command, you can also use the *Shift* key the same way to toggle between resizing the selection vertically or horizontally (without changing the other dimension). However, you’re better off using the *Screenshot* app, discussed in the next chapter, to get an image of a certain size. If you want the resulting image saved to your *Clipboard* instead, use the slightly different Mac screenshot shortcut: **Command (⌘) + Control + Shift + 4**.
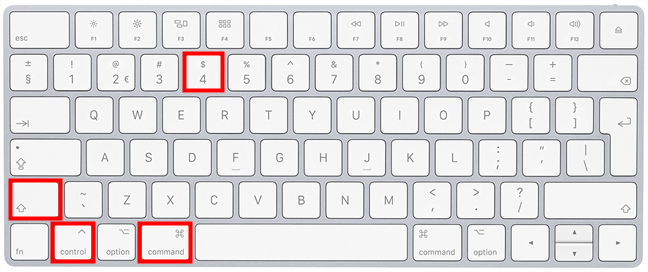

How to screen shot on a Mac, saving the highlighted area to the Clipboard Combine the instructions and hotkeys explained in this subchapter to adjust your selection. When you manage to frame the data you need perfectly, release the mouse or trackpad, and the resulting Mac *print screen* is saved to the *Clipboard*.
### Get a macOS screenshot of a highlighted window or menu
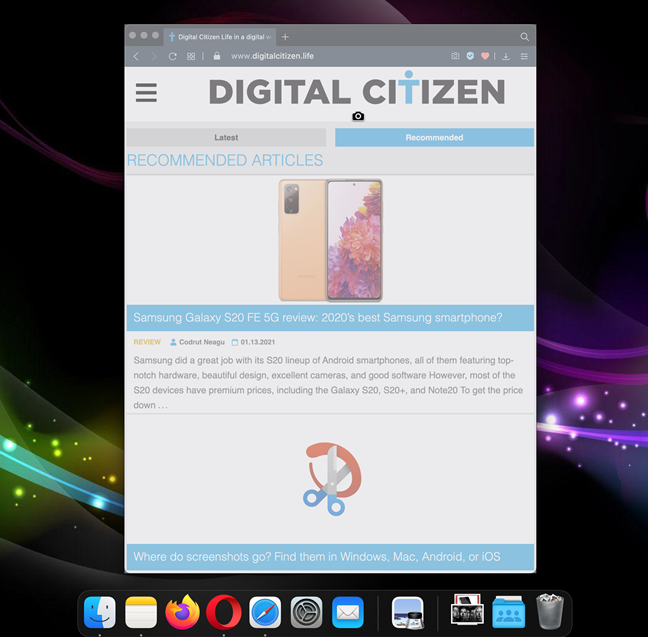
The same keyboard shortcuts illustrated in the previous subchapter apply when screenshotting a window or a menu, but the instructions that follow are a bit different. First, use the shortcut **Command (⌘) + Shift + 4** to get the crosshair pointer. Then, press the **Spacebar** key.

The screenshot Mac shortcut to capture any highlighted element Your mouse pointer now looks like a small camera. When you hover over different elements, like windows, open menus, and even the dock, they become highlighted. Clicking on any element, even if it’s not entirely visible, saves its contents right away as a macOS screenshot.

Grab a window or menu in your mac os screenshot When you use this Mac screenshot command, the resulting image includes the element’s shadow - a border around the resulting image. To screenshot on a Mac without the shadow, press and hold *Option* on your keyboard while clicking to capture a window or menu. **TIP:** If you change your mind, pressing the *Spacebar* key again returns your cursor to a crosshair, allowing you to toggle between capturing an area or an app window. Just like before, if you want your screengrab copied to the *Clipboard* instead, use: **Command (⌘) + Control + Shift + 4**, followed by **Spacebar**.

Use this shortcut and the result is copied to the Clipboard when you screenshot in Mac **TIP:** If you’re taking Mac screenshots from your favorite movies and videos, it might be easier to use our guide on [saving VLC snapshots](https://www.digitalcitizen.life/how-save-video-frames-images-vlc-media-player/).
### Capture the Touch Bar (if your MacBook has one)
The *Touch Bar* is a thin OLED touch screen fitted on the keyboard of your MacBook. Apple created a keyboard shortcut in case you want to show someone what you see on the *Touch Bar*. Simultaneously press: **Command (⌘) + Shift + 6**.
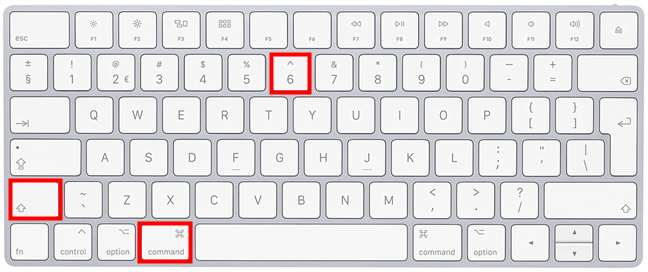

Create a Mac print screen of the Touch Bar OLED display This immediately saves a very wide and skinny image of your Touch Bar.
## How to screenshot on a Mac with the Screenshot app
The first time I came across the different macOS keyboard commands, I asked myself, *“How do I screenshot on a Mac without remembering complicated shortcuts?”*. If you also feel they are too hard to learn, don’t worry! A few years ago, Apple introduced the *Screenshot* app, creating a visual interface that makes screenshotting fun and user-friendly. However, the app is only available on macOS Mojave or newer, so [check your macOS version](https://www.digitalcitizen.life/macos-version/) to make sure you have it. The easiest way to open the *Screenshot* app on macOS is simultaneously pressing the keys: **Command (⌘) + Shift + 5**.

The Screenshot Mac shortcut launches the app This brings up a simple toolbar that includes all the options you need, including a timer and a way to change where you save a macOS screenshot. We’ve already explored in great detail [the Screenshot app and its many options to print screen on Mac](https://www.digitalcitizen.life/how-take-screenshots-your-mac-screenshot-app/) if you want to learn more about what it has to offer.

Use the Mac Screenshot app to get the image you want In addition to taking a screenshot on Mac, the app can also be used [to make a video recording of your screen](https://www.digitalcitizen.life/record-video-screen-mac/).
## How to screenshot on Mac with the Preview app
Not everyone knows this, but you can also use the *Preview* app to screenshot on Mac. This is helpful if you want to edit the macOS screenshot right away. Open your *Applications* folder by pressing the *F4* key and click on *Preview*. You can also use the search bar on top to find the app.

Take and edit Mac screenshots with Preview In the menu bar, click *File* and hover over *Take Screenshot* to reveal three options:

Preview offers three options to screenshot on Mac
- *From Selection* - lets you capture a rectangular area on your screen by clicking and dragging to create a selection. To best use this option, scroll up in this guide, and check the instructions and hotkeys detailed in the subchapter about *Screenshotting a selected portion of the screen* with keyboard shortcuts.
- *From Window* - allows you to grab an open app window. Press *Option* while clicking on the window you want to remove its shadow.
- *From Entire Screen* - sets off a timer, giving you time to access what you want to capture, and then creates a macOS image of the entire display.
When you click on an option, the *Preview* app displays instructions for it on your screen. The screenshots you take are immediately open. You can edit them and then save them in the format and location you want.
## How do you screenshot on a Mac?
Shortcuts are the reliable way to screenshot on a Mac, but the *Screenshot* app is more fun and flexible, while *Preview* lets you edit your results right away. Which one do you prefer? Whether you’re using an iMac or a MacBook Pro, let us know what works best for you when you *print screen* on Mac.
Discover: [Productivity](https://www.digitalcitizen.life/category/productivity/) [Accessibility](https://www.digitalcitizen.life/tag/accessibility/) [Apps](https://www.digitalcitizen.life/tag/apps/) [macOS](https://www.digitalcitizen.life/tag/macos/) [Recommended](https://www.digitalcitizen.life/tag/recommended-articles/) [Screenshots](https://www.digitalcitizen.life/tag/screenshots/) [Tutorials](https://www.digitalcitizen.life/tag/tutorials/)
- Subscribe to newsletter.
- [Daily](https://www.digitalcitizen.life/screenshot-mac/#nsl-tab-1)
- /
- [Weekly](https://www.digitalcitizen.life/screenshot-mac/#nsl-tab-2)
#### Thank you\!
You are subscribed to [www.digitalcitizen.life](https://www.digitalcitizen.life/).

#### Thank you\!
You are subscribed to [www.digitalcitizen.life](https://www.digitalcitizen.life/).

Join the discussion:
[See the comments](https://www.digitalcitizen.life/screenshot-mac/?show=comments)
[Comment](https://www.digitalcitizen.life/screenshot-mac/?show=comments#respond)
Subscribe: RSS Feed
Facebook
YouTube
### Related articles
### [How to use Hot Corners on a Mac: All you need to know](https://www.digitalcitizen.life/hot-corners-mac/ "How to use Hot Corners on a Mac: All you need to know")
### [The complete guide to selecting text on your Mac](https://www.digitalcitizen.life/selecting-text-mac/ "The complete guide to selecting text on your Mac")
[](https://www.digitalcitizen.life/right-click-mac/ "How to right-click on a Mac")
### [How to right-click on a Mac](https://www.digitalcitizen.life/right-click-mac/ "How to right-click on a Mac")
### [How to enable the Dark Mode Theme on your Mac](https://www.digitalcitizen.life/enable-dark-mode-theme-mac/ "How to enable the Dark Mode Theme on your Mac")
EXPAND CLOSE
[]() |
| Readable Markdown | How to screenshot on Mac is anything but obvious, as the absence of a *Print Screen* Mac button confuses most new users. However, Apple makes up for that by offering plenty of user-friendly tools to take a Mac screenshot, from several keyboard shortcuts to built-in apps. Whether you’re saving receipts or a friend’s reaction during a video call, if you’re wondering how to *print screen* on a Mac, this guide has all the answers you need. Read on to find out how to screenshot on Mac using all the available options and discover the one(s) you prefer:
**Table of contents**
## Use a Mac screenshot shortcut to grab what you want
If you want to know how to *screen grab* on a Mac (as some veteran users call it) as fast as possible, the trick is to memorize a few default keyboard shortcuts. Don’t worry; they are all quite similar and easy to learn. You can use a Mac screenshot shortcut to capture the entire display, one to grab a specific portion of the screen or window, and there’s another Mac screenshot command to save what’s on your *Touch Bar* (if you have one). With the help of a few hotkeys, you can capture exactly what you want on any macOS device, no matter how old or new. **NOTE:** Mac screenshots are automatically saved on your *Desktop*, but, as you’re about to see, some keyboard shortcuts help you copy them to the *Clipboard* instead. If you can’t find a Mac screenshot, [our guide about screenshot locations](https://www.digitalcitizen.life/where-are-screenshots-saved-locations/) provides more details.
### How to Print Screen on Mac - Capture the entire screen
As we said, there is no *Print Screen* button in macOS, but if you want to capture the entire display, you can use the Mac *print screen* shortcut: **Command (⌘) + Shift + 3**.

Hold down the highlighted keys simultaneously to Print Screen on Mac This Mac screenshot command instantly saves an image of everything on your display. If you’re using multiple screens, it creates more screenshots at the same time, one for each of the displays on macOS. You might want to copy the resulting image to your *Clipboard* instead of saving it automatically. In that case, the Mac screenshot shortcut is a little different: **Command (⌘) + Control + Shift + 3**.

How to screenshot in Mac and copy the entire screen to the Clipboard Since you can’t save more than one Mac screenshot to *Clipboard*, only your main display is captured when you’re using multiple monitors. **TIP:** If you’re wondering how to paste a screenshot on Mac into another app or document, use *Command (⌘) + V* or check our guide for more [ways to Cut, Copy, and Paste](https://www.digitalcitizen.life/cut-copy-paste-text-mac/).
### Screenshotting a selected portion of the screen
When you screenshot on Mac, you don’t always need everything on your screen. If you want a macOS screenshot showing only part of your display, use the keyboard shortcut: **Command (⌘) + Shift + 4**.

Use this screenshot shortcut on Mac to capture part of the display As soon as you press the Mac screenshot command, your pointer turns into a crosshair. Click-and-hold, then drag the cursor to create a rectangular selection around the area you want to grab. The captured image’s width and height are indicated in numbers of pixels, next to the crosshair.

Check the size of your image while screenshotting on Mac If you release the mouse button or trackpad, your macOS screenshot is saved. You can press *Esc* (Escape) on your keyboard to cancel taking it if you make the wrong selection, but then you have to start over. However, if you highlight an area and then realize you don’t have what you need, press-and-hold the *Spacebar* key without releasing the mouse or trackpad. This lets you move around the selected area. When you get it into the right position, release the *Spacebar* to continue resizing the highlighted area. While making your selection, you can also press-and-hold the *Option* key and move the crosshair. This scales the highlighted area up or down, keeping the original [aspect ratio](https://www.digitalcitizen.life/what-screen-resolution-or-aspect-ratio-what-do-720p-1080i-1080p-mean/) - much like zooming in or out. **TIP:** If you’re looking for a specific size when you screengrab on Mac using this command, you can also use the *Shift* key the same way to toggle between resizing the selection vertically or horizontally (without changing the other dimension). However, you’re better off using the *Screenshot* app, discussed in the next chapter, to get an image of a certain size. If you want the resulting image saved to your *Clipboard* instead, use the slightly different Mac screenshot shortcut: **Command (⌘) + Control + Shift + 4**.

How to screen shot on a Mac, saving the highlighted area to the Clipboard Combine the instructions and hotkeys explained in this subchapter to adjust your selection. When you manage to frame the data you need perfectly, release the mouse or trackpad, and the resulting Mac *print screen* is saved to the *Clipboard*.
### Get a macOS screenshot of a highlighted window or menu
The same keyboard shortcuts illustrated in the previous subchapter apply when screenshotting a window or a menu, but the instructions that follow are a bit different. First, use the shortcut **Command (⌘) + Shift + 4** to get the crosshair pointer. Then, press the **Spacebar** key.

The screenshot Mac shortcut to capture any highlighted element Your mouse pointer now looks like a small camera. When you hover over different elements, like windows, open menus, and even the dock, they become highlighted. Clicking on any element, even if it’s not entirely visible, saves its contents right away as a macOS screenshot.

Grab a window or menu in your mac os screenshot When you use this Mac screenshot command, the resulting image includes the element’s shadow - a border around the resulting image. To screenshot on a Mac without the shadow, press and hold *Option* on your keyboard while clicking to capture a window or menu. **TIP:** If you change your mind, pressing the *Spacebar* key again returns your cursor to a crosshair, allowing you to toggle between capturing an area or an app window. Just like before, if you want your screengrab copied to the *Clipboard* instead, use: **Command (⌘) + Control + Shift + 4**, followed by **Spacebar**.

Use this shortcut and the result is copied to the Clipboard when you screenshot in Mac **TIP:** If you’re taking Mac screenshots from your favorite movies and videos, it might be easier to use our guide on [saving VLC snapshots](https://www.digitalcitizen.life/how-save-video-frames-images-vlc-media-player/).
### Capture the Touch Bar (if your MacBook has one)
The *Touch Bar* is a thin OLED touch screen fitted on the keyboard of your MacBook. Apple created a keyboard shortcut in case you want to show someone what you see on the *Touch Bar*. Simultaneously press: **Command (⌘) + Shift + 6**.

Create a Mac print screen of the Touch Bar OLED display This immediately saves a very wide and skinny image of your Touch Bar.
## How to screenshot on a Mac with the Screenshot app
The first time I came across the different macOS keyboard commands, I asked myself, *“How do I screenshot on a Mac without remembering complicated shortcuts?”*. If you also feel they are too hard to learn, don’t worry! A few years ago, Apple introduced the *Screenshot* app, creating a visual interface that makes screenshotting fun and user-friendly. However, the app is only available on macOS Mojave or newer, so [check your macOS version](https://www.digitalcitizen.life/macos-version/) to make sure you have it. The easiest way to open the *Screenshot* app on macOS is simultaneously pressing the keys: **Command (⌘) + Shift + 5**.

The Screenshot Mac shortcut launches the app This brings up a simple toolbar that includes all the options you need, including a timer and a way to change where you save a macOS screenshot. We’ve already explored in great detail [the Screenshot app and its many options to print screen on Mac](https://www.digitalcitizen.life/how-take-screenshots-your-mac-screenshot-app/) if you want to learn more about what it has to offer.

Use the Mac Screenshot app to get the image you want In addition to taking a screenshot on Mac, the app can also be used [to make a video recording of your screen](https://www.digitalcitizen.life/record-video-screen-mac/).
## How to screenshot on Mac with the Preview app
Not everyone knows this, but you can also use the *Preview* app to screenshot on Mac. This is helpful if you want to edit the macOS screenshot right away. Open your *Applications* folder by pressing the *F4* key and click on *Preview*. You can also use the search bar on top to find the app.

Take and edit Mac screenshots with Preview In the menu bar, click *File* and hover over *Take Screenshot* to reveal three options:

Preview offers three options to screenshot on Mac
- *From Selection* - lets you capture a rectangular area on your screen by clicking and dragging to create a selection. To best use this option, scroll up in this guide, and check the instructions and hotkeys detailed in the subchapter about *Screenshotting a selected portion of the screen* with keyboard shortcuts.
- *From Window* - allows you to grab an open app window. Press *Option* while clicking on the window you want to remove its shadow.
- *From Entire Screen* - sets off a timer, giving you time to access what you want to capture, and then creates a macOS image of the entire display.
When you click on an option, the *Preview* app displays instructions for it on your screen. The screenshots you take are immediately open. You can edit them and then save them in the format and location you want.
## How do you screenshot on a Mac?
Shortcuts are the reliable way to screenshot on a Mac, but the *Screenshot* app is more fun and flexible, while *Preview* lets you edit your results right away. Which one do you prefer? Whether you’re using an iMac or a MacBook Pro, let us know what works best for you when you *print screen* on Mac. |
| Shard | 116 (laksa) |
| Root Hash | 17243520882424897116 |
| Unparsed URL | life,digitalcitizen!www,/screenshot-mac/ s443 |