ℹ️ Skipped - page is already crawled
| Filter | Status | Condition | Details |
|---|---|---|---|
| HTTP status | PASS | download_http_code = 200 | HTTP 200 |
| Age cutoff | PASS | download_stamp > now() - 6 MONTH | 0.2 months ago |
| History drop | PASS | isNull(history_drop_reason) | No drop reason |
| Spam/ban | PASS | fh_dont_index != 1 AND ml_spam_score = 0 | ml_spam_score=0 |
| Canonical | PASS | meta_canonical IS NULL OR = '' OR = src_unparsed | Not set |
| Property | Value |
|---|---|
| URL | https://www.annabregmanportraits.co.uk/project/oil-painting-hacks-and-tips/ |
| Last Crawled | 2026-04-17 10:47:38 (4 days ago) |
| First Indexed | 2021-04-07 14:22:34 (5 years ago) |
| HTTP Status Code | 200 |
| Meta Title | Oil painting hacks • Anna Bregman Portraits |
| Meta Description | Oil painting can be a messy and expensive business, so here are some tips for how to reduce waste and make your painting sessions easier |
| Meta Canonical | null |
| Boilerpipe Text | Painting
&
Drawing blog
MY FAVOURITE OIL PAINTING HACKS
Painting in oils is little messier and more time-consuming than painting with acrylics or watercolours, largely because you cannot clean or thin oil paint with water. Both the paints and the mediums you use to clean and dilute them with are on the expensive side and it’s easy to waste them. Despite this oil painting is well worth the effort, so here are my favourite tricks
to make the experience easier, cleaner and more economical. There are no paid links on this page, just my personal recommendations for some helpful products.
1. Arrange paints on your palette according to their colour
It may sound a little obsessive-compulsive but putting out my paint colours this way has saved me so much time wasted searching for the colour I want! I arrange similar hues together according to the colour spectrum: reds together, greens, blues and so on. Even if you use a very limited number of paints, arranging them in the same order each time will really help you to locate the colour you want quickly. I’ll put white in the middle because I so frequently use a little of it in each colour mix that I make. I’ll also leave some space in the centre of the palette for making up those mixtures.
2. Don’t squeeze too much paint out onto your palette before starting your painting
This one may seem obvious, but I still find that it’s incredibly easy to squeeze out too much paint and end up wasting it. Remember that strong colours with a high tinting strength like many reds and blues – particularly those made from the modern synthetic
pthalo
and
quinacridone
pigments – go an awful long way when used mixed with other colours. I tend to find that these are the ones I waste the most because I end up needing much less than I put out. Squeeze out a really small blob of paint at first, and add more as and when you need to.
3. Before you wash your brushes, remember to wipe them
You’ll find that using ‘artists’ white spirit or other solvents to dilute your paint or rinse your brushes in between colours can get expensive. Each time you dip your brush into the jar your spirits will get more and more saturated with particles of paint pigment until they’re too muddy to be usable. It might be tempting to economise by using regular white spirit from a DIY store and keep throwing it away, but please don’t do this as cheap spirits will contain impurities that will damage your paint layers.
You can keep your spirits clearer for much longer if you remember to get as much paint off your brushes as you can before immersing them. First use a palette knife to gently scrape off as much excess paint as you can, and then wipe each brush on an old rag or piece of kitchen paper. You’ll be surprised how much difference this will make.
4. Use coffee filter paper to strain and re-use your spirits
This is a way to make your spirits last much longer and avoid environmentally unfriendly wastage. When you finish your painting for the day keep your jar of spirits (or whatever kind of solvents you use to dilute your paint) instead of throwing it away. When you return you’ll see that the paint sediment has sunk to the bottom, leaving the liquid on top. It may be a little yellowy, but it will be perfectly good for diluting any colour that isn’t very pale, or for rinsing brushes or cleaning your palette with. Tipping the jar gently so that the sediment stays largely on the bottom pour the spirits into a jug or jar, straining them through a coffee filter or piece of kitchen paper rolled into a funnel shape. You should end up with quite clear and reusable spirits.
5. Use specialist soaps to clean your brushes and your hands
It took me a while to realise that you don’t need to use harsh white spirits to clean your hands or your brushes after you’ve been oil painting. It isn’t good for either of them, and leaves you smelling unpleasantly of spirits for the rest of the day! There are some great products such as General Pencils’ famous
‘The Master’s Soap’
(for your hands) or
‘The Master’s Brush Cleaner’
which will do the job much more gently. Their formulas are considered proprietary information but they are definitely vegetable-oil based and non-toxic. To use them you wipe your brushes and then dip them in the paste and lather them up well with water, before rinsing them off.
Other oil based cleaning products for both brushes and hands include
Jacksons’
‘Marseille Soap Pellets’
and
Da Vinci
and
Escoda’s
specialist artists’ soaps. For cleaning brushes a popular product is
Weber’s
‘Turpenoid’
turpentine substitute which is low odor and non toxic.
6. Dry and reshape your brushes after cleaning them
Good paintbrushes aren’t cheap and you need to look after them properly! A specialist product such
The Master’s Brush Cleaner
or something similar will be less harsh than washing them with spirits. Be sure to dry them well afterwards, particularly natural hog brushes which an actually get mildew if put away damp. Dry them gently with a paper towel and as you do so shape them gently to a point, which will help the brush maintain its ‘spring’ the next time you use it.
7. Restore your old brushes
When you clean your brushes it can be difficult to get all of the paint out of the ‘heal’ of the brush, which is the part where the bristles are clamped to the handle by the metal ferrule. However if you’ve let too much paint dry on your brushes, it’s perfectly possible to restore them back to health.
The Master’s Brush Cleaner
works as a restorer as well as a cleanser. For this you work up a lather with some hot water and let the brush sit for a while resting on its side, before rinsing it off. Repeat as many times as necessary until the dried on paint is gone. To get paint off the ferrule (the metal part of the brush) leave it for several hours before rinsing.
Another good product for removing dried paint is
Winsor & Newton’s Brush Cleaner
which is also water-soluble. You soak your brush in it overnight before rinsing it with water. Make sure you don’t leave the brush upside down in a jar and touching the bottom, as the bristles will bend permanently out of shape! I like to clip my brush with pegs to keep the bristles safely suspended in the solution.
8. Clingfilm (plastic wrap) any colours you want to keep on your palette in between painting sessions
Oil paint dries when the oil that is added to bind the pigment together starts to oxidise. Therefore if you cover your painting palette when you’ve finished a painting session to limit further exposure to the air, you can keep most of your squeezed-out paint workable until the next day. Once you’ve scraped off any mixed-up colours that you don’t need any more, lay a piece of Clingfilm (plastic wrap) over your palette and gently press out any air bubbles. If you want to be more environmentally friendly you could use baking parchment instead, although this won’t create an airtight seal around the paint quite so effectively.
Paint that you’ve mixed together won’t last as long as paint that’s straight out of the tube, because more air has already been introduced to it. Very small amounts of paint or paint mixed with a lot of spirits or drying oils will still dry out even if you cover them with film. But larger amounts of fairly undiluted paint will stay useable for ages using this method.
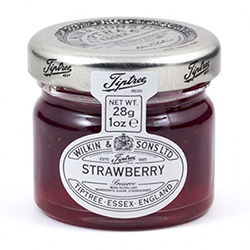
9. When you’ve mixed up a large amount of a paint colour and want to keep the leftovers overnight or longer, store the mixture in a miniature jam jar with water on top
Sometimes I mix up a reasonably large batch of one particular colour for something like a background. If I haven’t finished using the mixture by the end of a painting session I want to keep it, instead of trying to make up a new mix to match the next day.
There is a way of keeping a large paint mixture viable for weeks by storing it in a miniature jar – the kind of thing you get given in a hotel or on a plane. Scrape your leftover paint into the jar and then put a thin layer of water over the top. As oil paint is not soluble in water at all the water won’t mix with the paint but will form a complete barrier that stops any more exposure to the air and therefore oxidisation. When you are ready to use the paint again, just open the lid and tip the water off.
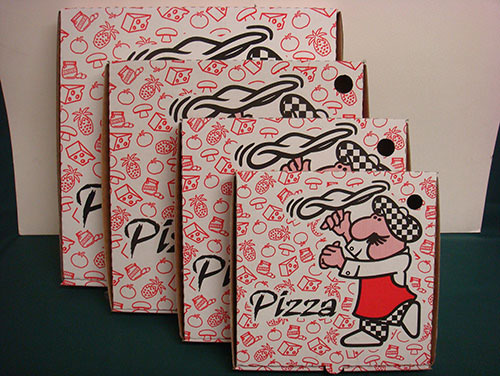
10. Keep dust off your painting using pizza boxes
One annoying problem I’ve experienced with painting in oils is that dust tends to settle on a painting that’s left out to dry overnight and sticks to the paint. Even a painting that’s almost vertical on an easel will usually attract a bit of dust. I try to keep the studio dusted and vacuumed as much as possible to reduce the dust floating around in the air.
However to keep a painting totally free of dust you need to cover it whilst it dries, in a sturdy flat box. Ask your local pizza takeaway if they’ll sell you a few (unused) boxes. A deep-pan box should be perfect for even a chunky canvas! |
| Markdown | - [Pencil drawings](https://www.annabregmanportraits.co.uk/pencil-portraits/)
- [Watercolours](https://www.annabregmanportraits.co.uk/watercolour-portraits/)
- [Oils](https://www.annabregmanportraits.co.uk/oil-portraits/)
- [Pet portraits](https://www.annabregmanportraits.co.uk/pet-portraits/)
- [Film & TV props](https://www.annabregmanportraits.co.uk/film/)
[](https://www.annabregmanportraits.co.uk/)
- [HOME](https://www.annabregmanportraits.co.uk/)
- [INFORMATION](https://www.annabregmanportraits.co.uk/commissioning-info/)
- [Commissioning a portrait](https://www.annabregmanportraits.co.uk/commissioning-info/)
- [Choosing the size & pose](https://www.annabregmanportraits.co.uk/size-and-pose/)
- [Photo reference](https://www.annabregmanportraits.co.uk/photos/)
- [REVIEWS](https://www.annabregmanportraits.co.uk/feedback/)
- [PRICES](https://www.annabregmanportraits.co.uk/prices/)
- [CONTACT](https://www.annabregmanportraits.co.uk/contact/)
- [ABOUT](https://www.annabregmanportraits.co.uk/about/)
Select Page
Painting *&* Drawing blog
# MY FAVOURITE OIL PAINTING HACKS
**Painting in oils is little messier and more time-consuming than painting with acrylics or watercolours, largely because you cannot clean or thin oil paint with water. Both the paints and the mediums you use to clean and dilute them with are on the expensive side and it’s easy to waste them. Despite this oil painting is well worth the effort, so here are my favourite tricks** **to make the experience easier, cleaner and more economical. There are no paid links on this page, just my personal recommendations for some helpful products.**
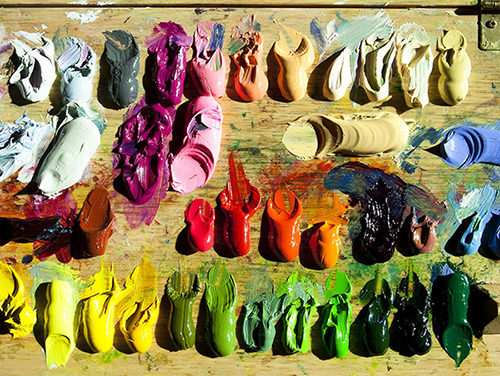
## 1\. Arrange paints on your palette according to their colour
It may sound a little obsessive-compulsive but putting out my paint colours this way has saved me so much time wasted searching for the colour I want! I arrange similar hues together according to the colour spectrum: reds together, greens, blues and so on. Even if you use a very limited number of paints, arranging them in the same order each time will really help you to locate the colour you want quickly. I’ll put white in the middle because I so frequently use a little of it in each colour mix that I make. I’ll also leave some space in the centre of the palette for making up those mixtures.
## 2\. Don’t squeeze too much paint out onto your palette before starting your painting
This one may seem obvious, but I still find that it’s incredibly easy to squeeze out too much paint and end up wasting it. Remember that strong colours with a high tinting strength like many reds and blues – particularly those made from the modern synthetic *pthalo* and *quinacridone* pigments – go an awful long way when used mixed with other colours. I tend to find that these are the ones I waste the most because I end up needing much less than I put out. Squeeze out a really small blob of paint at first, and add more as and when you need to.
## 3\. Before you wash your brushes, remember to wipe them
You’ll find that using ‘artists’ white spirit or other solvents to dilute your paint or rinse your brushes in between colours can get expensive. Each time you dip your brush into the jar your spirits will get more and more saturated with particles of paint pigment until they’re too muddy to be usable. It might be tempting to economise by using regular white spirit from a DIY store and keep throwing it away, but please don’t do this as cheap spirits will contain impurities that will damage your paint layers.
You can keep your spirits clearer for much longer if you remember to get as much paint off your brushes as you can before immersing them. First use a palette knife to gently scrape off as much excess paint as you can, and then wipe each brush on an old rag or piece of kitchen paper. You’ll be surprised how much difference this will make.
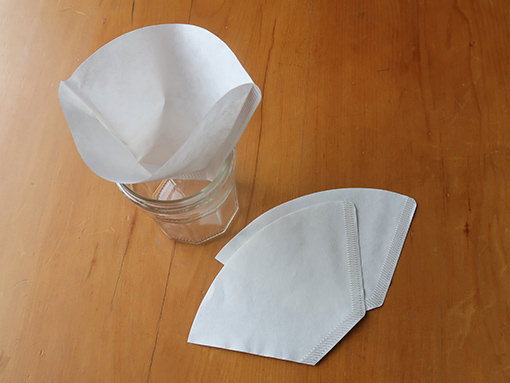
## 4\. Use coffee filter paper to strain and re-use your spirits
This is a way to make your spirits last much longer and avoid environmentally unfriendly wastage. When you finish your painting for the day keep your jar of spirits (or whatever kind of solvents you use to dilute your paint) instead of throwing it away. When you return you’ll see that the paint sediment has sunk to the bottom, leaving the liquid on top. It may be a little yellowy, but it will be perfectly good for diluting any colour that isn’t very pale, or for rinsing brushes or cleaning your palette with. Tipping the jar gently so that the sediment stays largely on the bottom pour the spirits into a jug or jar, straining them through a coffee filter or piece of kitchen paper rolled into a funnel shape. You should end up with quite clear and reusable spirits.
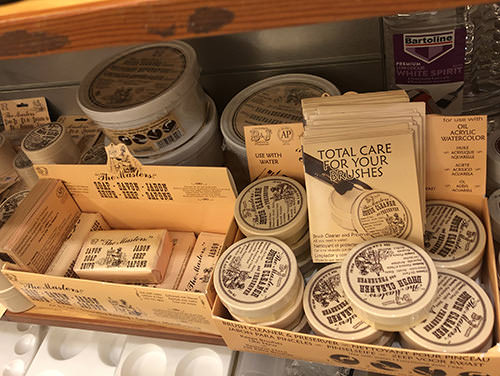
## 5\. Use specialist soaps to clean your brushes and your hands
It took me a while to realise that you don’t need to use harsh white spirits to clean your hands or your brushes after you’ve been oil painting. It isn’t good for either of them, and leaves you smelling unpleasantly of spirits for the rest of the day! There are some great products such as General Pencils’ famous **‘The Master’s Soap’** (for your hands) or **‘The Master’s Brush Cleaner’** which will do the job much more gently. Their formulas are considered proprietary information but they are definitely vegetable-oil based and non-toxic. To use them you wipe your brushes and then dip them in the paste and lather them up well with water, before rinsing them off.
Other oil based cleaning products for both brushes and hands include *Jacksons’* **‘Marseille Soap Pellets’** and *Da Vinci* and *Escoda’s* specialist artists’ soaps. For cleaning brushes a popular product is *Weber’s* **‘Turpenoid’** turpentine substitute which is low odor and non toxic.
## 6\. Dry and reshape your brushes after cleaning them
Good paintbrushes aren’t cheap and you need to look after them properly! A specialist product such **The Master’s Brush Cleaner** or something similar will be less harsh than washing them with spirits. Be sure to dry them well afterwards, particularly natural hog brushes which an actually get mildew if put away damp. Dry them gently with a paper towel and as you do so shape them gently to a point, which will help the brush maintain its ‘spring’ the next time you use it.
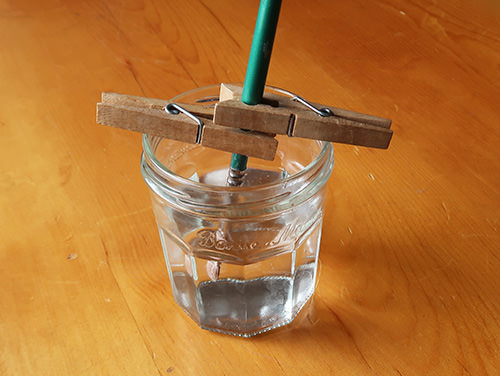
## 7\. Restore your old brushes
When you clean your brushes it can be difficult to get all of the paint out of the ‘heal’ of the brush, which is the part where the bristles are clamped to the handle by the metal ferrule. However if you’ve let too much paint dry on your brushes, it’s perfectly possible to restore them back to health. **The Master’s Brush Cleaner** works as a restorer as well as a cleanser. For this you work up a lather with some hot water and let the brush sit for a while resting on its side, before rinsing it off. Repeat as many times as necessary until the dried on paint is gone. To get paint off the ferrule (the metal part of the brush) leave it for several hours before rinsing.
Another good product for removing dried paint is **Winsor & Newton’s Brush Cleaner** which is also water-soluble. You soak your brush in it overnight before rinsing it with water. Make sure you don’t leave the brush upside down in a jar and touching the bottom, as the bristles will bend permanently out of shape! I like to clip my brush with pegs to keep the bristles safely suspended in the solution.
## 8\. Clingfilm (plastic wrap) any colours you want to keep on your palette in between painting sessions
Oil paint dries when the oil that is added to bind the pigment together starts to oxidise. Therefore if you cover your painting palette when you’ve finished a painting session to limit further exposure to the air, you can keep most of your squeezed-out paint workable until the next day. Once you’ve scraped off any mixed-up colours that you don’t need any more, lay a piece of Clingfilm (plastic wrap) over your palette and gently press out any air bubbles. If you want to be more environmentally friendly you could use baking parchment instead, although this won’t create an airtight seal around the paint quite so effectively.
Paint that you’ve mixed together won’t last as long as paint that’s straight out of the tube, because more air has already been introduced to it. Very small amounts of paint or paint mixed with a lot of spirits or drying oils will still dry out even if you cover them with film. But larger amounts of fairly undiluted paint will stay useable for ages using this method.

## 9\. When you’ve mixed up a large amount of a paint colour and want to keep the leftovers overnight or longer, store the mixture in a miniature jam jar with water on top
Sometimes I mix up a reasonably large batch of one particular colour for something like a background. If I haven’t finished using the mixture by the end of a painting session I want to keep it, instead of trying to make up a new mix to match the next day.
There is a way of keeping a large paint mixture viable for weeks by storing it in a miniature jar – the kind of thing you get given in a hotel or on a plane. Scrape your leftover paint into the jar and then put a thin layer of water over the top. As oil paint is not soluble in water at all the water won’t mix with the paint but will form a complete barrier that stops any more exposure to the air and therefore oxidisation. When you are ready to use the paint again, just open the lid and tip the water off.
## 10\. Keep dust off your painting using pizza boxes
One annoying problem I’ve experienced with painting in oils is that dust tends to settle on a painting that’s left out to dry overnight and sticks to the paint. Even a painting that’s almost vertical on an easel will usually attract a bit of dust. I try to keep the studio dusted and vacuumed as much as possible to reduce the dust floating around in the air.
However to keep a painting totally free of dust you need to cover it whilst it dries, in a sturdy flat box. Ask your local pizza takeaway if they’ll sell you a few (unused) boxes. A deep-pan box should be perfect for even a chunky canvas\!
NEXT: Try this post on [oil painting techniques](https://www.annabregmanportraits.co.uk/project/oil-painting-tips-techniques/)
[‹ back to article index](https://www.annabregmanportraits.co.uk/archives)
© Article rights reserved. [Oil portrait artist UK](https://www.annabregmanportraits.co.uk/)
## CATEGORIES
DRAWING PEOPLE
DRAWING ANIMALS
DRAWING MATERIALS
OIL PAINTING
WATERCOLOUR
PAINTING MATERIALS
FRAMING
- [Follow](https://www.annabregmanportraits.co.uk/project/oil-painting-hacks-and-tips/ "Follow on Pinterest")
- [Follow](https://www.annabregmanportraits.co.uk/project/oil-painting-hacks-and-tips/ "Follow on Instagram")
[](https://www.annabregmanportraits.co.uk/)
#### [HOME](https://www.annabregmanportraits.co.uk/)
- [Terms & conditions](https://www.annabregmanportraits.co.uk/terms-and-conditions/)
- [Privacy policy](https://www.annabregmanportraits.co.uk/privacy-policy/)
- [Follow](https://www.pinterest.co.uk/annasportraits/ "Follow on Pinterest")
- [Follow](https://www.annabregmanportraits.co.uk/project/oil-painting-hacks-and-tips/ "Follow on Instagram")
Copyright © Anna Bregman 2008-2021
We use cookies to offer you a better browsing experience and to analyse site traffic. Read about cookies and how you can control them by clicking on ‘Settings’ or click ‘Accept’ to consent to all cookies.
[Cookie settings]()[ACCEPT]()
Manage consent
Close
#### Privacy Overview
This website uses cookies to improve your experience while you navigate through the website. Out of these, the cookies that are categorized as necessary are stored on your browser as they are essential for the working of basic functionalities of the website. We also use third-party cookies that help us analyze and understand how you use this website. These cookies will be stored in your browser only with your consent. You also have the option to opt-out of these cookies. But opting out of some of these cookies may affect your browsing experience.
[Necessary]()
Necessary
Always Enabled
Necessary cookies are absolutely essential for the website to function properly. These cookies ensure basic functionalities and security features of the website, anonymously.
| Cookie | Duration | Description |
|---|---|---|
| cookielawinfo-checbox-analytics | 11 months | This cookie is set by GDPR Cookie Consent plugin. The cookie is used to store the user consent for the cookies in the category "Analytics". |
| cookielawinfo-checbox-functional | 11 months | The cookie is set by GDPR cookie consent to record the user consent for the cookies in the category "Functional". |
| cookielawinfo-checbox-others | 11 months | This cookie is set by GDPR Cookie Consent plugin. The cookie is used to store the user consent for the cookies in the category "Other. |
| cookielawinfo-checkbox-necessary | 11 months | This cookie is set by GDPR Cookie Consent plugin. The cookies is used to store the user consent for the cookies in the category "Necessary". |
| cookielawinfo-checkbox-performance | 11 months | This cookie is set by GDPR Cookie Consent plugin. The cookie is used to store the user consent for the cookies in the category "Performance". |
| viewed\_cookie\_policy | 11 months | The cookie is set by the GDPR Cookie Consent plugin and is used to store whether or not user has consented to the use of cookies. It does not store any personal data. |
[Functional]()
Functional
Functional cookies help to perform certain functionalities like sharing the content of the website on social media platforms, collect feedbacks, and other third-party features.
[Performance]()
Performance
Performance cookies are used to understand and analyze the key performance indexes of the website which helps in delivering a better user experience for the visitors.
[Analytics]()
Analytics
Analytical cookies are used to understand how visitors interact with the website. These cookies help provide information on metrics the number of visitors, bounce rate, traffic source, etc.
[Others]()
Others
Other uncategorized cookies are those that are being analyzed and have not been classified into a category as yet.
[SAVE & ACCEPT]()
Powered by [](https://www.cookieyes.com/)
### Pin It on Pinterest
### Share This
Share this article\! |
| Readable Markdown | Painting *&* Drawing blog
MY FAVOURITE OIL PAINTING HACKS
**Painting in oils is little messier and more time-consuming than painting with acrylics or watercolours, largely because you cannot clean or thin oil paint with water. Both the paints and the mediums you use to clean and dilute them with are on the expensive side and it’s easy to waste them. Despite this oil painting is well worth the effort, so here are my favourite tricks** **to make the experience easier, cleaner and more economical. There are no paid links on this page, just my personal recommendations for some helpful products.**
1\. Arrange paints on your palette according to their colour
It may sound a little obsessive-compulsive but putting out my paint colours this way has saved me so much time wasted searching for the colour I want! I arrange similar hues together according to the colour spectrum: reds together, greens, blues and so on. Even if you use a very limited number of paints, arranging them in the same order each time will really help you to locate the colour you want quickly. I’ll put white in the middle because I so frequently use a little of it in each colour mix that I make. I’ll also leave some space in the centre of the palette for making up those mixtures.

2\. Don’t squeeze too much paint out onto your palette before starting your painting
This one may seem obvious, but I still find that it’s incredibly easy to squeeze out too much paint and end up wasting it. Remember that strong colours with a high tinting strength like many reds and blues – particularly those made from the modern synthetic *pthalo* and *quinacridone* pigments – go an awful long way when used mixed with other colours. I tend to find that these are the ones I waste the most because I end up needing much less than I put out. Squeeze out a really small blob of paint at first, and add more as and when you need to.
3\. Before you wash your brushes, remember to wipe them
You’ll find that using ‘artists’ white spirit or other solvents to dilute your paint or rinse your brushes in between colours can get expensive. Each time you dip your brush into the jar your spirits will get more and more saturated with particles of paint pigment until they’re too muddy to be usable. It might be tempting to economise by using regular white spirit from a DIY store and keep throwing it away, but please don’t do this as cheap spirits will contain impurities that will damage your paint layers.
You can keep your spirits clearer for much longer if you remember to get as much paint off your brushes as you can before immersing them. First use a palette knife to gently scrape off as much excess paint as you can, and then wipe each brush on an old rag or piece of kitchen paper. You’ll be surprised how much difference this will make.
4\. Use coffee filter paper to strain and re-use your spirits
This is a way to make your spirits last much longer and avoid environmentally unfriendly wastage. When you finish your painting for the day keep your jar of spirits (or whatever kind of solvents you use to dilute your paint) instead of throwing it away. When you return you’ll see that the paint sediment has sunk to the bottom, leaving the liquid on top. It may be a little yellowy, but it will be perfectly good for diluting any colour that isn’t very pale, or for rinsing brushes or cleaning your palette with. Tipping the jar gently so that the sediment stays largely on the bottom pour the spirits into a jug or jar, straining them through a coffee filter or piece of kitchen paper rolled into a funnel shape. You should end up with quite clear and reusable spirits.

5\. Use specialist soaps to clean your brushes and your hands
It took me a while to realise that you don’t need to use harsh white spirits to clean your hands or your brushes after you’ve been oil painting. It isn’t good for either of them, and leaves you smelling unpleasantly of spirits for the rest of the day! There are some great products such as General Pencils’ famous **‘The Master’s Soap’** (for your hands) or **‘The Master’s Brush Cleaner’** which will do the job much more gently. Their formulas are considered proprietary information but they are definitely vegetable-oil based and non-toxic. To use them you wipe your brushes and then dip them in the paste and lather them up well with water, before rinsing them off.
Other oil based cleaning products for both brushes and hands include *Jacksons’* **‘Marseille Soap Pellets’** and *Da Vinci* and *Escoda’s* specialist artists’ soaps. For cleaning brushes a popular product is *Weber’s* **‘Turpenoid’** turpentine substitute which is low odor and non toxic.

6\. Dry and reshape your brushes after cleaning them
Good paintbrushes aren’t cheap and you need to look after them properly! A specialist product such **The Master’s Brush Cleaner** or something similar will be less harsh than washing them with spirits. Be sure to dry them well afterwards, particularly natural hog brushes which an actually get mildew if put away damp. Dry them gently with a paper towel and as you do so shape them gently to a point, which will help the brush maintain its ‘spring’ the next time you use it.
7\. Restore your old brushes
When you clean your brushes it can be difficult to get all of the paint out of the ‘heal’ of the brush, which is the part where the bristles are clamped to the handle by the metal ferrule. However if you’ve let too much paint dry on your brushes, it’s perfectly possible to restore them back to health. **The Master’s Brush Cleaner** works as a restorer as well as a cleanser. For this you work up a lather with some hot water and let the brush sit for a while resting on its side, before rinsing it off. Repeat as many times as necessary until the dried on paint is gone. To get paint off the ferrule (the metal part of the brush) leave it for several hours before rinsing.
Another good product for removing dried paint is **Winsor & Newton’s Brush Cleaner** which is also water-soluble. You soak your brush in it overnight before rinsing it with water. Make sure you don’t leave the brush upside down in a jar and touching the bottom, as the bristles will bend permanently out of shape! I like to clip my brush with pegs to keep the bristles safely suspended in the solution.

8\. Clingfilm (plastic wrap) any colours you want to keep on your palette in between painting sessions
Oil paint dries when the oil that is added to bind the pigment together starts to oxidise. Therefore if you cover your painting palette when you’ve finished a painting session to limit further exposure to the air, you can keep most of your squeezed-out paint workable until the next day. Once you’ve scraped off any mixed-up colours that you don’t need any more, lay a piece of Clingfilm (plastic wrap) over your palette and gently press out any air bubbles. If you want to be more environmentally friendly you could use baking parchment instead, although this won’t create an airtight seal around the paint quite so effectively.
Paint that you’ve mixed together won’t last as long as paint that’s straight out of the tube, because more air has already been introduced to it. Very small amounts of paint or paint mixed with a lot of spirits or drying oils will still dry out even if you cover them with film. But larger amounts of fairly undiluted paint will stay useable for ages using this method.

9\. When you’ve mixed up a large amount of a paint colour and want to keep the leftovers overnight or longer, store the mixture in a miniature jam jar with water on top
Sometimes I mix up a reasonably large batch of one particular colour for something like a background. If I haven’t finished using the mixture by the end of a painting session I want to keep it, instead of trying to make up a new mix to match the next day.
There is a way of keeping a large paint mixture viable for weeks by storing it in a miniature jar – the kind of thing you get given in a hotel or on a plane. Scrape your leftover paint into the jar and then put a thin layer of water over the top. As oil paint is not soluble in water at all the water won’t mix with the paint but will form a complete barrier that stops any more exposure to the air and therefore oxidisation. When you are ready to use the paint again, just open the lid and tip the water off.

10\. Keep dust off your painting using pizza boxes
One annoying problem I’ve experienced with painting in oils is that dust tends to settle on a painting that’s left out to dry overnight and sticks to the paint. Even a painting that’s almost vertical on an easel will usually attract a bit of dust. I try to keep the studio dusted and vacuumed as much as possible to reduce the dust floating around in the air.
However to keep a painting totally free of dust you need to cover it whilst it dries, in a sturdy flat box. Ask your local pizza takeaway if they’ll sell you a few (unused) boxes. A deep-pan box should be perfect for even a chunky canvas\!
 |
| Shard | 184 (laksa) |
| Root Hash | 3239963851162578184 |
| Unparsed URL | uk,co,annabregmanportraits!www,/project/oil-painting-hacks-and-tips/ s443 |