ℹ️ Skipped - page is already crawled
| Filter | Status | Condition | Details |
|---|---|---|---|
| HTTP status | PASS | download_http_code = 200 | HTTP 200 |
| Age cutoff | PASS | download_stamp > now() - 6 MONTH | 0.1 months ago |
| History drop | PASS | isNull(history_drop_reason) | No drop reason |
| Spam/ban | PASS | fh_dont_index != 1 AND ml_spam_score = 0 | ml_spam_score=0 |
| Canonical | PASS | meta_canonical IS NULL OR = '' OR = src_unparsed | Not set |
| Property | Value |
|---|---|
| URL | https://macbookjournal.com/how-to-take-a-screenshot-on-your-mac/ |
| Last Crawled | 2026-04-04 08:56:31 (3 days ago) |
| First Indexed | 2024-08-03 22:51:38 (1 year ago) |
| HTTP Status Code | 200 |
| Meta Title | How to Take a Screenshot on Your Mac: 4 Best Ways |
| Meta Description | From capturing the entire screen to selecting specific areas, learn the best ways to take a screenshot on your Mac with this comprehensive guide. |
| Meta Canonical | null |
| Boilerpipe Text | TL;DR
To take a screenshot on your Mac:
Capture Full Screen:
Press
Command (⌘) + Shift (⇧) + 3
to capture the entire screen.
Capture a Portion of the Screen:
Press
Command (⌘) + Shift (⇧) + 4
to turn your cursor into a crosshair. Drag to select the area you want to capture.
Tried and Tested
✅: The methods and steps mentioned in this article have been tried and tested firsthand by Ojash Yadav on his MacBook Pro M3 and rechecked for errors on Hashir’s MacBook Air M2.
Screenshots are a handy tool, but figuring out the best way to take them on a Mac can be tricky. I’ve found a few easy methods that work well, and I’m here to share them with you. Let’s get started!
Why You Can Trust MacBook Journal
We always conduct first-hand research and verify every method or solution we present, ensuring you receive reliable and effective advice.
Learn more about our process
.
Check out these handy methods for capturing screenshots on your Mac:
1. Take a Screenshot With Keyboard Shortcuts
Here, I’ve shared some common keyboard shortcuts to take a screenshot on your Mac.
a. Capture Full Screen on Your Mac
To capture the full screen on your Mac, press the following keys simultaneously:
Command ⌘ + Shift ⇧ + 3
This shortcut captures a screenshot of the entire screen. You should hear a camera shutter sound, and the screenshot will save as a
.png
file on your desktop.
You can change the default file format for screenshots from
.png
to
.jpg
,
.pdf
, or other formats using a terminal command. Just type
defaults write com.apple.screencapture type jpg
in the Terminal app.
b. Capture a Portion of the Screen on Your Mac
If you want to take a screenshot on your Mac but only for a portion, you can use the following key combo:
Command ⌘ + Shift ⇧ + 4
There are different variations in taking this type of screenshot. For instance:
Press and release the space bar:
After using
Command ⌘ + Shift ⇧ + 4
, press the space bar to turn the crosshair into a camera icon. Move it over any window and click to capture with a white border and drop shadow.
Press and hold the space bar:
After selecting an area, hold the space bar to lock its shape and size, allowing you to reposition it before capturing.
Hold down the Shift ⇧ key:
While selecting an area, hold
Shift ⇧
to lock all sides except the bottom edge, letting you adjust it. Release
Shift
, press it again to adjust the right edge, and capture.
c. Screenshot the Touch Bar
To take a screenshot of the
Touch Bar on a Mac
, you can use the built-in screenshot functionalities provided by macOS. Press the following keyboard combination:
Command ⌘ + Shift ⇧ + 6
This command specifically captures the Touch Bar region.
These options only appear on the OLED strip if you have a MacBook with a Touch Bar.
2. Take a Screenshot With the Screen Capture Panel
Here’s how to take a screenshot on your Mac using the Screen Capture Panel:
Press
Shift
⇧
+ Command
⌘
+ 5
to open the Screenshot Toolbar or Screen Capture Panel.
Choose whether you want to capture the entire screen, a selected window, or a specific portion of the screen. Click the relevant
option.
If you selected a portion of the screen or a specific window, drag your mouse to select the area you want to capture.
Click the
camera
icon to take the screenshot.
You can also customize your screenshot settings on your Mac to meet your specific needs. Here’s how to do it:
To access the Screenshot app on your Mac, press
Shift ⇧ + Command ⌘ + 5
or search for it in the Launchpad or Applications folder.
In the Screenshot app, click
Options
in the toolbar.
Select where you want your screenshots saved by clicking your desired option under
Save to
. You can choose from options like
Desktop
,
Documents
, or
Clipboard
.
You can also set a timer for the screenshot to capture after a specific time under
Timer
and choose a time interval.
Other options include
Show Floating Thumbnail
,
Remember Last Selection
, and
Show Mouse Pointer
.
3. Capture the Screen With the Mac Screenshot App
To take a screenshot on your Mac using Preview, follow these steps:
Open
Preview
on your Mac.
Click
File
in the menu bar and select Take
Screenshot
.
Choose to capture the entire screen, a selected portion, or a window.
If you choose to capture a window, click the window you want to capture.
The screenshot will open in Preview, where you can edit, annotate, and save it.
4. Capture the Screenshot With Third-Party Apps
Here are a few popular third-party apps you can use to capture the screen on your Mac:
Be cautious when using third-party screenshot apps. Some may require extensive permissions, which could pose a security risk if not from a trusted source. Always download from reputable sites or the App Store.
Snagit
: Snagit is a powerful screen capture and image editing tool that offers a wide range of features. It allows you to capture screenshots, record videos, and annotate images. Snagit also provides options for timed captures, scrolling captures, and capturing specific areas of the screen.
CleanShot X
: CleanShot X is a comprehensive screen capture and recording tool with various advanced features. It lets you capture screenshots of selected areas, windows, or the entire screen. CleanShot X offers a clutter-free and intuitive interface, making it easy to use.
Lightshot
: Lightshot is a lightweight screen capture tool that allows you to capture selected areas of your screen or the entire screen. It offers a simple editing interface where you can add annotations, highlight specific areas, or blur out sensitive information. Lightshot also provides instant sharing options.
Snip
: Snip is a free and open-source screen capture tool that offers a range of capture modes, including full-screen, window, and custom region capture. It also allows you to record screen activity and provides basic editing features like adding text, arrows, and shapes to your screenshots.
Capture Screenshots on Your Mac Successfully
Now that you know how to take a screenshot on your Mac easily, your system must be efficient and storage organized. Here are some tips to make your Mac experience better:
Customize your
Mac’s screenshot shortcuts
for easier use.
Organize your files on Mac
so you don’t have to struggle to find them.
You can also record the entire screen on your Mac, check out
my guide
to do it.
Frequently Asked Questions
Yes, you can take screenshots of a specific menu on your Mac. You can use the
Command ⌘ + Shift ⇧ + 4
shortcut to take a screenshot of a specific menu on your Mac, capture an image of a drop-down menu, contextual menu, or any other type of menu.
How can I take a screenshot of a webpage that extends beyond the screen?
You can take a screenshot of a webpage that extends beyond the screen using the
Command ⌘ + Shift ⇧ + 3
shortcut, then open the screenshot in Preview and select
File > Export as PDF
. It will save the entire webpage as a PDF file.
Where are the screenshots saved on a Mac after capturing?
After capturing a screenshot on a Mac, the default save location is the desktop. However, you can also find them in the
Screenshots
folder within your
Pictures
directory. Additionally, you can change the save location using the
Options
menu that appears when taking a screenshot. |
| Markdown | [MacBook Journal](https://macbookjournal.com/)
- [About Us](https://macbookjournal.com/about-us/)
- [Contact Us](https://macbookjournal.com/contact/)
- [Editorial Process](https://macbookjournal.com/editorial-process/)
- [Why Trust Us?](https://macbookjournal.com/why-trust-us/)
- [Affiliate Linking Policy](https://macbookjournal.com/affiliate-linking-policy/)
- [Privacy Policy](https://macbookjournal.com/privacy-policy/)
- [Terms of Service](https://macbookjournal.com/terms-of-service/)
- [Disclaimer](https://macbookjournal.com/disclaimer/)
##### Weekly Must-Reads[View All](https://macbookjournal.com/how-to-take-a-screenshot-on-your-mac/)
[How to Scan for Virus on Mac \[4 Effective Methods\] Secure your Mac: Quick and simple virus protection](https://macbookjournal.com/how-to-run-a-virus-scan-on-mac/)
5 minute read
[How to Check for Malware on Your Mac: 6 macOS Built-in Tools Spot and remove Mac malware](https://macbookjournal.com/how-to-check-for-malware-on-your-mac/)
10 minute read
[How to Find Saved Passwords on Your Mac: 3 Best Ways Easily find and manage your Mac's saved passwords](https://macbookjournal.com/how-to-find-saved-passwords-on-your-mac/)
6 minute read
[How to Compress a Video on Mac: 3 Best Ways Easy video compression tips for Mac users](https://macbookjournal.com/how-to-compress-a-video-on-mac/)
5 minute read
Phone [(407) 777-2211](tel:+14077772211)
***
Email [contact@macbookjournal.com](mailto:contact@macbookjournal.com)
***
Address 1317 Edgewater, Dr \#4609 Orlando, Florida 32804
[MacBook Journal](https://macbookjournal.com/)
- [Mac Maintenance](https://macbookjournal.com/mac-maintenance/)
- [Mac Security and Privacy](https://macbookjournal.com/mac-security-and-privacy/)
- [Mac Tips and Tricks](https://macbookjournal.com/mac-tips-and-tricks/)
- [Troubleshooting Mac Issues](https://macbookjournal.com/troubleshooting-mac-issues/)
- [Reviews](https://macbookjournal.com/reviews/)
[MacBook Journal](https://macbookjournal.com/)
##### Popular Topics
- [Yes](https://macbookjournal.com/tag/yes/)
- [wi-fi connectivity issue](https://macbookjournal.com/tag/wi-fi-connectivity-issue/)
- [What to Do With Your Old MacBook? 13 Useful Ways to Reuse an Old Mac](https://macbookjournal.com/tag/what-to-do-with-your-old-macbook-13-useful-ways-to-reuse-an-old-mac/)
- [What Software Comes With MacBook](https://macbookjournal.com/tag/what-software-comes-with-macbook/)
- [What Is the MacBook Flexgate Issue and How to Fix It](https://macbookjournal.com/tag/what-is-the-macbook-flexgate-issue-and-how-to-fix-it/)
- [What Is the MacBook Flexgate Issue](https://macbookjournal.com/tag/what-is-the-macbook-flexgate-issue/)
- [volume issue](https://macbookjournal.com/tag/volume-issue/)
- [video compression](https://macbookjournal.com/tag/video-compression/)
- [ventura install](https://macbookjournal.com/tag/ventura-install/)
- [Update macOS on Your Mac](https://macbookjournal.com/tag/update-macos-on-your-mac/)
##### Trending Now[View All](https://macbookjournal.com/how-to-take-a-screenshot-on-your-mac/)

[How to Scan for Virus on Mac \[4 Effective Methods\] Secure your Mac: Quick and simple virus protection](https://macbookjournal.com/how-to-run-a-virus-scan-on-mac/)
by[Ojash](https://macbookjournal.com/author/ojash/ "View all posts by Ojash")
November 23, 2025

[How to Check for Malware on Your Mac: 6 macOS Built-in Tools Spot and remove Mac malware](https://macbookjournal.com/how-to-check-for-malware-on-your-mac/)
by[Ojash](https://macbookjournal.com/author/ojash/ "View all posts by Ojash")
November 23, 2025

[How to Find Saved Passwords on Your Mac: 3 Best Ways Easily find and manage your Mac's saved passwords](https://macbookjournal.com/how-to-find-saved-passwords-on-your-mac/)
by[Ojash](https://macbookjournal.com/author/ojash/ "View all posts by Ojash")
November 23, 2025

[How to Compress a Video on Mac: 3 Best Ways Easy video compression tips for Mac users](https://macbookjournal.com/how-to-compress-a-video-on-mac/)
by[Ojash](https://macbookjournal.com/author/ojash/ "View all posts by Ojash")
November 23, 2025

[Home](https://macbookjournal.com/)[Mac Tips and Tricks](https://macbookjournal.com/mac-tips-and-tricks/)How to Take a Screenshot on Your Mac: 4 Best Ways
- [Mac Tips and Tricks](https://macbookjournal.com/mac-tips-and-tricks/)
August 28, 2024
# How to Take a Screenshot on Your Mac: 4 Best Ways
Capture your Mac screen like a pro\!
5 minute read

Written by
[Ojash](https://macbookjournal.com/author/ojash/)

Reviewed by
[Hashir Ibrahim](https://macbookjournal.com/author/hashir/)
Last updated: August 28, 2024
Expert verified

**TL;DR**
To take a screenshot on your Mac:
1. **Capture Full Screen:** Press **Command (⌘) + Shift (⇧) + 3** to capture the entire screen.
2. **Capture a Portion of the Screen:** Press **Command (⌘) + Shift (⇧) + 4** to turn your cursor into a crosshair. Drag to select the area you want to capture.
**Tried and Tested** ✅: The methods and steps mentioned in this article have been tried and tested firsthand by Ojash Yadav on his MacBook Pro M3 and rechecked for errors on Hashir’s MacBook Air M2.
Screenshots are a handy tool, but figuring out the best way to take them on a Mac can be tricky. I’ve found a few easy methods that work well, and I’m here to share them with you. Let’s get started\!
## 4 Ways to Take a Screenshot on Your Mac
**Why You Can Trust MacBook Journal**  We always conduct first-hand research and verify every method or solution we present, ensuring you receive reliable and effective advice. [Learn more about our process](https://macbookjournal.com/why-trust-us/).
Check out these handy methods for capturing screenshots on your Mac:
### 1\. Take a Screenshot With Keyboard Shortcuts
Here, I’ve shared some common keyboard shortcuts to take a screenshot on your Mac.
#### a. Capture Full Screen on Your Mac
To capture the full screen on your Mac, press the following keys simultaneously:
**Command ⌘ + Shift ⇧ + 3**

This shortcut captures a screenshot of the entire screen. You should hear a camera shutter sound, and the screenshot will save as a **.png** file on your desktop.
You can change the default file format for screenshots from **.png** to **.jpg**, **.pdf**, or other formats using a terminal command. Just type `defaults write com.apple.screencapture type jpg` in the Terminal app.
#### b. Capture a Portion of the Screen on Your Mac
If you want to take a screenshot on your Mac but only for a portion, you can use the following key combo:
**Command ⌘ + Shift ⇧ + 4**

There are different variations in taking this type of screenshot. For instance:
1. **Press and release the space bar:** After using **Command ⌘ + Shift ⇧ + 4**, press the space bar to turn the crosshair into a camera icon. Move it over any window and click to capture with a white border and drop shadow.
2. **Press and hold the space bar:** After selecting an area, hold the space bar to lock its shape and size, allowing you to reposition it before capturing.
3. **Hold down the Shift ⇧ key:** While selecting an area, hold **Shift ⇧** to lock all sides except the bottom edge, letting you adjust it. Release **Shift**, press it again to adjust the right edge, and capture.
#### c. Screenshot the Touch Bar
To take a screenshot of the [Touch Bar on a Mac](https://support.apple.com/en-gb/guide/mac-help/mchlbfd5b039/mac), you can use the built-in screenshot functionalities provided by macOS. Press the following keyboard combination:
**Command ⌘ + Shift ⇧ + 6**
This command specifically captures the Touch Bar region.

These options only appear on the OLED strip if you have a MacBook with a Touch Bar.
### 2\. Take a Screenshot With the Screen Capture Panel
Here’s how to take a screenshot on your Mac using the Screen Capture Panel:
1. Press **Shift** ⇧ **\+ Command** **⌘** **\+ 5** to open the Screenshot Toolbar or Screen Capture Panel.
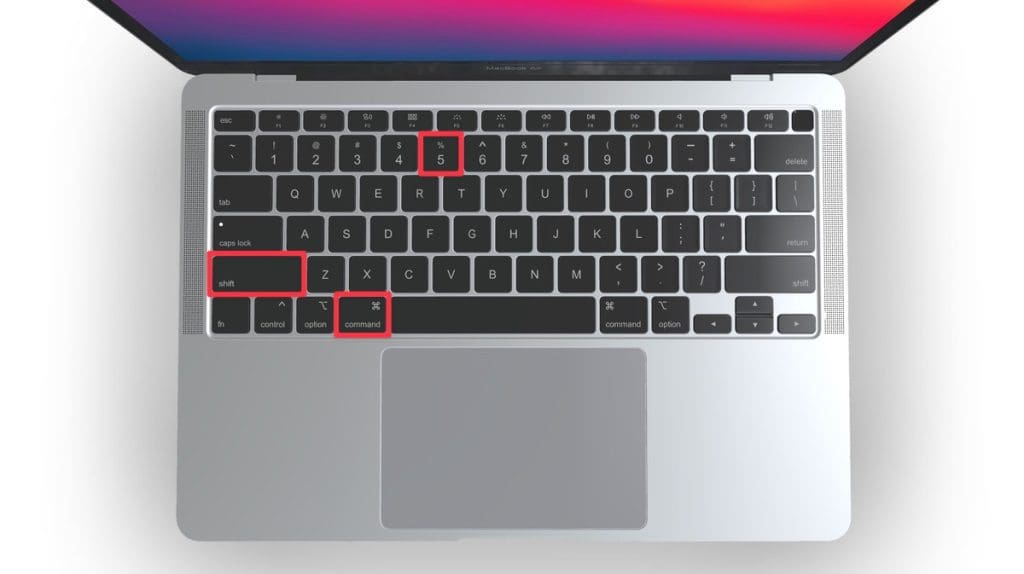
1. Choose whether you want to capture the entire screen, a selected window, or a specific portion of the screen. Click the relevantoption.

1. If you selected a portion of the screen or a specific window, drag your mouse to select the area you want to capture.
2. Click the **camera** icon to take the screenshot.
You can also customize your screenshot settings on your Mac to meet your specific needs. Here’s how to do it:
1. To access the Screenshot app on your Mac, press **Shift ⇧ + Command ⌘ + 5** or search for it in the Launchpad or Applications folder.
2. In the Screenshot app, click **Options** in the toolbar.

1. Select where you want your screenshots saved by clicking your desired option under **Save to**. You can choose from options like **Desktop**, **Documents**, or **Clipboard**.

1. You can also set a timer for the screenshot to capture after a specific time under **Timer** and choose a time interval.

1. Other options include **Show Floating Thumbnail**, **Remember Last Selection**, and **Show Mouse Pointer**.
### 3\. Capture the Screen With the Mac Screenshot App
To take a screenshot on your Mac using Preview, follow these steps:
1. Open **Preview** on your Mac.

1. Click **File** in the menu bar and select Take **Screenshot**.

1. Choose to capture the entire screen, a selected portion, or a window.

1. If you choose to capture a window, click the window you want to capture.
2. The screenshot will open in Preview, where you can edit, annotate, and save it.
### 4\. Capture the Screenshot With Third-Party Apps
Here are a few popular third-party apps you can use to capture the screen on your Mac:
Be cautious when using third-party screenshot apps. Some may require extensive permissions, which could pose a security risk if not from a trusted source. Always download from reputable sites or the App Store.
1. **[Snagit](https://www.techsmith.com/snagit)**: Snagit is a powerful screen capture and image editing tool that offers a wide range of features. It allows you to capture screenshots, record videos, and annotate images. Snagit also provides options for timed captures, scrolling captures, and capturing specific areas of the screen.
2. **[CleanShot X](https://cleanshot.com/)**: CleanShot X is a comprehensive screen capture and recording tool with various advanced features. It lets you capture screenshots of selected areas, windows, or the entire screen. CleanShot X offers a clutter-free and intuitive interface, making it easy to use.
3. **[Lightshot](https://apps.apple.com/us/app/lightshot-screenshot/id526298438?mt=12)**: Lightshot is a lightweight screen capture tool that allows you to capture selected areas of your screen or the entire screen. It offers a simple editing interface where you can add annotations, highlight specific areas, or blur out sensitive information. Lightshot also provides instant sharing options.
4. **[Snip](https://apps.apple.com/us/app/snip/id512505421?mt=12)**: Snip is a free and open-source screen capture tool that offers a range of capture modes, including full-screen, window, and custom region capture. It also allows you to record screen activity and provides basic editing features like adding text, arrows, and shapes to your screenshots.
## Capture Screenshots on Your Mac Successfully
Now that you know how to take a screenshot on your Mac easily, your system must be efficient and storage organized. Here are some tips to make your Mac experience better:
- Customize your **[Mac’s screenshot shortcuts](https://macbookjournal.com/mac-keyboard-shortcuts-to-work-faster/)** for easier use.
- [**Organize your files on Mac**](https://macbookjournal.com/how-to-organize-files-on-your-mac/) so you don’t have to struggle to find them.
- You can also record the entire screen on your Mac, check out **[my guide](https://macbookjournal.com/how-to-record-a-video-on-your-mac/)** to do it.
## Frequently Asked Questions
### Can I take screenshots of a specific menu on my Mac?
Yes, you can take screenshots of a specific menu on your Mac. You can use the **Command ⌘ + Shift ⇧ + 4** shortcut to take a screenshot of a specific menu on your Mac, capture an image of a drop-down menu, contextual menu, or any other type of menu.
### How can I take a screenshot of a webpage that extends beyond the screen?
You can take a screenshot of a webpage that extends beyond the screen using the **Command ⌘ + Shift ⇧ + 3** shortcut, then open the screenshot in Preview and select **File \> Export as PDF**. It will save the entire webpage as a PDF file.
### Where are the screenshots saved on a Mac after capturing?
After capturing a screenshot on a Mac, the default save location is the desktop. However, you can also find them in the **Screenshots** folder within your **Pictures** directory. Additionally, you can change the save location using the **Options** menu that appears when taking a screenshot.

### [Ojash](https://macbookjournal.com/author/ojash/)
Author
Hi there! I'm Ojash, a tech journalist with over a decade of experience in the industry. I've had the privilege of contributing to some of the world's largest tech publications, making my mark as a respected Mac expert. My passion lies in exploring, using, and writing about MacBooks, and I enjoy sharing my expertise to help others make informed decisions and get the most out of their MacBook experience. Join me as we delve into the fascinating world of MacBooks together\!

### [Hashir Ibrahim](https://macbookjournal.com/author/hashir/)
Reviewer
Hello! I'm Hashir, a seasoned tech journalist with a unique blend of academic expertise and hands-on experience. With a bachelor's in IT, a master's in cybersecurity, and over a decade in the industry, I've built a reputation for demystifying complex Apple hardware. My work has been featured in top tech outlets like MakeUseOf and MakeTechEasier. As the senior writer at MacBook Journal, I write guides that help you solve any issues you have with your mac.
Total
0
Shares
[Share 0](https://www.facebook.com/sharer.php?u=https://macbookjournal.com/how-to-take-a-screenshot-on-your-mac/)
[Tweet 0](https://x.com/share?&text=How%20to%20Take%20a%20Screenshot%20on%20Your%20Mac%3A%204%20Best%20Ways&via=MacBook_Journal&url=https://macbookjournal.com/how-to-take-a-screenshot-on-your-mac/)
[Pin it 0](https://pinterest.com/pin/create/bookmarklet/?url=https://macbookjournal.com/how-to-take-a-screenshot-on-your-mac/&media=https://macbookjournal.com/wp-content/uploads/2023/06/How-to-Take-a-Screenshot-on-Your-Mac-Featured-Image-1024x576.png)
[Share 0](whatsapp://send?text=https://macbookjournal.com/how-to-take-a-screenshot-on-your-mac/)
[Share 0](https://t.me/share/url?&text=How%20to%20Take%20a%20Screenshot%20on%20Your%20Mac%3A%204%20Best%20Ways&url=https://macbookjournal.com/how-to-take-a-screenshot-on-your-mac/)
[Share 0](http://www.reddit.com/submit?url=https://macbookjournal.com/how-to-take-a-screenshot-on-your-mac/)
##### Author
##### [Ojash](https://macbookjournal.com/author/ojash/)
[](https://macbookjournal.com/author/ojash/)
Hi there! I'm Ojash, a tech journalist with over a decade of experience in the industry. I've had the privilege of contributing to some of the world's largest tech publications, making my mark as a respected Mac expert. My passion lies in exploring, using, and writing about MacBooks, and I enjoy sharing my expertise to help others make informed decisions and get the most out of their MacBook experience. Join me as we delve into the fascinating world of MacBooks together\!
##### Table of Contents Hide
1. [4 Ways to Take a Screenshot on Your Mac](https://macbookjournal.com/how-to-take-a-screenshot-on-your-mac/#4-ways-to-take-a-screenshot-on-your-mac)
1. [1\. Take a Screenshot With Keyboard Shortcuts](https://macbookjournal.com/how-to-take-a-screenshot-on-your-mac/#1-take-a-screenshot-with-keyboard-shortcuts)
2. [2\. Take a Screenshot With the Screen Capture Panel](https://macbookjournal.com/how-to-take-a-screenshot-on-your-mac/#2-take-a-screenshot-with-the-screen-capture-panel)
3. [3\. Capture the Screen With the Mac Screenshot App](https://macbookjournal.com/how-to-take-a-screenshot-on-your-mac/#3-capture-the-screen-with-the-mac-screenshot-app)
4. [4\. Capture the Screenshot With Third-Party Apps](https://macbookjournal.com/how-to-take-a-screenshot-on-your-mac/#4-capture-the-screenshot-with-third-party-apps)
2. [Capture Screenshots on Your Mac Successfully](https://macbookjournal.com/how-to-take-a-screenshot-on-your-mac/#capture-screenshots-on-your-mac-successfully)
3. [Frequently Asked Questions](https://macbookjournal.com/how-to-take-a-screenshot-on-your-mac/#frequently-asked-questions)
1. [Can I take screenshots of a specific menu on my Mac?](https://macbookjournal.com/how-to-take-a-screenshot-on-your-mac/#can-i-take-screenshots-of-a-specific-menu-on-my-mac)
2. [How can I take a screenshot of a webpage that extends beyond the screen?](https://macbookjournal.com/how-to-take-a-screenshot-on-your-mac/#how-can-i-take-a-screenshot-of-a-webpage-that-extends-beyond-the-screen)
3. [Where are the screenshots saved on a Mac after capturing?](https://macbookjournal.com/how-to-take-a-screenshot-on-your-mac/#where-are-the-screenshots-saved-on-a-mac-after-capturing)
##### You May Also Like

[How to Install Xcode Command Line Tools on Mac: 3 Best Methods Master Xcode tools setup in minutes](https://macbookjournal.com/how-to-install-xcode-command-line-tools-on-mac/)
by[Ojash](https://macbookjournal.com/author/ojash/ "View all posts by Ojash")
September 21, 2024

[How to AirPlay From a Mac to TV: 3 Quick and Easy Methods AirPlay from Mac to TV and stream content seamlessly](https://macbookjournal.com/how-to-airplay-from-a-mac-to-tv/)
by[Ojash](https://macbookjournal.com/author/ojash/ "View all posts by Ojash")
September 22, 2025

[How to See Image Dimensions in Finder on Mac: 3 Best Ways Mac tips: Check image dimensions easily](https://macbookjournal.com/how-to-see-image-dimensions-in-finder-on-mac/)
by[Ojash](https://macbookjournal.com/author/ojash/ "View all posts by Ojash")
November 21, 2024

[What Is AirPlay? Everything About Apple’s Streaming Technology Unlock the power of Apple's AirPlay for seamless streaming](https://macbookjournal.com/what-is-airplay/)
by[Ojash](https://macbookjournal.com/author/ojash/ "View all posts by Ojash")
December 30, 2024
[MacBook Journal](https://macbookjournal.com/)
1317 Edgewater, Dr \#4609 Orlando, Florida 32804 [(407) 777-2211](tel:+14077772211)
About MacBook Journal
- [About Us](https://macbookjournal.com/about-us/)
- [Contact Us](https://macbookjournal.com/contact/)
- [Editorial Process](https://macbookjournal.com/editorial-process/)
- [Why Trust Us?](https://macbookjournal.com/why-trust-us/)
- [Affiliate Linking Policy](https://macbookjournal.com/affiliate-linking-policy/)
- [Privacy Policy](https://macbookjournal.com/privacy-policy/)
- [Terms of Service](https://macbookjournal.com/terms-of-service/)
- [Disclaimer](https://macbookjournal.com/disclaimer/)
Guides
- [How To Clean Up Your Mac](https://macbookjournal.com/how-to-clean-up-your-mac/)
- [How to Speed Up a Slow Mac](https://macbookjournal.com/how-to-speed-up-a-slow-mac/)
- [How to Clear System Data on Your Mac](https://macbookjournal.com/how-to-clear-system-data-on-your-mac/)
- [How to Run a Virus Scan on Mac](https://macbookjournal.com/how-to-run-a-virus-scan-on-mac/)
- [How to Clear Cache on Your Mac](https://macbookjournal.com/how-to-clear-cache-on-your-mac/)
- [How to Uninstall Apps on Your Mac](https://macbookjournal.com/how-to-uninstall-apps-on-your-mac/)
- [How to Fix ‘Your Disk Is Almost Full’ on Mac](https://macbookjournal.com/fix-your-disk-is-almost-full-on-mac/)
- [How to Clear Other Storage on Mac](https://macbookjournal.com/how-to-clear-other-storage-on-mac/)
- [Mac Running Slow? 20 Fixes to Speed Up Your Mac](https://macbookjournal.com/how-to-fix-a-mac-running-slow/)
Business Hours
- Monday 8AM - 8PM
- Tuesday 8AM - 8PM
- wednesday 8AM - 8PM
- thursday 8AM - 8PM
- friday 8AM - 8PM
- saturday 8AM - 8PM
- sunday 8AM - 8PM
[0](https://facebook.com/)
[0](https://x.com/MacBook_Journal)
[0](https://www.instagram.com/macbook_journal)
[0](https://www.linkedin.com/company/macbook-journal/)
© 2024 MacBookJournal |
| Readable Markdown | **TL;DR**
To take a screenshot on your Mac:
1. **Capture Full Screen:** Press **Command (⌘) + Shift (⇧) + 3** to capture the entire screen.
2. **Capture a Portion of the Screen:** Press **Command (⌘) + Shift (⇧) + 4** to turn your cursor into a crosshair. Drag to select the area you want to capture.
**Tried and Tested** ✅: The methods and steps mentioned in this article have been tried and tested firsthand by Ojash Yadav on his MacBook Pro M3 and rechecked for errors on Hashir’s MacBook Air M2.
Screenshots are a handy tool, but figuring out the best way to take them on a Mac can be tricky. I’ve found a few easy methods that work well, and I’m here to share them with you. Let’s get started\!
**Why You Can Trust MacBook Journal**  We always conduct first-hand research and verify every method or solution we present, ensuring you receive reliable and effective advice. [Learn more about our process](https://macbookjournal.com/why-trust-us/).
Check out these handy methods for capturing screenshots on your Mac:
### 1\. Take a Screenshot With Keyboard Shortcuts
Here, I’ve shared some common keyboard shortcuts to take a screenshot on your Mac.
#### a. Capture Full Screen on Your Mac
To capture the full screen on your Mac, press the following keys simultaneously:
**Command ⌘ + Shift ⇧ + 3**

This shortcut captures a screenshot of the entire screen. You should hear a camera shutter sound, and the screenshot will save as a **.png** file on your desktop.
You can change the default file format for screenshots from **.png** to **.jpg**, **.pdf**, or other formats using a terminal command. Just type `defaults write com.apple.screencapture type jpg` in the Terminal app.
#### b. Capture a Portion of the Screen on Your Mac
If you want to take a screenshot on your Mac but only for a portion, you can use the following key combo:
**Command ⌘ + Shift ⇧ + 4**

There are different variations in taking this type of screenshot. For instance:
1. **Press and release the space bar:** After using **Command ⌘ + Shift ⇧ + 4**, press the space bar to turn the crosshair into a camera icon. Move it over any window and click to capture with a white border and drop shadow.
2. **Press and hold the space bar:** After selecting an area, hold the space bar to lock its shape and size, allowing you to reposition it before capturing.
3. **Hold down the Shift ⇧ key:** While selecting an area, hold **Shift ⇧** to lock all sides except the bottom edge, letting you adjust it. Release **Shift**, press it again to adjust the right edge, and capture.
#### c. Screenshot the Touch Bar
To take a screenshot of the [Touch Bar on a Mac](https://support.apple.com/en-gb/guide/mac-help/mchlbfd5b039/mac), you can use the built-in screenshot functionalities provided by macOS. Press the following keyboard combination:
**Command ⌘ + Shift ⇧ + 6**
This command specifically captures the Touch Bar region.

These options only appear on the OLED strip if you have a MacBook with a Touch Bar.
### 2\. Take a Screenshot With the Screen Capture Panel
Here’s how to take a screenshot on your Mac using the Screen Capture Panel:
1. Press **Shift** ⇧ **\+ Command** **⌘** **\+ 5** to open the Screenshot Toolbar or Screen Capture Panel.

1. Choose whether you want to capture the entire screen, a selected window, or a specific portion of the screen. Click the relevantoption.

1. If you selected a portion of the screen or a specific window, drag your mouse to select the area you want to capture.
2. Click the **camera** icon to take the screenshot.
You can also customize your screenshot settings on your Mac to meet your specific needs. Here’s how to do it:
1. To access the Screenshot app on your Mac, press **Shift ⇧ + Command ⌘ + 5** or search for it in the Launchpad or Applications folder.
2. In the Screenshot app, click **Options** in the toolbar.

1. Select where you want your screenshots saved by clicking your desired option under **Save to**. You can choose from options like **Desktop**, **Documents**, or **Clipboard**.

1. You can also set a timer for the screenshot to capture after a specific time under **Timer** and choose a time interval.

1. Other options include **Show Floating Thumbnail**, **Remember Last Selection**, and **Show Mouse Pointer**.
### 3\. Capture the Screen With the Mac Screenshot App
To take a screenshot on your Mac using Preview, follow these steps:
1. Open **Preview** on your Mac.

1. Click **File** in the menu bar and select Take **Screenshot**.

1. Choose to capture the entire screen, a selected portion, or a window.

1. If you choose to capture a window, click the window you want to capture.
2. The screenshot will open in Preview, where you can edit, annotate, and save it.
### 4\. Capture the Screenshot With Third-Party Apps
Here are a few popular third-party apps you can use to capture the screen on your Mac:
Be cautious when using third-party screenshot apps. Some may require extensive permissions, which could pose a security risk if not from a trusted source. Always download from reputable sites or the App Store.
1. **[Snagit](https://www.techsmith.com/snagit)**: Snagit is a powerful screen capture and image editing tool that offers a wide range of features. It allows you to capture screenshots, record videos, and annotate images. Snagit also provides options for timed captures, scrolling captures, and capturing specific areas of the screen.
2. **[CleanShot X](https://cleanshot.com/)**: CleanShot X is a comprehensive screen capture and recording tool with various advanced features. It lets you capture screenshots of selected areas, windows, or the entire screen. CleanShot X offers a clutter-free and intuitive interface, making it easy to use.
3. **[Lightshot](https://apps.apple.com/us/app/lightshot-screenshot/id526298438?mt=12)**: Lightshot is a lightweight screen capture tool that allows you to capture selected areas of your screen or the entire screen. It offers a simple editing interface where you can add annotations, highlight specific areas, or blur out sensitive information. Lightshot also provides instant sharing options.
4. **[Snip](https://apps.apple.com/us/app/snip/id512505421?mt=12)**: Snip is a free and open-source screen capture tool that offers a range of capture modes, including full-screen, window, and custom region capture. It also allows you to record screen activity and provides basic editing features like adding text, arrows, and shapes to your screenshots.
## Capture Screenshots on Your Mac Successfully
Now that you know how to take a screenshot on your Mac easily, your system must be efficient and storage organized. Here are some tips to make your Mac experience better:
- Customize your **[Mac’s screenshot shortcuts](https://macbookjournal.com/mac-keyboard-shortcuts-to-work-faster/)** for easier use.
- [**Organize your files on Mac**](https://macbookjournal.com/how-to-organize-files-on-your-mac/) so you don’t have to struggle to find them.
- You can also record the entire screen on your Mac, check out **[my guide](https://macbookjournal.com/how-to-record-a-video-on-your-mac/)** to do it.
## Frequently Asked Questions
Yes, you can take screenshots of a specific menu on your Mac. You can use the **Command ⌘ + Shift ⇧ + 4** shortcut to take a screenshot of a specific menu on your Mac, capture an image of a drop-down menu, contextual menu, or any other type of menu.
### How can I take a screenshot of a webpage that extends beyond the screen?
You can take a screenshot of a webpage that extends beyond the screen using the **Command ⌘ + Shift ⇧ + 3** shortcut, then open the screenshot in Preview and select **File \> Export as PDF**. It will save the entire webpage as a PDF file.
### Where are the screenshots saved on a Mac after capturing?
After capturing a screenshot on a Mac, the default save location is the desktop. However, you can also find them in the **Screenshots** folder within your **Pictures** directory. Additionally, you can change the save location using the **Options** menu that appears when taking a screenshot. |
| Shard | 70 (laksa) |
| Root Hash | 7898336946989740270 |
| Unparsed URL | com,macbookjournal!/how-to-take-a-screenshot-on-your-mac/ s443 |