ℹ️ Skipped - page is already crawled
| Filter | Status | Condition | Details |
|---|---|---|---|
| HTTP status | PASS | download_http_code = 200 | HTTP 200 |
| Age cutoff | PASS | download_stamp > now() - 6 MONTH | 0.1 months ago |
| History drop | PASS | isNull(history_drop_reason) | No drop reason |
| Spam/ban | PASS | fh_dont_index != 1 AND ml_spam_score = 0 | ml_spam_score=0 |
| Canonical | PASS | meta_canonical IS NULL OR = '' OR = src_unparsed | Not set |
| Property | Value | |||||||||
|---|---|---|---|---|---|---|---|---|---|---|
| URL | https://hot-thai-kitchen.com/coffee-bun/ | |||||||||
| Last Crawled | 2026-04-20 10:24:01 (2 days ago) | |||||||||
| First Indexed | 2018-12-06 07:54:59 (7 years ago) | |||||||||
| HTTP Status Code | 200 | |||||||||
| Content | ||||||||||
| Meta Title | Mexican Coffee Bun (Rotiboy) Recipe & Video Tutorial | |||||||||
| Meta Description | These buns are SO delicious you've got to try them! Fluffy, buttery that are topped with a coffee scented cookie crust. Mmm mm mmmm! | |||||||||
| Meta Canonical | null | |||||||||
| Boilerpipe Text | 1
recipe
hokkaido milk bread
(see note)
100 g
salted butter, divided into 12 equal portions and keep cold (see note)
Coffee Cookie Topping
120 g
all-purpose flour
¼ tsp
baking powder
¼ tsp
salt
100 g
unsalted butter, softened
90 g
confectioners’ sugar
2
large eggs
1 tsp
vanilla extract
1 tsp
hot water
2 tsp
instant coffee (if you don't want to do coffee flavour, feel free to use only vanilla or other flavouring extracts as you wish)
NOTE: Use 4 tablespoon sugar + 1 teaspoon vanilla in the bread recipe. You want to start this recipe out with the dough that has finished the first proofing and has doubled in size. You can make the dough the night before, let it proof in the fridge overnight, and then pull it out 2 hours before using so it has time to soften.
For the butter, you can simply cut them into cubes, but I find it easier to wrap butter that is round-ish rather than squared. So, I start out with soft butter and use a small disher or a measuring spoon to scoop out rounds. Place the pieces on a plate and then put it in the fridge to firm up.
Ingredients and Kitchen Tools I Use
Start with Hokkaido milk bread dough that has proofed the first time until doubled in size. Turn dough out onto a work surface and press all the air out of it. Cut out one portion of the dough that weighs about 180 g (the total dough weight is about 700g). This small portion is your "inside dough", and the bigger part is your "outside dough".
Shape the smaller inside dough into a log, then cut into 12 equal pieces; I cut it first in half, then cut each half into quarters, then each quarter into 3. For each of the small pieces, roll it out into a round sheet. Place one piece of cold salted butter inside and wrap it really well, pinching and twisting the top to make sure it's as well sealed as possible. Turn it upside down so the seam is on the bottom, set aside. Repeat for all 12 pieces.
Now shape the bigger "outside dough" into a log, then cut it also into 12 pieces. Form each piece into a round ball (see video for technique) and roll the ball into a circular sheet. Place one of the inside dough-butter balls in the middle, seam side down, and wrap the outside dough around it, making sure to seal it as best you can. Turn the buns over so now the outside seam is down (and the butter seam is up), then place the bun on a parchment-lined or greased baking sheet. Repeat with the remaining dough. Make sure you give the buns plenty of space in between as they will expand a lot.
Let the buns proof in a warm place, covered with a towel, until doubled in size which should take one more hour. If it's cold where you live, it may take longer.
Meanwhile, make the cookie topping:
Preheat the oven to 375°F or 190°C.
Combine instant coffee with hot water and stir to dissolve, then add vanilla and stir.
In a small bowl, whisk the flour, baking powder, and salt together.
In a large mixing bowl, beat butter and powdered sugar with an electric mixer on low speed, then once the sugar is mixed in, increase the speed to medium-high and beat until light and fluffy, scraping the bowl once or twice in between.
Add eggs, one at a time, beating until well-combined after each addition. Add the coffee mixture and beat to combine, then add the flour mixture and beat just until combined, stopping to scrape the bowl once in between as needed.
Once combined, give it a mix with a rubber spatula one more time, scraping the bottom to make sure everything is well mixed. Transfer the dough into a piping bag or a heavy-duty zip-top bag (do not use sandwich bags, those are too thin). Set aside until ready to use (if it's really warm where you live, I would stick it in the fridge while you wait for the buns to finish rising, but do not refrigerate for longer than 15 minutes or so or it will become too hard to pipe.)
Once the buns are risen until doubled in size, p
ipe a spiral onto the buns, covering them as close to the outside edge as possible. Bake 15-18 mins until the bottoms are browned and the top has darkened slightly. If you have 2 pans, I would bake one at a time for even cooking.
If the butter leaks out around the buns, do not worry! This happens to me too, usually I get a few that leak despite my best efforts. If this happens, just leave them on the pan and as they cool the buns will absorb the butter back in, and you'll still get the same buttery salty flavour, except now it is more on the bottom of the buns rather than inside.
Let the buns cool for at least 5-10 minutes before serving or until the cookie crust firms up and becomes crispy. If the cookie crust has lost its crispiness (which happens naturally after about a day) simply put them in the oven for 5-7 minutes to crisp them back up.
You can freeze these buns too!
To reheat, microwave it briefly (20-30 seconds) just to take the chill off, then bake it in a 350F oven (or toaster oven) for 5-7 minutes until the cookie crust is crispy again.
Enjoy!
Join us on Patreon for bonus content & rewards! | |||||||||
| Markdown | [Hot Thai Kitchen](https://hot-thai-kitchen.com/)
- [Recipes by Categories](https://hot-thai-kitchen.com/all-recipes-by-categories/)
- [Thai Ingredients & Techniques](https://hot-thai-kitchen.com/category/tutorials/)
- [Newsletter](https://hot-thai-kitchen.com/hot-thai-kitchen-newsletter/)
- [Shop Ingredients & Tools](https://hot-thai-kitchen.com/shop-for-ingredients-and-tools/)
- [My Cookbooks](https://hot-thai-kitchen.com/htk-cookbook/)
- [Merch](https://searchandrescuedenim.com/collections/hot-thai-kitchen)
- [Find an Asian Grocer](https://hot-thai-kitchen.com/locate-a-thai-grocer/)
- [About](https://hot-thai-kitchen.com/about/)
- [Contact](https://hot-thai-kitchen.com/contact-2/)
[](https://hot-thai-kitchen.com/)
[](https://hot-thai-kitchen.com/htk-cookbook/)
[](https://hot-thai-kitchen.com/)
- [Recipes by Categories](https://hot-thai-kitchen.com/all-recipes-by-categories/)
- [Thai Ingredients & Techniques](https://hot-thai-kitchen.com/category/tutorials/)
- [Newsletter](https://hot-thai-kitchen.com/hot-thai-kitchen-newsletter/)
- [Shop Ingredients & Tools](https://hot-thai-kitchen.com/shop-for-ingredients-and-tools/)
- [My Cookbooks](https://hot-thai-kitchen.com/htk-cookbook/)
- [Merch](https://searchandrescuedenim.com/collections/hot-thai-kitchen)
- [Find an Asian Grocer](https://hot-thai-kitchen.com/locate-a-thai-grocer/)
- [About](https://hot-thai-kitchen.com/about/)
- [Contact](https://hot-thai-kitchen.com/contact-2/)
[×](https://hot-thai-kitchen.com/coffee-bun/)
[Home](https://hot-thai-kitchen.com/) » [Recipes](https://hot-thai-kitchen.com/blog/) » [All Recipes](https://hot-thai-kitchen.com/category/all-recipes/) » [Desserts & Sweets](https://hot-thai-kitchen.com/category/all-recipes/sweets/)
# Mexican Coffee Buns (Rotiboy)
Published: Oct 10, 2017 · Modified: Dec 7, 2020 by [Pailin Chongchitnant](https://hot-thai-kitchen.com/about/) · This post may contain affiliate links
[Jump to Recipe](https://hot-thai-kitchen.com/coffee-bun/#tasty-recipes-7692-jump-target)·[Print Recipe](https://hot-thai-kitchen.com/coffee-bun/print/7692/)
## [Jump to video\!](https://hot-thai-kitchen.com/coffee-bun/#h-watch-the-full-video-tutorial)
***
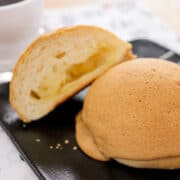
O.M.G. these buns are SO delicious you've got to try them! These fluffy, buttery buns are topped with a coffee scented cookie crust, and because they're so ridiculously tasty they became wildly popular in Southeast Asia. "Rotiboy", which started in Malaysia, is perhaps the most well known brand that specializes in these buns, but since then there have been a few others such as papparoti and Mr. Bun.
But once you know how to make the basic fluffy milk bread dough (recipe linked below), the rest is quite easy! Give it a go and you'll find there is nothing more satisfying than biting into these...crispy on the outside, buttery and a little salty on the inside, with a hint of coffee...mmm mm mmmm\!
### Save this recipe\!
We can email this post to you, so you can come back to it later\!
## Watch The Full Video Tutorial\!
All my recipes come with step-by-step video tutorials with extra tips not mentioned in the blog post, so make sure you watch the video below to ensure success - and if you enjoy the show, please consider [subscribing to my YouTube channel](http://youtube.com/pailinskitchen). Thank you\!
[Print](https://hot-thai-kitchen.com/coffee-bun/print/7692/)
clock icon
cutlery icon
flag icon
folder icon
instagram icon
pinterest icon
facebook icon
print icon
squares icon
heart icon
heart solid icon
## Mexican Coffee Buns (Rotiboy)
*5 Stars* *4 Stars* *3 Stars* *2 Stars* *1 Star* 5 from 2 reviews
- Author: [Pailin Chongchitnant](https://hot-thai-kitchen.com/about/)
- Yield:
Makes 12 buns
[Print Recipe](https://hot-thai-kitchen.com/coffee-bun/print/7692/)
[Pin Recipe]()
***
### Ingredients
### Save this recipe\!
We can email this post to you, so you can come back to it later\!
- 1 recipe [hokkaido milk bread](https://hot-thai-kitchen.com/hokkaido-milk-bread/) (see note)
- 100 g salted butter, divided into 12 equal portions and keep cold (see note)
**Coffee Cookie Topping**
- 120 g all-purpose flour
- ¼ tsp baking powder
- ¼ tsp salt
- 100 g unsalted butter, softened
- 90 g confectioners’ sugar
- 2 large eggs
- 1 tsp vanilla extract
- 1 tsp hot water
- 2 tsp instant coffee (if you don't want to do coffee flavour, feel free to use only vanilla or other flavouring extracts as you wish)
*NOTE: Use 4 tablespoon sugar + 1 teaspoon vanilla in the bread recipe. You want to start this recipe out with the dough that has finished the first proofing and has doubled in size. You can make the dough the night before, let it proof in the fridge overnight, and then pull it out 2 hours before using so it has time to soften.*
*For the butter, you can simply cut them into cubes, but I find it easier to wrap butter that is round-ish rather than squared. So, I start out with soft butter and use a small disher or a measuring spoon to scoop out rounds. Place the pieces on a plate and then put it in the fridge to firm up.*
[***Ingredients and Kitchen Tools I Use***](https://a.co/d/03xibrk6)
***
### Instructions
Start with Hokkaido milk bread dough that has proofed the first time until doubled in size. Turn dough out onto a work surface and press all the air out of it. Cut out one portion of the dough that weighs about 180 g (the total dough weight is about 700g). This small portion is your "inside dough", and the bigger part is your "outside dough".
Shape the smaller inside dough into a log, then cut into 12 equal pieces; I cut it first in half, then cut each half into quarters, then each quarter into 3. For each of the small pieces, roll it out into a round sheet. Place one piece of cold salted butter inside and wrap it really well, pinching and twisting the top to make sure it's as well sealed as possible. Turn it upside down so the seam is on the bottom, set aside. Repeat for all 12 pieces.
Now shape the bigger "outside dough" into a log, then cut it also into 12 pieces. Form each piece into a round ball (see video for technique) and roll the ball into a circular sheet. Place one of the inside dough-butter balls in the middle, seam side down, and wrap the outside dough around it, making sure to seal it as best you can. Turn the buns over so now the outside seam is down (and the butter seam is up), then place the bun on a parchment-lined or greased baking sheet. Repeat with the remaining dough. Make sure you give the buns plenty of space in between as they will expand a lot.
Let the buns proof in a warm place, covered with a towel, until doubled in size which should take one more hour. If it's cold where you live, it may take longer.
**Meanwhile, make the cookie topping:**
Preheat the oven to 375°F or 190°C.
Combine instant coffee with hot water and stir to dissolve, then add vanilla and stir.
In a small bowl, whisk the flour, baking powder, and salt together.
In a large mixing bowl, beat butter and powdered sugar with an electric mixer on low speed, then once the sugar is mixed in, increase the speed to medium-high and beat until light and fluffy, scraping the bowl once or twice in between.
Add eggs, one at a time, beating until well-combined after each addition. Add the coffee mixture and beat to combine, then add the flour mixture and beat just until combined, stopping to scrape the bowl once in between as needed.
Once combined, give it a mix with a rubber spatula one more time, scraping the bottom to make sure everything is well mixed. Transfer the dough into a piping bag or a heavy-duty zip-top bag (do not use sandwich bags, those are too thin). Set aside until ready to use (if it's really warm where you live, I would stick it in the fridge while you wait for the buns to finish rising, but do not refrigerate for longer than 15 minutes or so or it will become too hard to pipe.)
Once the buns are risen until doubled in size, pipe a spiral onto the buns, covering them as close to the outside edge as possible. Bake 15-18 mins until the bottoms are browned and the top has darkened slightly. If you have 2 pans, I would bake one at a time for even cooking.
If the butter leaks out around the buns, do not worry! This happens to me too, usually I get a few that leak despite my best efforts. If this happens, just leave them on the pan and as they cool the buns will absorb the butter back in, and you'll still get the same buttery salty flavour, except now it is more on the bottom of the buns rather than inside.
Let the buns cool for at least 5-10 minutes before serving or until the cookie crust firms up and becomes crispy. If the cookie crust has lost its crispiness (which happens naturally after about a day) simply put them in the oven for 5-7 minutes to crisp them back up.
**You can freeze these buns too\!** To reheat, microwave it briefly (20-30 seconds) just to take the chill off, then bake it in a 350F oven (or toaster oven) for 5-7 minutes until the cookie crust is crispy again.
Enjoy\!
*[**Join us on Patreon for bonus content & rewards\!**](https://hot-thai-kitchen.com/support-htk/)*
***
### Did you make this recipe?
Tag @HOTTHAIKITCHEN on Instagram and hashtag it \#HotThaiKitchen\!
## More Desserts and Sweets
- [Too May Bananas? Try Thai Banana Cake (Kanom Gluay)](https://hot-thai-kitchen.com/thai-banana-cake/)
- [Pandan Palm Sugar Dumplings (Kanom Ko)](https://hot-thai-kitchen.com/kanom-ko/)
- [Thai Mango Sticky Rice Recipe](https://hot-thai-kitchen.com/mango-sticky-rice/)
- [15 Thai Street Food Recipes You Can Make At Home](https://hot-thai-kitchen.com/thai-street-food-recipes/)
### Comments
1. Donna says
June 06, 2025 at 10:54 am
Hi Palin\!
I love your coffee bun recipe!!! So much better than what you buy in the bakeries around me in California. Was wondering if you've ever tried substituting the yeast for sourdough starter? I'm trying to see how to do these substitutions cuz I heard the starter is healthier?
Thanks,
Donna
[Reply](https://hot-thai-kitchen.com/coffee-bun/#comment-25784)
2. Tina says
December 25, 2020 at 4:18 pm
The first couple of times I made these, I hadn't tried a rotiboy before. This year, one of these places finally opened in my city, and my family says they like the version from this recipe more!\!
The storebought version has a much more overwhelming coffee+butter aroma, which this recipe doesn't - it's a little more natural albeit milder.
I don't always use her milk bread recipe to make this (though it is very good as is), but the technique outlined here is very reliable, and her cookie crust works as advertised.
[Reply](https://hot-thai-kitchen.com/coffee-bun/#comment-416)

### **Sawaddee ka\!**
I'm Pai, a chef, author, and YouTuber. I'm here to demystify Thai cuisine and help you cook great Thai food at home. Want to learn more about me?
[Here's my story](https://hot-thai-kitchen.com/about/)

**[My Latest Cookbook](https://hot-thai-kitchen.com/htk-cookbook/)**
### Popular Classics
- [The Only PAD KRA PAO Recipe You Need - Holy Basil Stir Fry](https://hot-thai-kitchen.com/pad-kra-pao-anything/)
- [Thai Cashew Chicken - Better Than Takeout\!](https://hot-thai-kitchen.com/cashew-chicken/)
- [Yen Ta Fo Pink Noodle Soup: A Thai Street Food Gem](https://hot-thai-kitchen.com/yen-ta-fo/)
- [Authentic Thai Massaman Curry with Chicken](https://hot-thai-kitchen.com/massaman-curry/)
## Footer
### Subscribe to my newsletter\!
[Subscribe for free\!](https://hot-thai-kitchen.com/hot-thai-kitchen-newsletter/)
- [Privacy Policy](https://hot-thai-kitchen.com/privacy-policy)
- [Accessibility Statement](https://hot-thai-kitchen.com/accessibility/)
- [Merch](https://store.dftba.com/collections/hot-thai-kitchen)
- [All Recipes](https://hot-thai-kitchen.com/all-recipes-by-categories/)
- [Contact](https://hot-thai-kitchen.com/contact)
- [My Cookbook](https://hot-thai-kitchen.com/htk-cookbook/)
- [Patreon](https://hot-thai-kitchen.com/support-htk/)
[↑ back to top](https://hot-thai-kitchen.com/coffee-bun/)
As an Amazon Associate I earn from qualifying purchases.
Copyright © Pailin's Kitchen Inc. 2025 | |||||||||
| Readable Markdown | - 1 recipe [hokkaido milk bread](https://hot-thai-kitchen.com/hokkaido-milk-bread/) (see note)
- 100 g salted butter, divided into 12 equal portions and keep cold (see note)
**Coffee Cookie Topping**
- 120 g all-purpose flour
- ¼ tsp baking powder
- ¼ tsp salt
- 100 g unsalted butter, softened
- 90 g confectioners’ sugar
- 2 large eggs
- 1 tsp vanilla extract
- 1 tsp hot water
- 2 tsp instant coffee (if you don't want to do coffee flavour, feel free to use only vanilla or other flavouring extracts as you wish)
*NOTE: Use 4 tablespoon sugar + 1 teaspoon vanilla in the bread recipe. You want to start this recipe out with the dough that has finished the first proofing and has doubled in size. You can make the dough the night before, let it proof in the fridge overnight, and then pull it out 2 hours before using so it has time to soften.*
*For the butter, you can simply cut them into cubes, but I find it easier to wrap butter that is round-ish rather than squared. So, I start out with soft butter and use a small disher or a measuring spoon to scoop out rounds. Place the pieces on a plate and then put it in the fridge to firm up.*
[***Ingredients and Kitchen Tools I Use***](https://a.co/d/03xibrk6)
Start with Hokkaido milk bread dough that has proofed the first time until doubled in size. Turn dough out onto a work surface and press all the air out of it. Cut out one portion of the dough that weighs about 180 g (the total dough weight is about 700g). This small portion is your "inside dough", and the bigger part is your "outside dough".
Shape the smaller inside dough into a log, then cut into 12 equal pieces; I cut it first in half, then cut each half into quarters, then each quarter into 3. For each of the small pieces, roll it out into a round sheet. Place one piece of cold salted butter inside and wrap it really well, pinching and twisting the top to make sure it's as well sealed as possible. Turn it upside down so the seam is on the bottom, set aside. Repeat for all 12 pieces.
Now shape the bigger "outside dough" into a log, then cut it also into 12 pieces. Form each piece into a round ball (see video for technique) and roll the ball into a circular sheet. Place one of the inside dough-butter balls in the middle, seam side down, and wrap the outside dough around it, making sure to seal it as best you can. Turn the buns over so now the outside seam is down (and the butter seam is up), then place the bun on a parchment-lined or greased baking sheet. Repeat with the remaining dough. Make sure you give the buns plenty of space in between as they will expand a lot.
Let the buns proof in a warm place, covered with a towel, until doubled in size which should take one more hour. If it's cold where you live, it may take longer.
**Meanwhile, make the cookie topping:**
Preheat the oven to 375°F or 190°C.
Combine instant coffee with hot water and stir to dissolve, then add vanilla and stir.
In a small bowl, whisk the flour, baking powder, and salt together.
In a large mixing bowl, beat butter and powdered sugar with an electric mixer on low speed, then once the sugar is mixed in, increase the speed to medium-high and beat until light and fluffy, scraping the bowl once or twice in between.
Add eggs, one at a time, beating until well-combined after each addition. Add the coffee mixture and beat to combine, then add the flour mixture and beat just until combined, stopping to scrape the bowl once in between as needed.
Once combined, give it a mix with a rubber spatula one more time, scraping the bottom to make sure everything is well mixed. Transfer the dough into a piping bag or a heavy-duty zip-top bag (do not use sandwich bags, those are too thin). Set aside until ready to use (if it's really warm where you live, I would stick it in the fridge while you wait for the buns to finish rising, but do not refrigerate for longer than 15 minutes or so or it will become too hard to pipe.)
Once the buns are risen until doubled in size, pipe a spiral onto the buns, covering them as close to the outside edge as possible. Bake 15-18 mins until the bottoms are browned and the top has darkened slightly. If you have 2 pans, I would bake one at a time for even cooking.
If the butter leaks out around the buns, do not worry! This happens to me too, usually I get a few that leak despite my best efforts. If this happens, just leave them on the pan and as they cool the buns will absorb the butter back in, and you'll still get the same buttery salty flavour, except now it is more on the bottom of the buns rather than inside.
Let the buns cool for at least 5-10 minutes before serving or until the cookie crust firms up and becomes crispy. If the cookie crust has lost its crispiness (which happens naturally after about a day) simply put them in the oven for 5-7 minutes to crisp them back up.
**You can freeze these buns too\!** To reheat, microwave it briefly (20-30 seconds) just to take the chill off, then bake it in a 350F oven (or toaster oven) for 5-7 minutes until the cookie crust is crispy again.
Enjoy\!
*[**Join us on Patreon for bonus content & rewards\!**](https://hot-thai-kitchen.com/support-htk/)* | |||||||||
| ML Classification | ||||||||||
| ML Categories |
Raw JSON{
"/Food_and_Drink": 999,
"/Food_and_Drink/Cooking_and_Recipes": 994,
"/Food_and_Drink/Cooking_and_Recipes/Desserts": 970
} | |||||||||
| ML Page Types |
Raw JSON{
"/Article": 729,
"/Article/Recipe": 710
} | |||||||||
| ML Intent Types |
Raw JSON{
"Informational": 961
} | |||||||||
| Content Metadata | ||||||||||
| Language | en-us | |||||||||
| Author | Pailin Chongchitnant | |||||||||
| Publish Time | 2017-10-10 06:00:11 (8 years ago) | |||||||||
| Original Publish Time | 2017-10-10 06:00:11 (8 years ago) | |||||||||
| Republished | No | |||||||||
| Word Count (Total) | 1,731 | |||||||||
| Word Count (Content) | 951 | |||||||||
| Links | ||||||||||
| External Links | 9 | |||||||||
| Internal Links | 32 | |||||||||
| Technical SEO | ||||||||||
| Meta Nofollow | No | |||||||||
| Meta Noarchive | No | |||||||||
| JS Rendered | No | |||||||||
| Redirect Target | null | |||||||||
| Performance | ||||||||||
| Download Time (ms) | 48 | |||||||||
| TTFB (ms) | 45 | |||||||||
| Download Size (bytes) | 99,898 | |||||||||
| Shard | 155 (laksa) | |||||||||
| Root Hash | 10736008279071459955 | |||||||||
| Unparsed URL | com,hot-thai-kitchen!/coffee-bun/ s443 | |||||||||