ℹ️ Skipped - page is already crawled
| Filter | Status | Condition | Details |
|---|---|---|---|
| HTTP status | PASS | download_http_code = 200 | HTTP 200 |
| Age cutoff | PASS | download_stamp > now() - 6 MONTH | 0 months ago |
| History drop | PASS | isNull(history_drop_reason) | No drop reason |
| Spam/ban | PASS | fh_dont_index != 1 AND ml_spam_score = 0 | ml_spam_score=0 |
| Canonical | PASS | meta_canonical IS NULL OR = '' OR = src_unparsed | Not set |
| Property | Value |
|---|---|
| URL | https://docs.expo.dev/tutorial/create-your-first-app/ |
| Last Crawled | 2026-04-11 12:14:51 (15 hours ago) |
| First Indexed | 2022-11-11 00:07:02 (3 years ago) |
| HTTP Status Code | 200 |
| Meta Title | Create your first app - Expo Documentation |
| Meta Description | In this chapter, learn how to create a new Expo project. |
| Meta Canonical | null |
| Boilerpipe Text | In this chapter, learn how to create a new Expo project.
Edit page
In this chapter, let's learn how to create a new Expo project and how to get it running.
Watch: Creating your first universal Expo app
Create a new Expo project from scratch and get it running on Android, iOS, and web.
Prerequisites
We'll need the following to get started:
Expo Go
installed on a physical device
Node.js (LTS version)
installed
VS Code
or any other preferred code editor or IDE installed
A macOS, Linux, or Windows (PowerShell and
WSL2
) with a terminal window open
The tutorial assumes that you are familiar with TypeScript and React. If you are not familiar with them, check out the
TypeScript Handbook
and
React's official tutorial
.
1
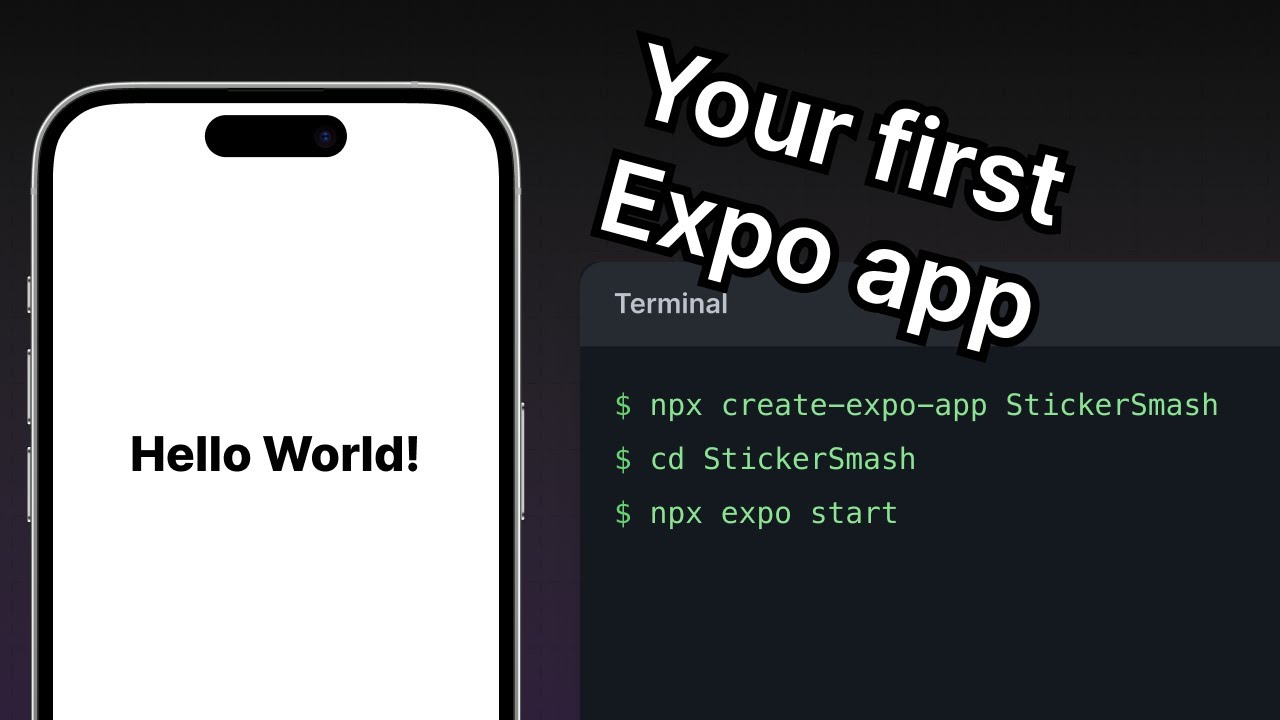
Initialize a new Expo app
We'll use
create-expo-app
to initialize a new Expo app. It is a command line tool to create a new React Native project. Run the following command in your terminal:
# Create a project named StickerSmash
-
npx
create-expo-app@latest StickerSmash
# Navigate to the project directory
-
cd
StickerSmash
This command will create a new project directory named StickerSmash, using the
default
template. This template has essential boilerplate code and libraries needed to build our app, including Expo Router. We'll continue to add more libraries throughout this tutorial as needed.
create-expo-app@latest
currently creates an SDK 54 project. This tutorial is designed for SDK 54, so no
--template
flag is needed.
Benefits of using the default template
2
3
Run reset-project script
In this tutorial, we'll build our app from scratch and understand the fundamentals of adding a file-based navigation. Let's run the
reset-project
script to remove the boilerplate code:
-
npm
run reset-project
After running the above command, there are two files (
index.tsx
and
_layout.tsx
) left inside the
app
directory. The previous files from
app
and other directories (
components
,
constants
, and
hooks
— containing boilerplate code) are moved inside the
app-example
directory by the script. We'll create our own directories and component files as we go along.
What does the
reset-project
script do?
4
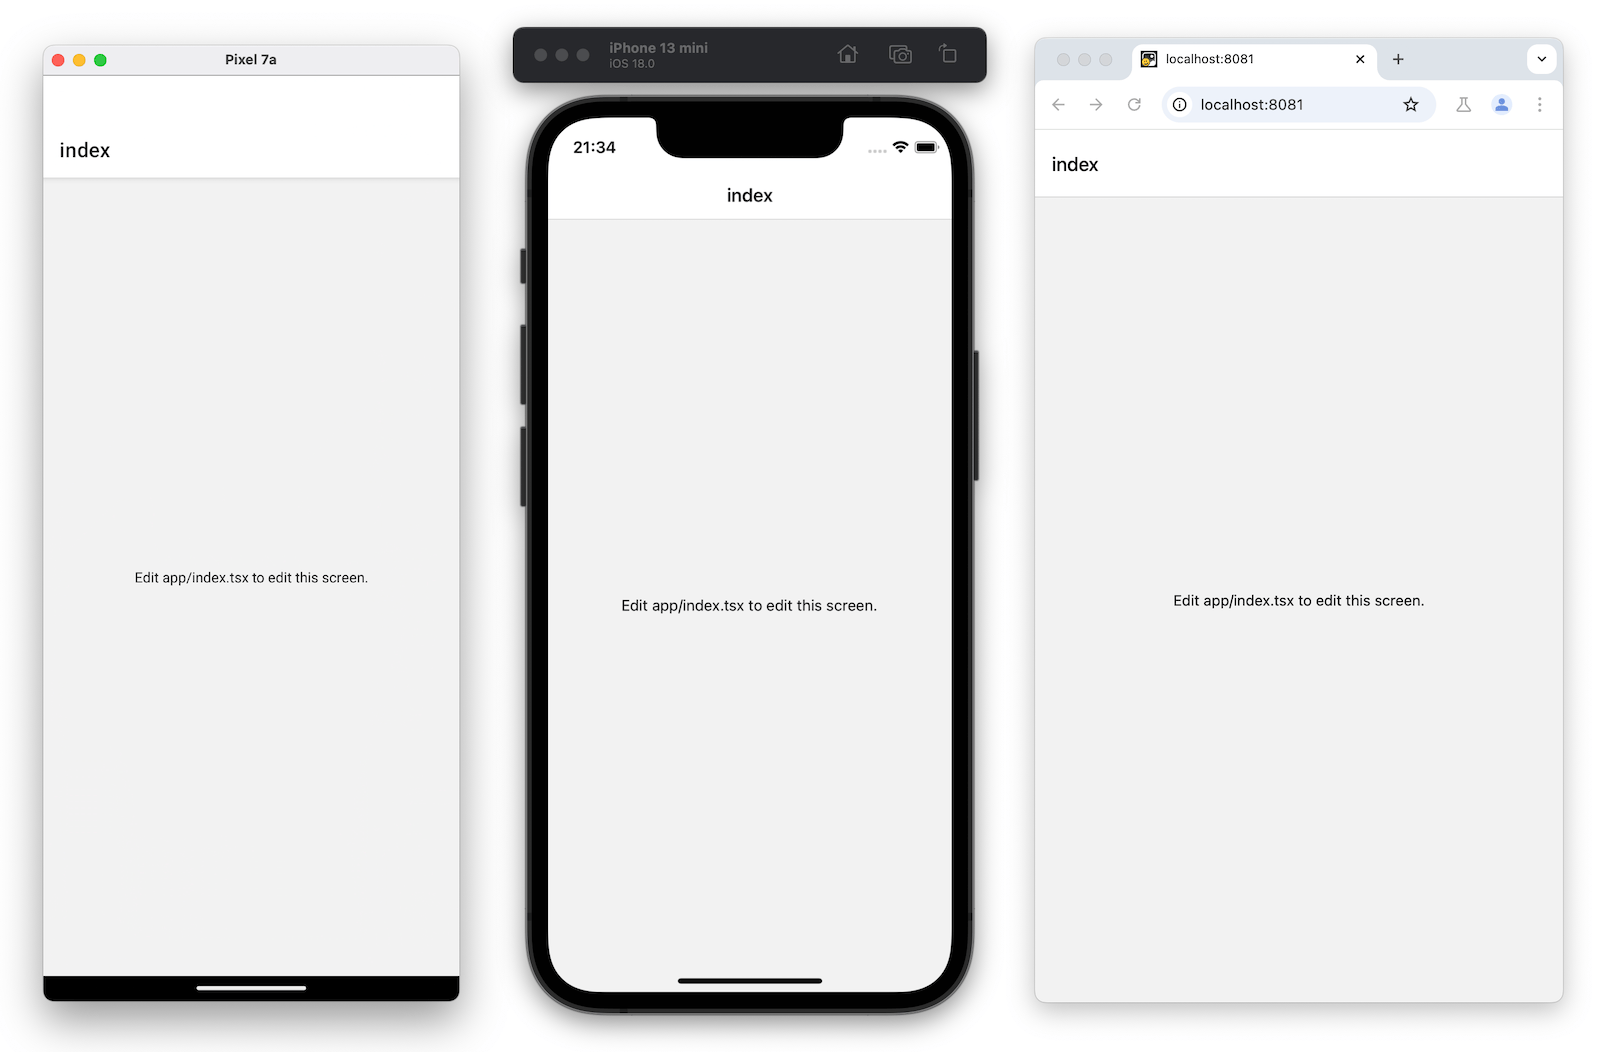
Run the app on mobile and web
In the project directory, run the following command to start the
development server
from the terminal:
-
npx
expo start
After running the above command:
The development server will start, and you'll see a QR code inside the terminal window.
Scan that QR code to open the app on the device. On Android, use the Expo Go >
Scan QR code
option. On iOS, use the default camera app.
To run the web app, press
w
in the terminal. It will open the web app in the default web browser.
Once it is running on all platforms, the app should look like this:
5
Edit the index screen
The
app/index.tsx
file defines the text displayed on the app's screen. It is the entry point of our app and executes when the development server starts. It uses core React Native components such as
<View>
and
<Text>
to display background and text.
Styles applied to these components use JavaScript objects rather than CSS, which is used on web. However, a lot of the properties will look familiar if you've previously used CSS on web. Most React Native components accept a
style
prop that accepts a JavaScript object as its value. For more details, see
Styling in React Native
.
Let's modify
app/index.tsx
screen:
Import
StyleSheet
from
react-native
and create a
styles
object to define our custom styles.
Add a
styles.container.backgroundColor
property to
<View>
with the value of
#25292e
. This changes the background color.
Replace the default value of
<Text>
with "Home screen".
Add a
styles.text.color
property to
<Text>
with the value of
#fff
(white) to change the text color.
import
{
Text
,
View
,
StyleSheet
}
from
'react-native'
;
export
default
function
Index
(
)
{
return
(
<
View
style
=
{
styles
.
container
}
>
<
Text
style
=
{
styles
.
text
}
>
Home screen
</
Text
>
</
View
>
)
;
}
const
styles
=
StyleSheet
.
create
(
{
container
:
{
flex
:
1
,
backgroundColor
:
'#25292e'
,
alignItems
:
'center'
,
justifyContent
:
'center'
,
}
,
text
:
{
color
:
'#fff'
,
}
,
}
)
;
React Native uses the same color format as the web. It supports hex triplets (this is what
#fff
is),
rgba
,
hsl
, and named colors, such as
red
,
green
,
blue
,
peru
, and
papayawhip
. For more information, see
Colors in React Native
.
Once you save your changes, they're sent and applied to the running apps connected to the development server:
Summary
Chapter 1: Create your first app
We've successfully created a new Expo project, used React Native core components, and are ready to develop our StickerSmash app.
Mark this chapter as read
In the next chapter, we will learn how to add a stack and a tab navigator to our app.
Next: Add navigation |
| Markdown | [Docs](https://docs.expo.dev/)
[Blog](https://expo.dev/blog)[Changelog](https://expo.dev/changelog)
[Star Us on GitHub](https://github.com/expo/expo)
Auto
Hide navigation
Search or Ask AI
`Ctrl` `K`
[Home](https://docs.expo.dev/)
[Guides](https://docs.expo.dev/guides/overview)
[EAS](https://docs.expo.dev/eas)
[Reference](https://docs.expo.dev/versions/latest)
[Learn](https://docs.expo.dev/tutorial/overview)
[Overview](https://docs.expo.dev/tutorial/overview)
Expo tutorial
0 of 9
[Introduction](https://docs.expo.dev/tutorial/introduction)
[Create your first app](https://docs.expo.dev/tutorial/create-your-first-app)
[Add navigation](https://docs.expo.dev/tutorial/add-navigation)
[Build a screen](https://docs.expo.dev/tutorial/build-a-screen)
[Use an image picker](https://docs.expo.dev/tutorial/image-picker)
[Create a modal](https://docs.expo.dev/tutorial/create-a-modal)
[Add gestures](https://docs.expo.dev/tutorial/gestures)
[Take a screenshot](https://docs.expo.dev/tutorial/screenshot)
[Handle platform differences](https://docs.expo.dev/tutorial/platform-differences)
[Configure status bar, splash screen and app icon](https://docs.expo.dev/tutorial/configuration)
[Learning resources](https://docs.expo.dev/tutorial/follow-up)
EAS tutorial
0 of 11
[Introduction](https://docs.expo.dev/tutorial/eas/introduction)
[Configure development build](https://docs.expo.dev/tutorial/eas/configure-development-build)
[Android development build](https://docs.expo.dev/tutorial/eas/android-development-build)
[iOS development build for simulators](https://docs.expo.dev/tutorial/eas/ios-development-build-for-simulators)
[iOS development build for devices](https://docs.expo.dev/tutorial/eas/ios-development-build-for-devices)
[Multiple app variants](https://docs.expo.dev/tutorial/eas/multiple-app-variants)
[Internal distribution build](https://docs.expo.dev/tutorial/eas/internal-distribution-builds)
[Manage app versions](https://docs.expo.dev/tutorial/eas/manage-app-versions)
[Android production build](https://docs.expo.dev/tutorial/eas/android-production-build)
[iOS production build](https://docs.expo.dev/tutorial/eas/ios-production-build)
[Share previews](https://docs.expo.dev/tutorial/eas/team-development)
[Builds from GitHub](https://docs.expo.dev/tutorial/eas/using-github)
[Next steps](https://docs.expo.dev/tutorial/eas/next-steps)
More
[Additional resources](https://docs.expo.dev/additional-resources)
[Archive](https://docs.expo.dev/archive)
[Expo Snack](https://snack.expo.dev/)
[Discord and Forums](https://chat.expo.dev/)
[Newsletter](https://expo.dev/mailing-list/signup)
# Create your first app
[Edit page](https://github.com/expo/expo/edit/main/docs/pages/tutorial/create-your-first-app.mdx)
Copy page
In this chapter, learn how to create a new Expo project.
[Edit page](https://github.com/expo/expo/edit/main/docs/pages/tutorial/create-your-first-app.mdx)
Copy page
***
In this chapter, let's learn how to create a new Expo project and how to get it running.
[Watch: Creating your first universal Expo app Create a new Expo project from scratch and get it running on Android, iOS, and web.](https://www.youtube.com/watch?v=m1-bc53EGh8)
***
## Prerequisites
We'll need the following to get started:
- [Expo Go](https://expo.dev/go) installed on a physical device
- [Node.js (LTS version)](https://nodejs.org/en) installed
- [VS Code](https://code.visualstudio.com/) or any other preferred code editor or IDE installed
- A macOS, Linux, or Windows (PowerShell and [WSL2](https://expo.fyi/wsl)) with a terminal window open
The tutorial assumes that you are familiar with TypeScript and React. If you are not familiar with them, check out the [TypeScript Handbook](https://www.typescriptlang.org/docs/handbook/2/everyday-types.html) and [React's official tutorial](https://react.dev/learn).
1
## Initialize a new Expo app
We'll use [`create-expo-app`](https://docs.expo.dev/more/create-expo) to initialize a new Expo app. It is a command line tool to create a new React Native project. Run the following command in your terminal:
Terminal
Copy
`# Create a project named StickerSmash`
`- ``npx create-expo-app@latest StickerSmash`
`# Navigate to the project directory`
`- ``cd StickerSmash`
This command will create a new project directory named StickerSmash, using the [default](https://docs.expo.dev/more/create-expo#--template) template. This template has essential boilerplate code and libraries needed to build our app, including Expo Router. We'll continue to add more libraries throughout this tutorial as needed.
> `create-expo-app@latest` currently creates an SDK 54 project. This tutorial is designed for SDK 54, so no `--template` flag is needed.
Benefits of using the default template
- Creates a new React Native project with `expo` package installed
- Includes recommended tools such as Expo CLI
- Includes a tab navigator from Expo Router to provide a basic navigation system
- Automatically configured to run a project on multiple platforms: Android, iOS, and web
- TypeScript configured by default
2
## Download assets
[Download assets archive We'll be using these assets throughout this tutorial.](https://docs.expo.dev/static/images/tutorial/sticker-smash-assets.zip)
After downloading the archive:
1. Unzip the archive and replace the default assets in the your-project-name/assets/images directory.
2. Open the project directory in a code editor or IDE.
3
## Run reset-project script
In this tutorial, we'll build our app from scratch and understand the fundamentals of adding a file-based navigation. Let's run the `reset-project` script to remove the boilerplate code:
Terminal
Copy
`- ``npm run reset-project`
After running the above command, there are two files (index.tsx and \_layout.tsx) left inside the app directory. The previous files from app and other directories (components, constants, and hooks — containing boilerplate code) are moved inside the app-example directory by the script. We'll create our own directories and component files as we go along.
What does the `reset-project` script do?
`reset-project` script resets the app directory structure in a project and copies the previous boilerplate files from the project's root directory to another sub-directory called app-example. We can delete it since it is not part of our main app's structure.
4
## Run the app on mobile and web
In the project directory, run the following command to start the [development server](https://docs.expo.dev/more/glossary-of-terms#development-server) from the terminal:
Terminal
Copy
`- ``npx expo start`
After running the above command:
1. The development server will start, and you'll see a QR code inside the terminal window.
2. Scan that QR code to open the app on the device. On Android, use the Expo Go \> Scan QR code option. On iOS, use the default camera app.
3. To run the web app, press `w` in the terminal. It will open the web app in the default web browser.
Once it is running on all platforms, the app should look like this:
5
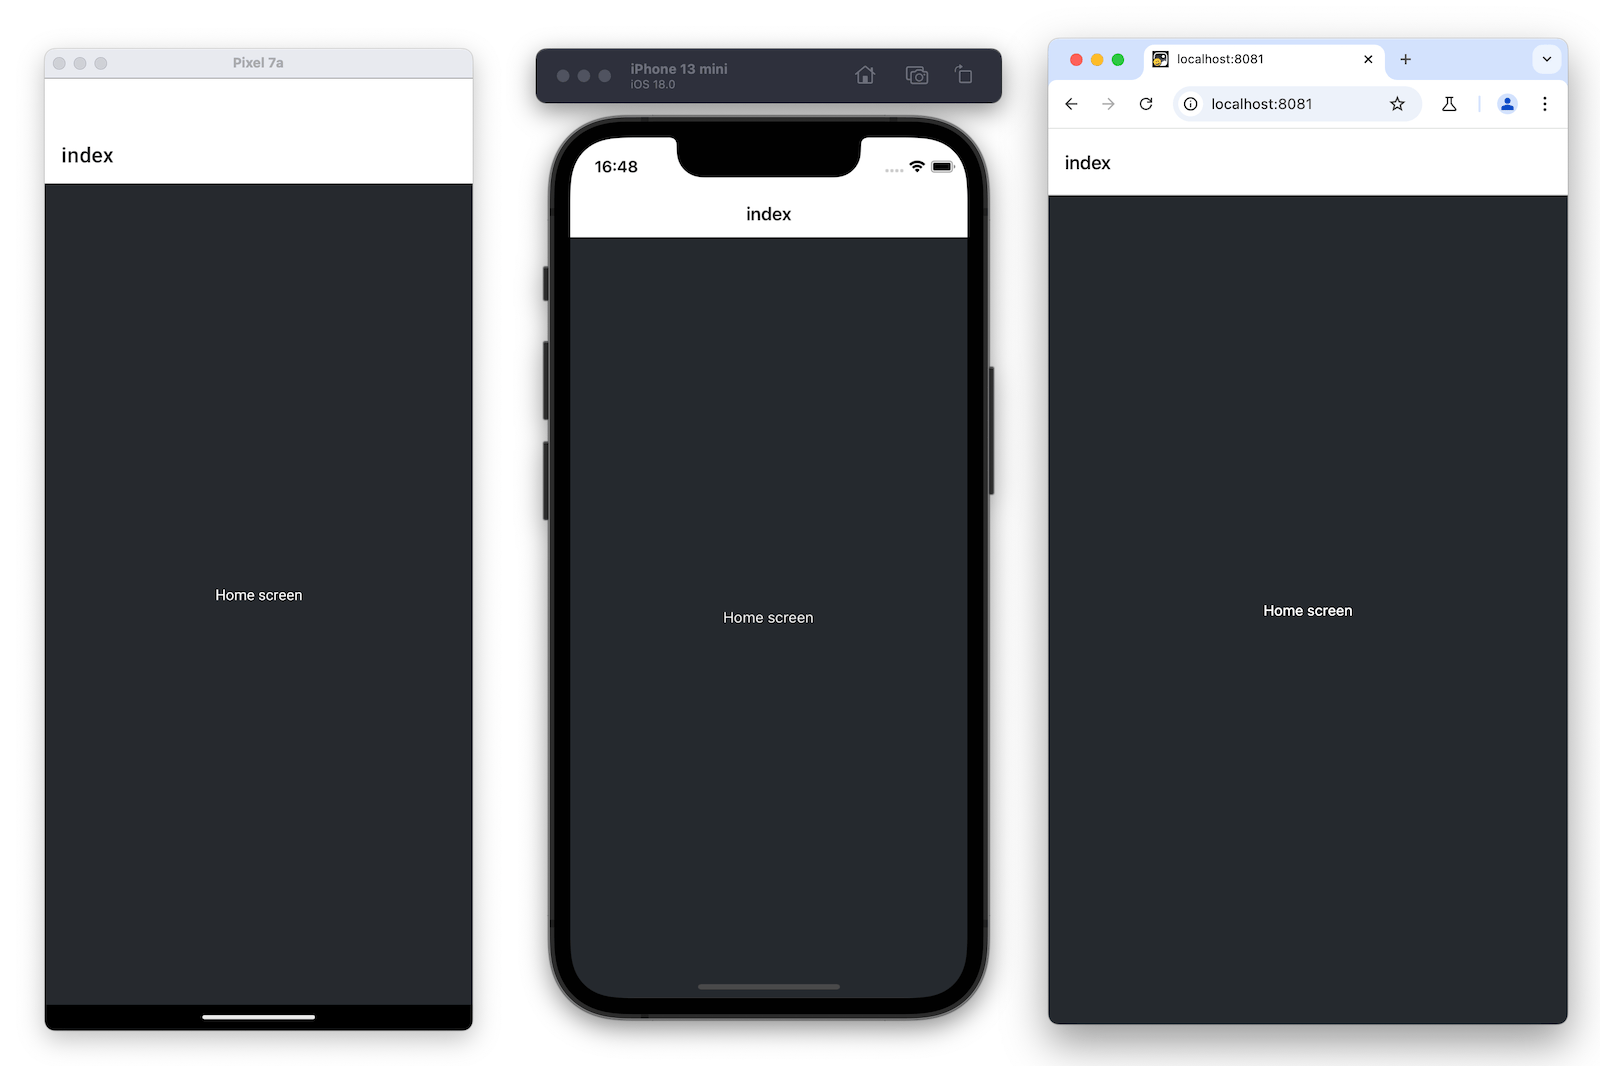
## Edit the index screen
The app/index.tsx file defines the text displayed on the app's screen. It is the entry point of our app and executes when the development server starts. It uses core React Native components such as `<View>` and `<Text>` to display background and text.
Styles applied to these components use JavaScript objects rather than CSS, which is used on web. However, a lot of the properties will look familiar if you've previously used CSS on web. Most React Native components accept a `style` prop that accepts a JavaScript object as its value. For more details, see [Styling in React Native](https://reactnative.dev/docs/style).
Let's modify app/index.tsx screen:
1. Import `StyleSheet` from `react-native` and create a `styles` object to define our custom styles.
2. Add a `styles.container.backgroundColor` property to `<View>` with the value of `#25292e`. This changes the background color.
3. Replace the default value of `<Text>` with "Home screen".
4. Add a `styles.text.color` property to `<Text>` with the value of `#fff` (white) to change the text color.
app/index.tsx
Copy
```
Show More
```
> React Native uses the same color format as the web. It supports hex triplets (this is what `#fff` is), `rgba`, `hsl`, and named colors, such as `red`, `green`, `blue`, `peru`, and `papayawhip`. For more information, see [Colors in React Native](https://reactnative.dev/docs/colors).
Once you save your changes, they're sent and applied to the running apps connected to the development server:
## Summary
Chapter 1: Create your first app
We've successfully created a new Expo project, used React Native core components, and are ready to develop our StickerSmash app.
Mark this chapter as read
In the next chapter, we will learn how to add a stack and a tab navigator to our app.
[Next: Add navigation](https://docs.expo.dev/tutorial/add-navigation)
[Previous (Expo tutorial) Introduction](https://docs.expo.dev/tutorial/introduction)
[Next (Expo tutorial) Add navigation](https://docs.expo.dev/tutorial/add-navigation)
Was this doc helpful?
- [Share your feedback]()
- [Ask a question on the forums](https://chat.expo.dev/)
- [Edit this page](https://github.com/expo/expo/edit/main/docs/pages/tutorial/create-your-first-app.mdx)
- View [llms.txt](https://docs.expo.dev/llms.txt) and [llms-full.txt](https://docs.expo.dev/llms-full.txt)
Sign up for the Expo Newsletter
Unsubscribe at any time. Read our [privacy policy](https://expo.dev/privacy).
Your Privacy Choices
On this page
[Prerequisites](https://docs.expo.dev/tutorial/create-your-first-app/#prerequisites)
[Initialize a new Expo app](https://docs.expo.dev/tutorial/create-your-first-app/#initialize-a-new-expo-app)
[Download assets](https://docs.expo.dev/tutorial/create-your-first-app/#download-assets)
[Run reset-project script](https://docs.expo.dev/tutorial/create-your-first-app/#run-reset-project-script)
[Run the app on mobile and web](https://docs.expo.dev/tutorial/create-your-first-app/#run-the-app-on-mobile-and-web)
[Edit the index screen](https://docs.expo.dev/tutorial/create-your-first-app/#edit-the-index-screen)
[Summary](https://docs.expo.dev/tutorial/create-your-first-app/#summary)
We value your privacy
We use cookies to collect data and improve our services. [Learn more](https://expo.dev/privacy/cookies)
Decline
Accept
Customize |
| Readable Markdown | In this chapter, learn how to create a new Expo project.
[Edit page](https://github.com/expo/expo/edit/main/docs/pages/tutorial/create-your-first-app.mdx)
***
In this chapter, let's learn how to create a new Expo project and how to get it running.
[Watch: Creating your first universal Expo app Create a new Expo project from scratch and get it running on Android, iOS, and web.](https://www.youtube.com/watch?v=m1-bc53EGh8)
***
## Prerequisites
We'll need the following to get started:
- [Expo Go](https://expo.dev/go) installed on a physical device
- [Node.js (LTS version)](https://nodejs.org/en) installed
- [VS Code](https://code.visualstudio.com/) or any other preferred code editor or IDE installed
- A macOS, Linux, or Windows (PowerShell and [WSL2](https://expo.fyi/wsl)) with a terminal window open
The tutorial assumes that you are familiar with TypeScript and React. If you are not familiar with them, check out the [TypeScript Handbook](https://www.typescriptlang.org/docs/handbook/2/everyday-types.html) and [React's official tutorial](https://react.dev/learn).
1
## Initialize a new Expo app
We'll use [`create-expo-app`](https://docs.expo.dev/more/create-expo) to initialize a new Expo app. It is a command line tool to create a new React Native project. Run the following command in your terminal:
`# Create a project named StickerSmash`
`- ``npx create-expo-app@latest StickerSmash`
`# Navigate to the project directory`
`- ``cd StickerSmash`
This command will create a new project directory named StickerSmash, using the [default](https://docs.expo.dev/more/create-expo#--template) template. This template has essential boilerplate code and libraries needed to build our app, including Expo Router. We'll continue to add more libraries throughout this tutorial as needed.
> `create-expo-app@latest` currently creates an SDK 54 project. This tutorial is designed for SDK 54, so no `--template` flag is needed.
Benefits of using the default template
2
3
## Run reset-project script
In this tutorial, we'll build our app from scratch and understand the fundamentals of adding a file-based navigation. Let's run the `reset-project` script to remove the boilerplate code:
`- ``npm run reset-project`
After running the above command, there are two files (index.tsx and \_layout.tsx) left inside the app directory. The previous files from app and other directories (components, constants, and hooks — containing boilerplate code) are moved inside the app-example directory by the script. We'll create our own directories and component files as we go along.
What does the `reset-project` script do?
4
## Run the app on mobile and web
In the project directory, run the following command to start the [development server](https://docs.expo.dev/more/glossary-of-terms#development-server) from the terminal:
`- ``npx expo start`
After running the above command:
1. The development server will start, and you'll see a QR code inside the terminal window.
2. Scan that QR code to open the app on the device. On Android, use the Expo Go \> Scan QR code option. On iOS, use the default camera app.
3. To run the web app, press `w` in the terminal. It will open the web app in the default web browser.
Once it is running on all platforms, the app should look like this:
5
## Edit the index screen
The app/index.tsx file defines the text displayed on the app's screen. It is the entry point of our app and executes when the development server starts. It uses core React Native components such as `<View>` and `<Text>` to display background and text.
Styles applied to these components use JavaScript objects rather than CSS, which is used on web. However, a lot of the properties will look familiar if you've previously used CSS on web. Most React Native components accept a `style` prop that accepts a JavaScript object as its value. For more details, see [Styling in React Native](https://reactnative.dev/docs/style).
Let's modify app/index.tsx screen:
1. Import `StyleSheet` from `react-native` and create a `styles` object to define our custom styles.
2. Add a `styles.container.backgroundColor` property to `<View>` with the value of `#25292e`. This changes the background color.
3. Replace the default value of `<Text>` with "Home screen".
4. Add a `styles.text.color` property to `<Text>` with the value of `#fff` (white) to change the text color.
```
```
> React Native uses the same color format as the web. It supports hex triplets (this is what `#fff` is), `rgba`, `hsl`, and named colors, such as `red`, `green`, `blue`, `peru`, and `papayawhip`. For more information, see [Colors in React Native](https://reactnative.dev/docs/colors).
Once you save your changes, they're sent and applied to the running apps connected to the development server:
## Summary
Chapter 1: Create your first app
We've successfully created a new Expo project, used React Native core components, and are ready to develop our StickerSmash app.
Mark this chapter as read
In the next chapter, we will learn how to add a stack and a tab navigator to our app.
[Next: Add navigation](https://docs.expo.dev/tutorial/add-navigation) |
| Shard | 50 (laksa) |
| Root Hash | 9098366656517426850 |
| Unparsed URL | dev,expo!docs,/tutorial/create-your-first-app/ s443 |